iWP-Dev Toolz
An easy way to create your own WordPress Plugins with/without coding
- Created: 01/01/2021
- Latest update: 02/03/2026
- By: CodeGenerator
- Email: iwpdev@ihsana.com
A. INSTALLATION
Welcome to
iWPDev Toolz v2!
Tools from Ihsana for developing your own WordPress Plugin
without coding
- System Requirements
- Overview Installation
- Installation Instructions
- How to install on an online server?
- How to update your iWP-DevToolz?
1) System Requirements
- Local computer or localhost (Share hosting/vps/nginx not recommended)
- Apache Server (XAMPP, WAMP or MAMP), Servers that use virtual machines cannot be used, such as xampp-osx-xxxx-vm.dmg will not work.
- PHP >= 5.5.6 or latest support: zlib Extension, ZipArchive Class and PHP-GD
- WordPress has been installed correctly
- Zip Software
- Disk free space >= 1000mb
Last update: 2023-03-03 05:54:17
2) Overview Installation
The way to install it is the same as the general website, but you don't need to install mysql/database.
- Download iWP-Dev Toolz v2 from codecanyon.net and WordPress CMS from wordpress.org
- Extract/Unzip iWP-Dev Toolz Files and copy/upload iWP-Dev Toolz to your server
- Also install wordpress on your server, it must be in the wp-test folder
- Then activate iwpdevtoolz.
- done!
Last update: 2022-10-25 04:57:22
3) Installation Instructions
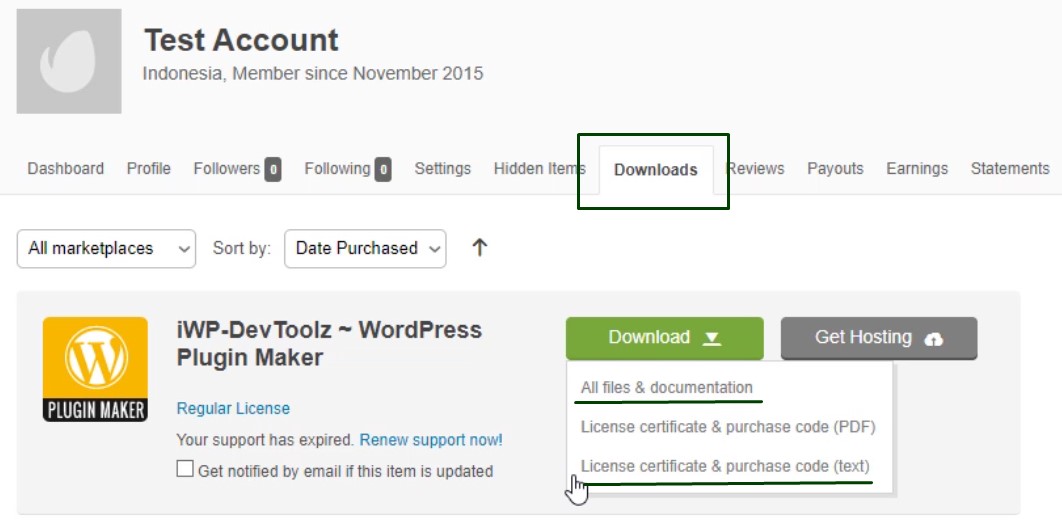
STEP 1 - Download iWP-Dev Toolz v2
You can download that file by logging into https://codecanyon.net/downloads and clicking the Downloads Tab
- All files and Documentation
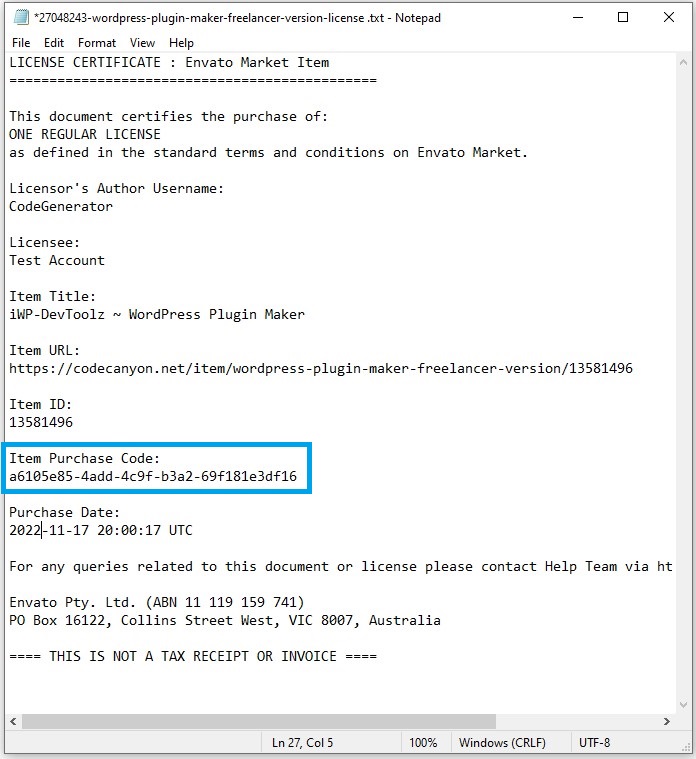
- License Certificate & Purchase Code (Text)
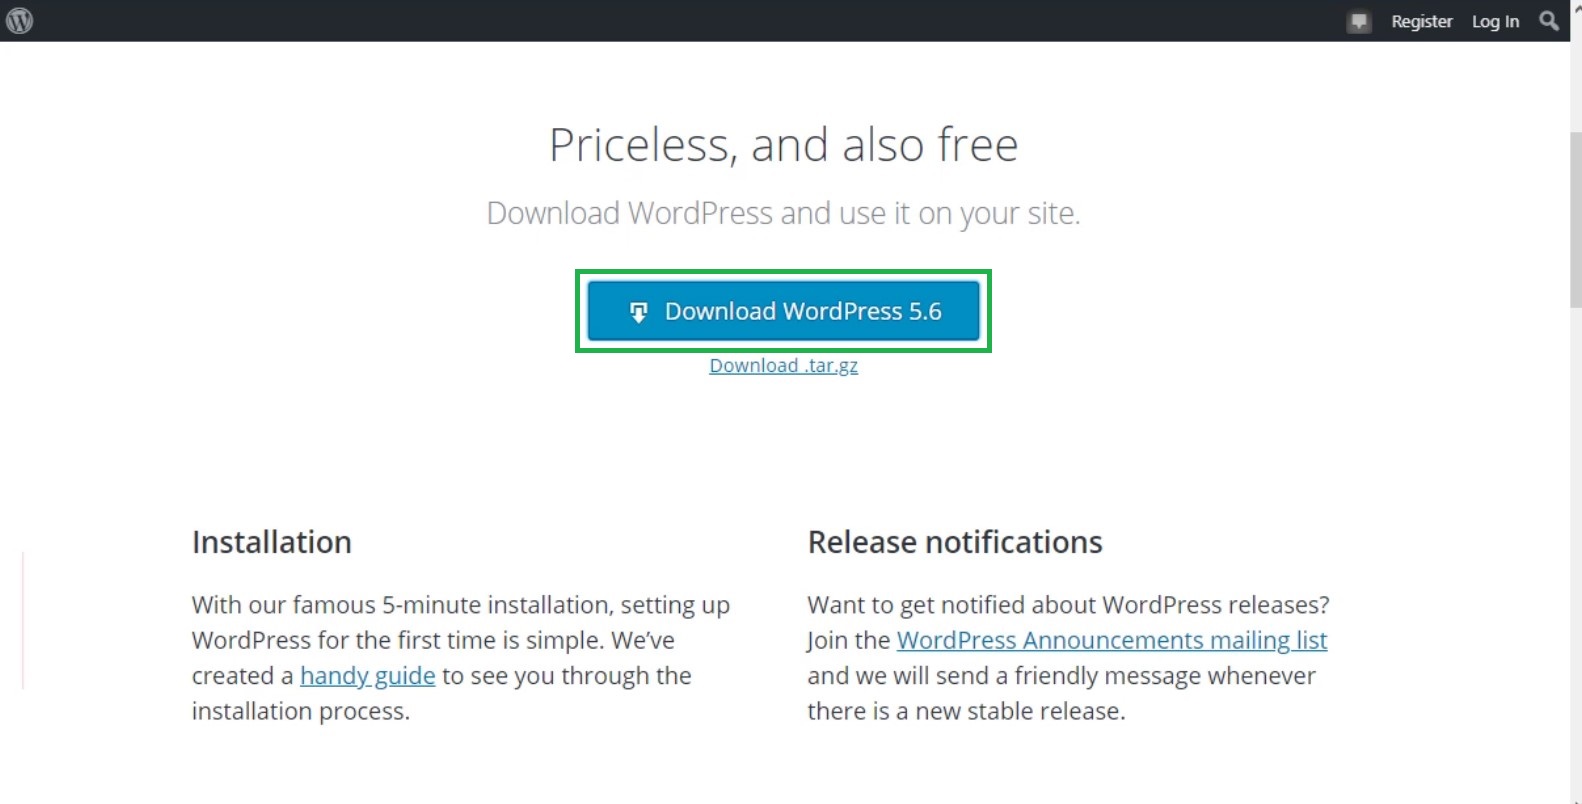
STEP 2 - Download WordPress CMS
To download Wordpress CMS, you should download it from the official website, namely: https://wordpress.org/download/
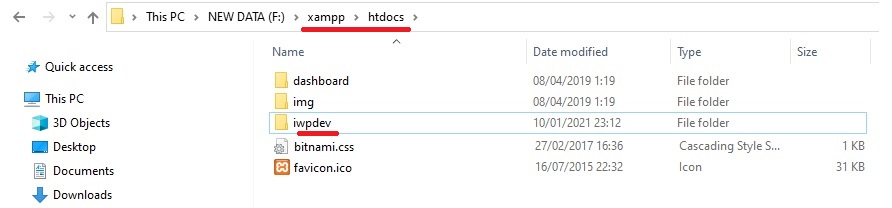
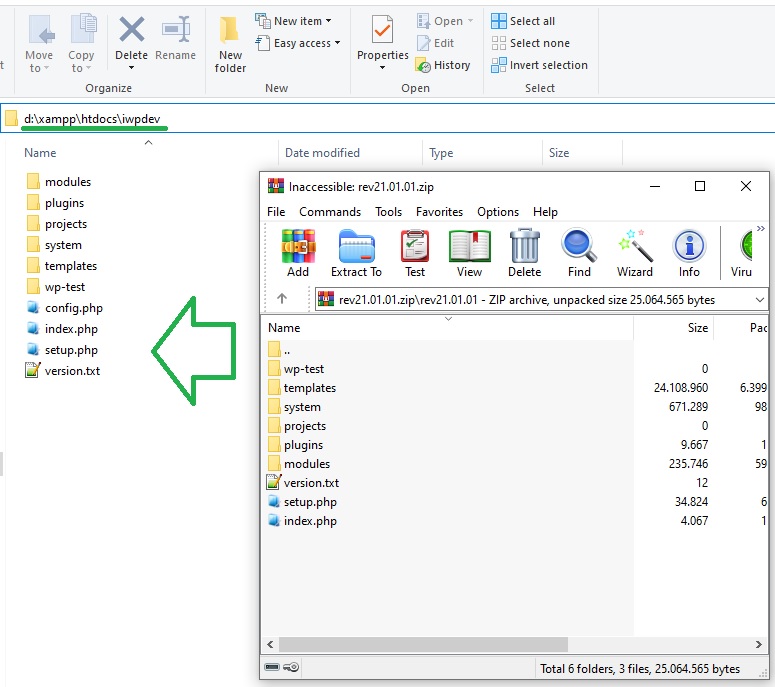
STEP 3 - Extract/Unzip iWP-Dev Toolz Files
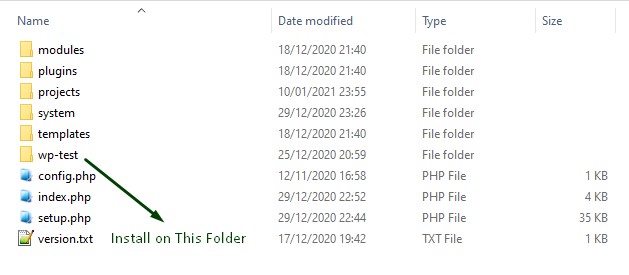
Please extract your iWP-Dev Toolz v2 file (rev21.xx.xx.zip) using winrar/winzip/7zip/tar and copy it into your webroot folder, example: d:/xampp/htdocs/iwpdev
STEP 4 - Changing Permission Files/Folders
Window Users
- In Windows Explorer, right-click iwpdev folder and choose Properties from the context menu. The Properties dialog box appears
- Click the General tab
- Unchecked Readonly
- Then click OK button

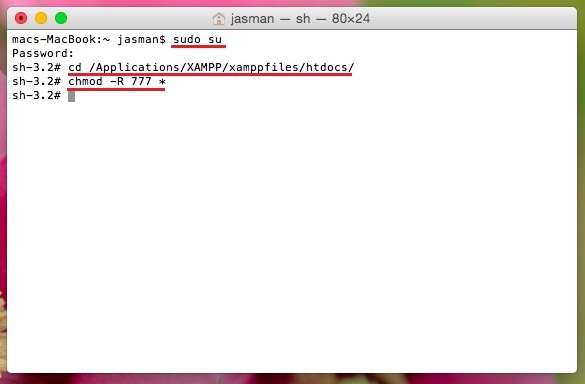
Linux/OSx Users
Linux and macOS users are advised to change permissions using chmod via the Terminal/SSH
$ sudo su
$ cd cd /Applications/XAMPP/xamppfiles/htdocs
$ chmod -R 777 *
STEP 5 - Setup Configuration
After successfully extracting and changing the file permissions, then you can configure it via the browser. Open http://localhost/iwpdev, for the first time you will be directed to the Setup configuration page and please enter the requested data.
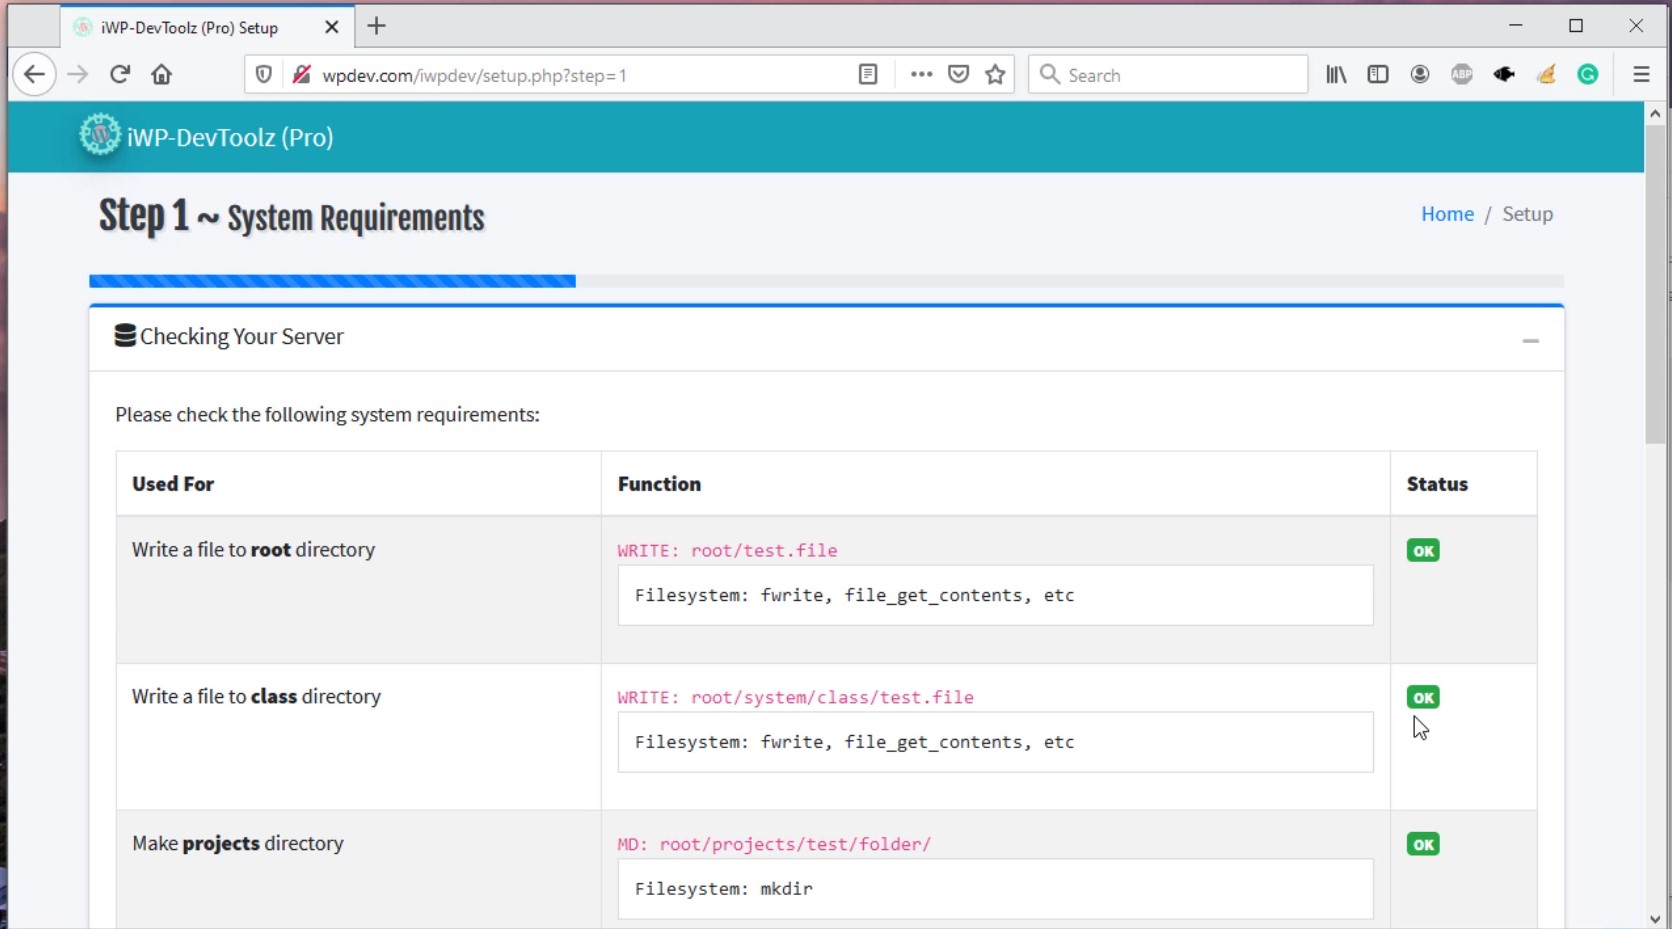
Check the system requirements, if all support you can click the Next button
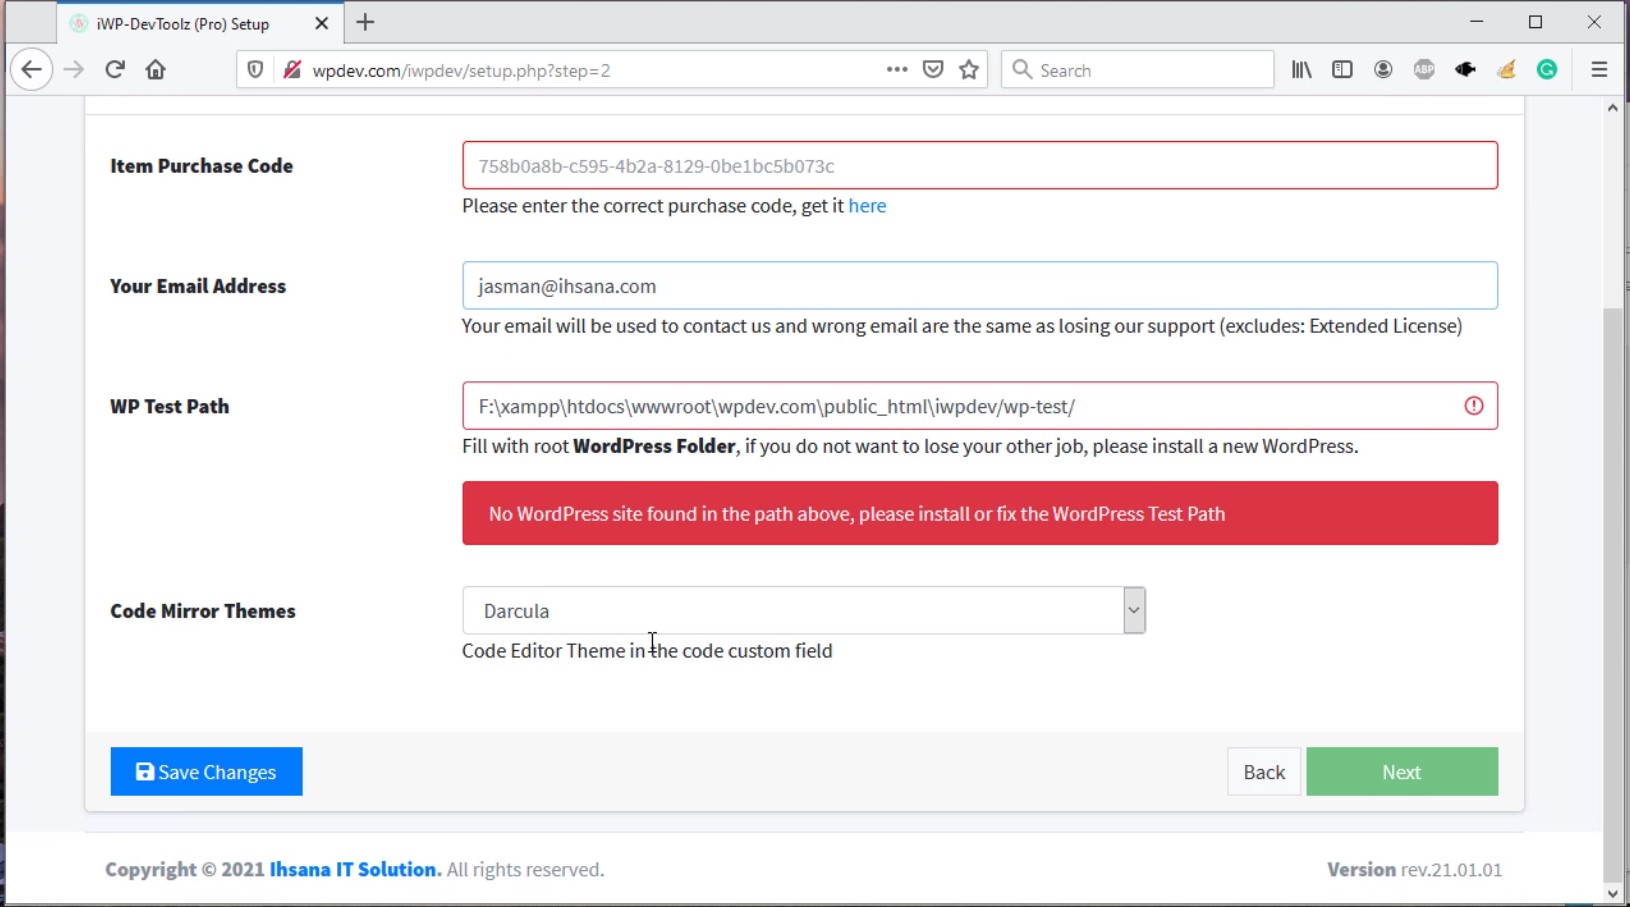
On Setup configuration tab you are asked to enter Your Purchase code and Email address, you can find it in the xxxxx-license.txt file
Here you are also asked to install WordPress CMS for Live Test in the wp-test folder, please install your WordPress there.
When finished, please click the Save Changes button, if everything is correct the Next button will appear.
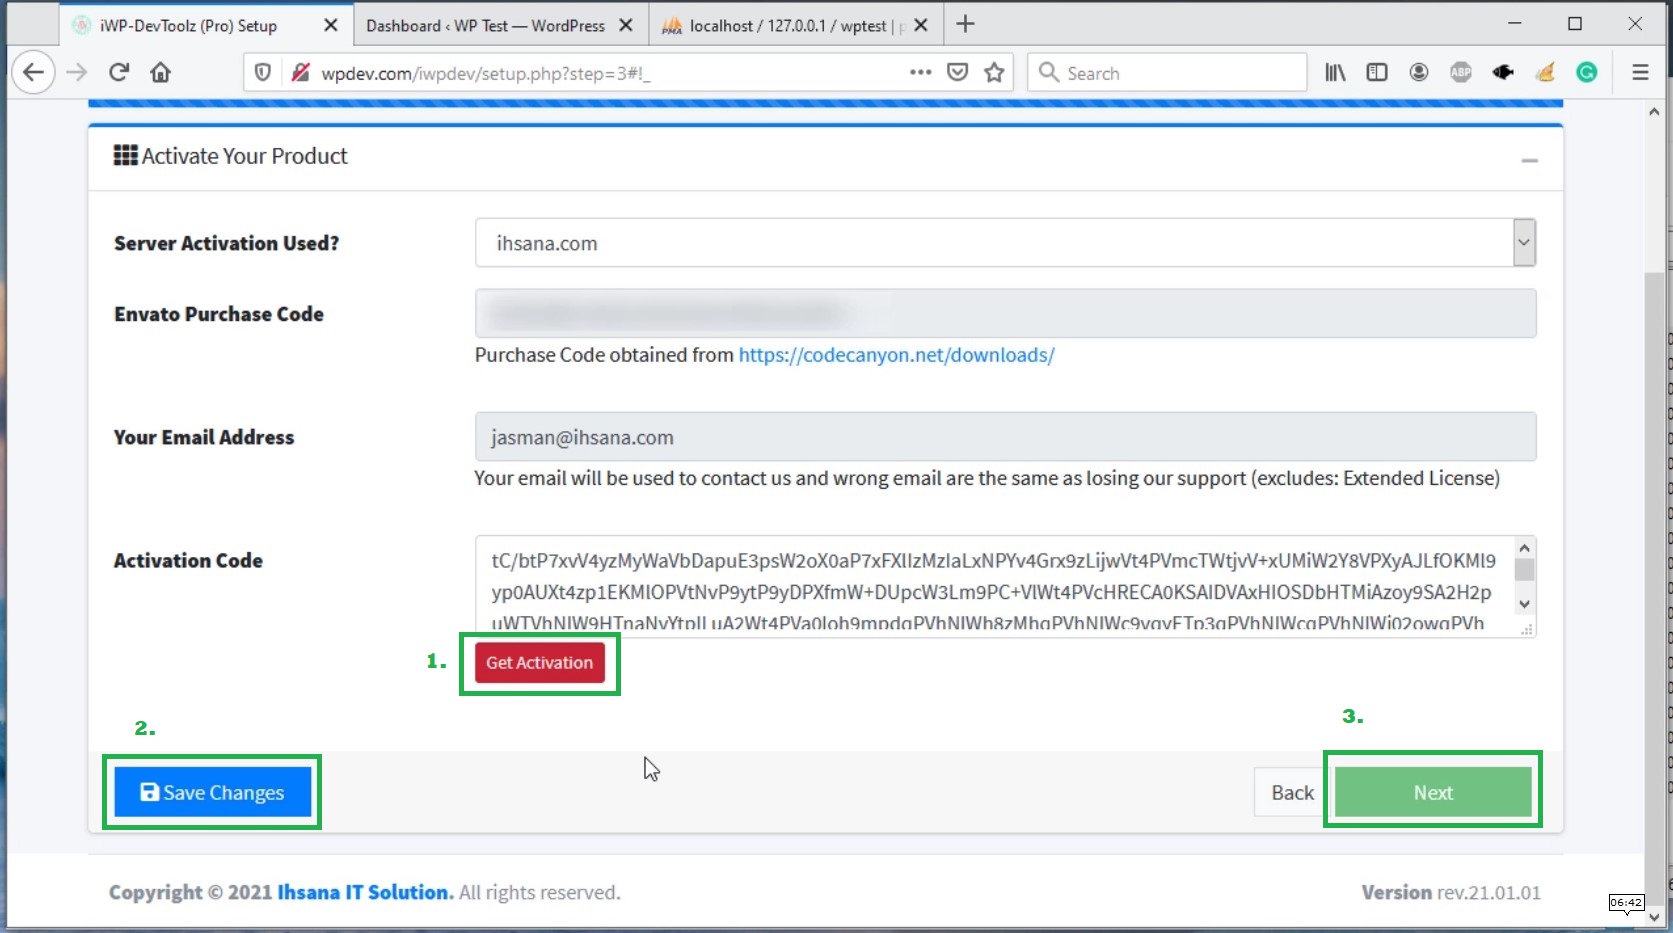
Then you click the Get Activation button, wait until you get the activation code, then click Save Changes button and click Finish/Next button
Last update: 2021-01-20 12:11:35
4) How to install on an online server?
It is not recommended that you install it on a public server, because this tool is a php code generator, so we recommend using sandbox hosting. Because this will be very dangerous for the security of your server and will also make it difficult for you to edit the code and images for your plugin. Preferably work on a local machine eq: Windows, MacOs or Linux Desktop.
- The first step is to download iWP-DevToolz from the codecanyon website (https://codecanyon.net/downloads). You need two files, namely:
- All files & documentation (codecanyon-xxx.zip)
- License certificate & purchase code (text) (xxx-license.txt)
- Then extract the zip file (codecanyon-xxx.zip), you will get two zip files, namely: Documents (documents.zip) and iWP-DevToolz installation file (rev2x.xx.xx.zip).

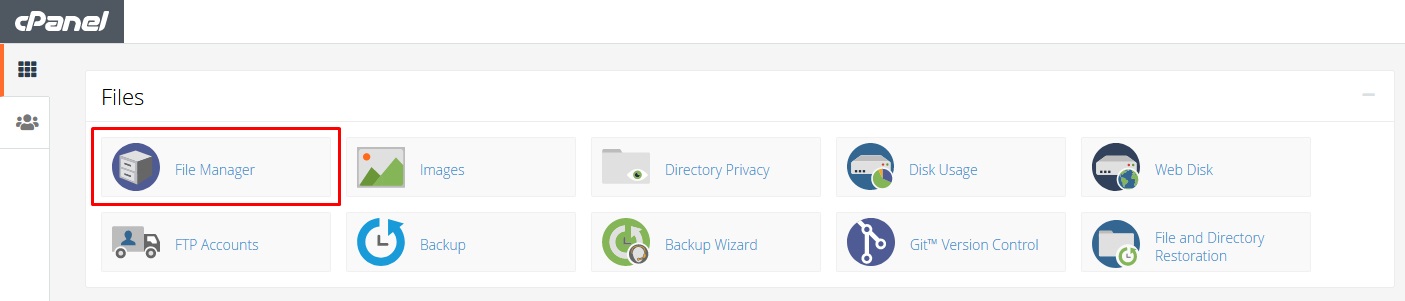
- The next step is to log in to your web hosting cPanel account.
- Once you are logged in, navigate to File Section and open the File Manager.
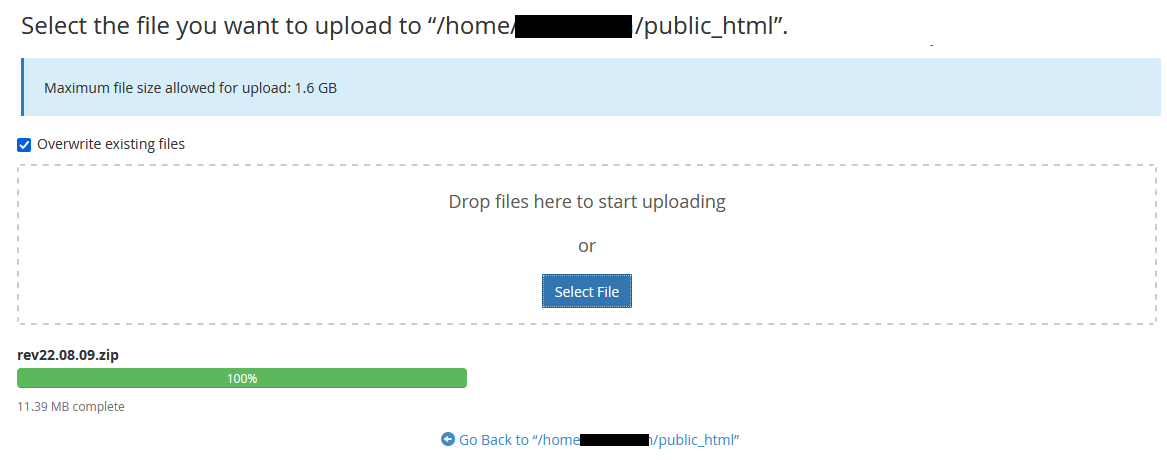
- Open the public_html folder and click on the Upload option on the cPanel menu bar.
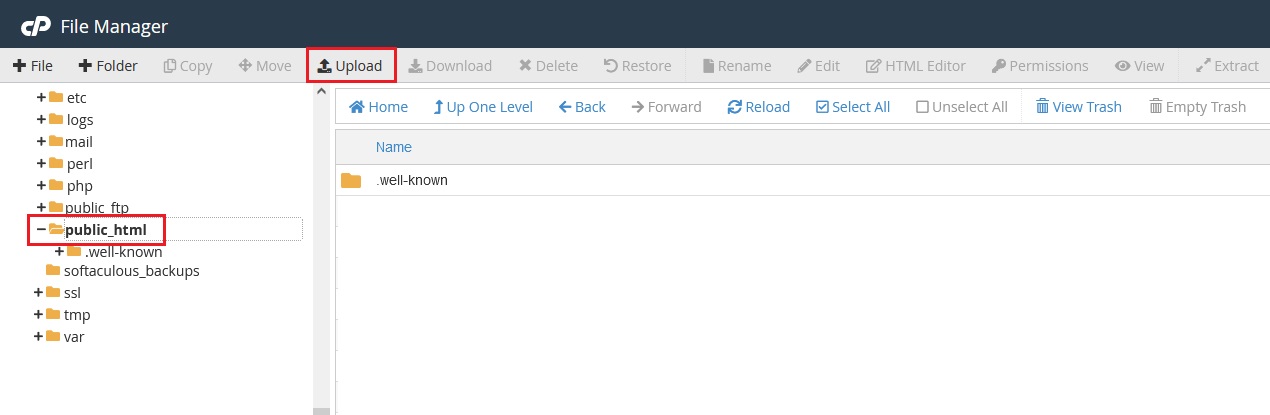
- This will open a new tab where you can choose the iWP-DevToolz installation file (rev2x.xx.xx.zip) from your local computer. Once the upload process is complete, go back to the public_html directory.
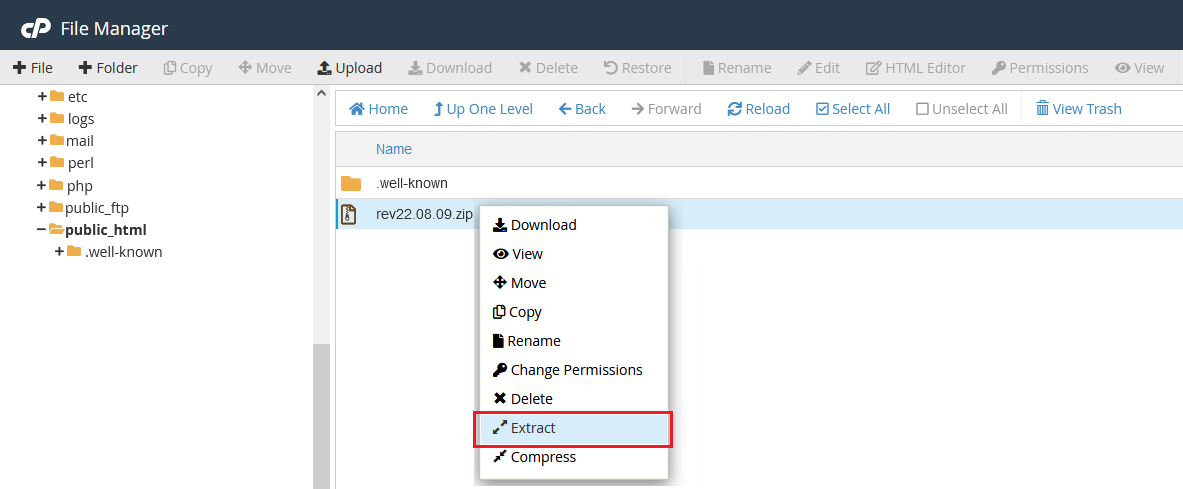
- The next step is to extract the zip file you have just uploaded. Right-click on the zip file and choose Extract.
- A popup will appear where you need to confirm the location to extract the Zip file.
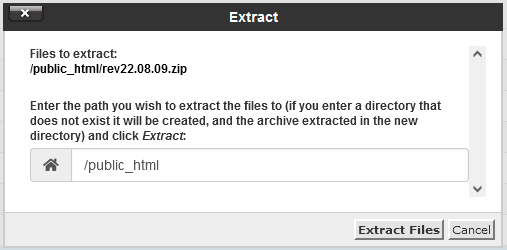
- The files will be extracted and a new popup appears showing the extraction results. Once you have checked the extraction results, click on the Close button.
- All the files will be stored in the rev2x.xx.xx folder
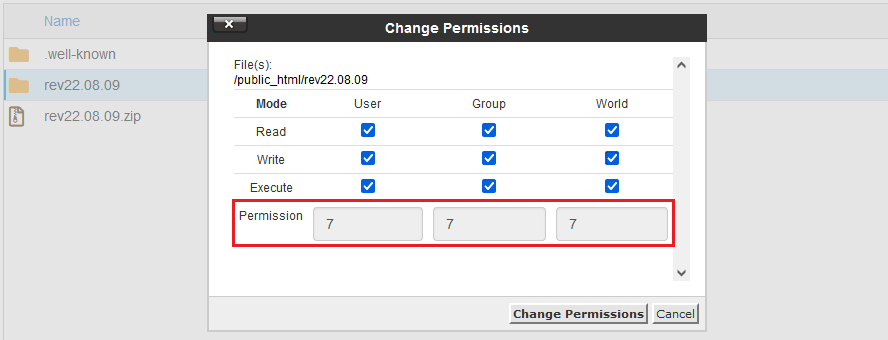
- Right-click on the rev2x.xx.xx folder and choose Change Permissions
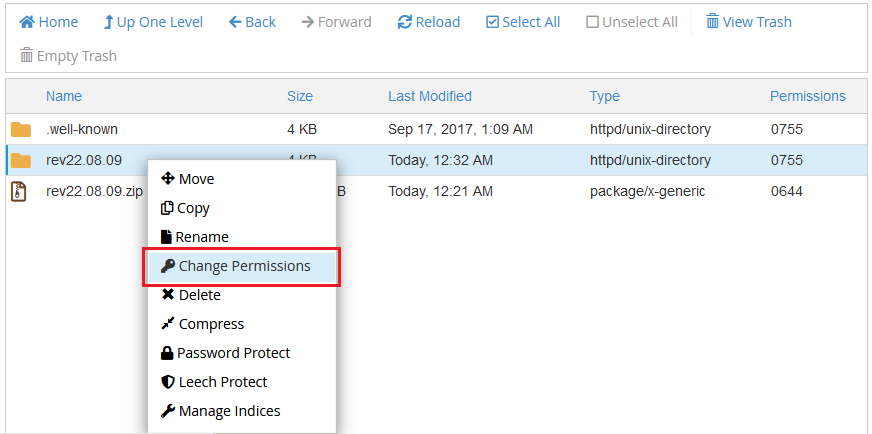 .
. - A popup will appear where you need to set the folder permissions to read, write and execute (777).
- Run the iTakeDown Toolz installation script by accessing the URL in a web browser. This should be the URL where you uploaded the iTakeDown Toolz files.
- If you installed iTakeDown Toolz in the root directory, you should visit: http://example.com/
- If you installed iTakeDown Toolz in its own subdirectory, for example: rev2x.xx.xx, you should visit: http://example.com/rev2x.xx.xx/

- For the first time, if you visit that URL, it'll redirect you to setup.php page. Then check that all of the system requirements are met.
- Check the system requirements, if all support you can click the Next button
- On Setup configuration tab you are asked to enter Your Purchase code and Email address, you can find it in the xxxxx-license.txt file
- Here you are also asked to install WordPress CMS for Live Test in the wp-test folder, please install your WordPress there.
- When finished, please click the Save Changes button, if everything is correct the Next button will appear.
- Then you click the Get Activation button, wait until you get the activation code, then click Save Changes button and click Finish/Next button
Last update: 2022-10-25 05:01:07
5) How to update your iWP-DevToolz?
- Backup the project by copying the `projects` folder to another folder, skip this step if you don't have a project yet.
- Go to
http://localhost/iwpdev/or click Unregister
- Then Download latest version (24.03.x or latest) from https://codecanyon.net/downloads
- Extract the obtained Zip file, or overwrite it to update the old iWP-DevToolz
- Then reactivate your iWP-DevToolz.
Last update: 2024-03-09 12:07:42
B. HOW TO USE?
- How to create widget options?
- How to create a new WordPress Plugin?
- How to add Custom Image Sizes in WordPress?
- How to create Custom User Roles in WordPress?
- How to create Custom Taxonomies in WordPress?
- How to add Fields to Taxonomies/Categories in WordPress?
- How to create Custom Posts in WordPress?
- How to add Fields to Custom Posts in WordPress?
- How to add JavaScript files into WordPress?
- How to add Style files into WordPress?
- How to create Custom WordPress Widgets?
- How to create Plugin Options in WordPress?
- How to change Post Layout in WordPress?
- How to create Short Codes in WordPress?
- How to add navigation menus to the Admin Bar in WordPress?
- How to enable REST-API in WordPress?
- How to use WordPress Extended RSS (WXR File) ?
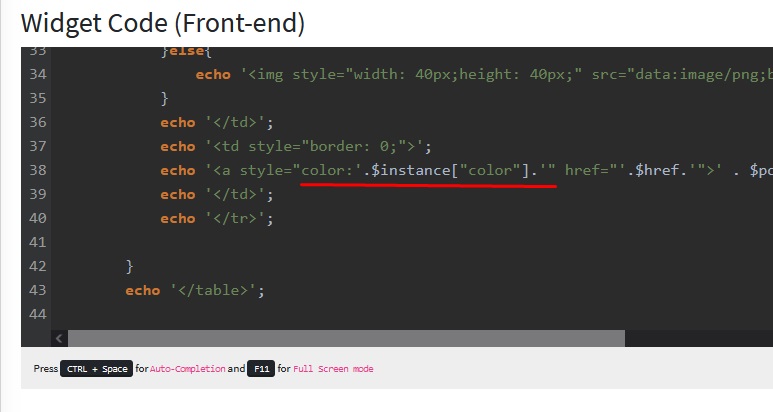
1) How to create widget options?
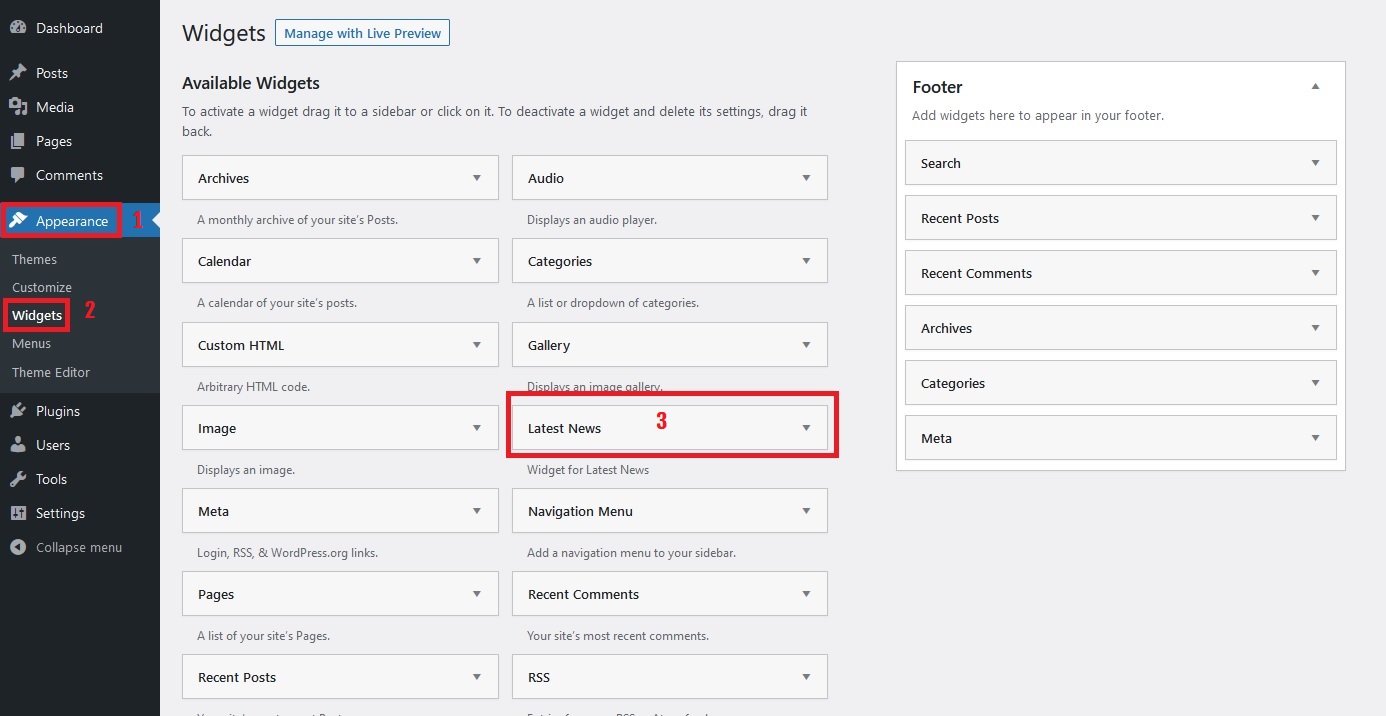
- Go to Widgets Page
- In add the desired options, like I want to add options for colors.
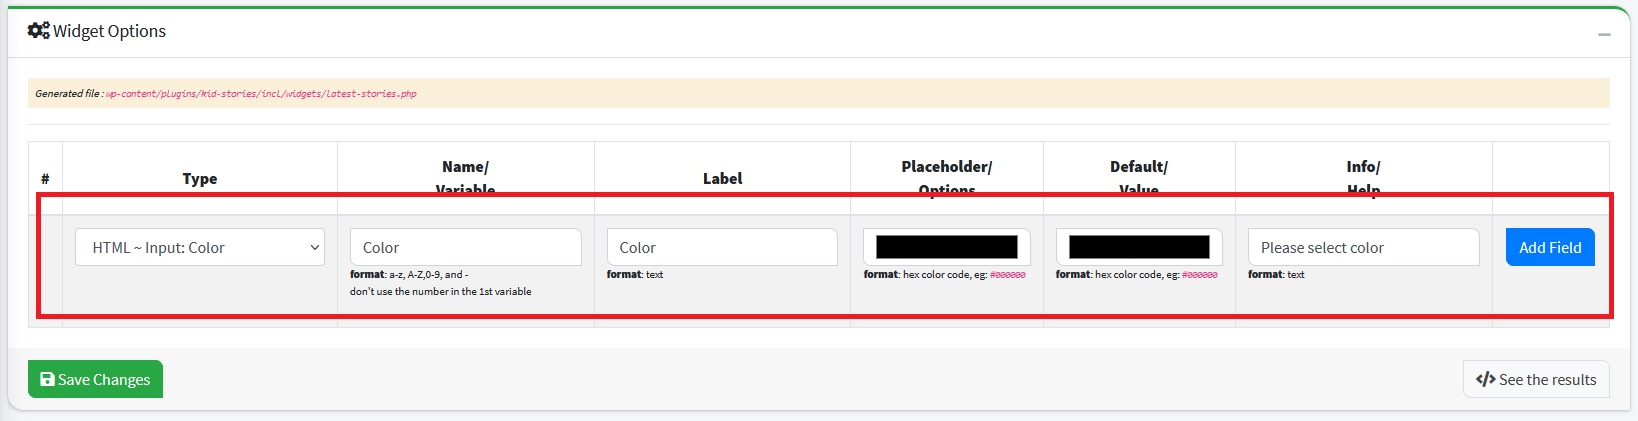 Then Click Save Changes button
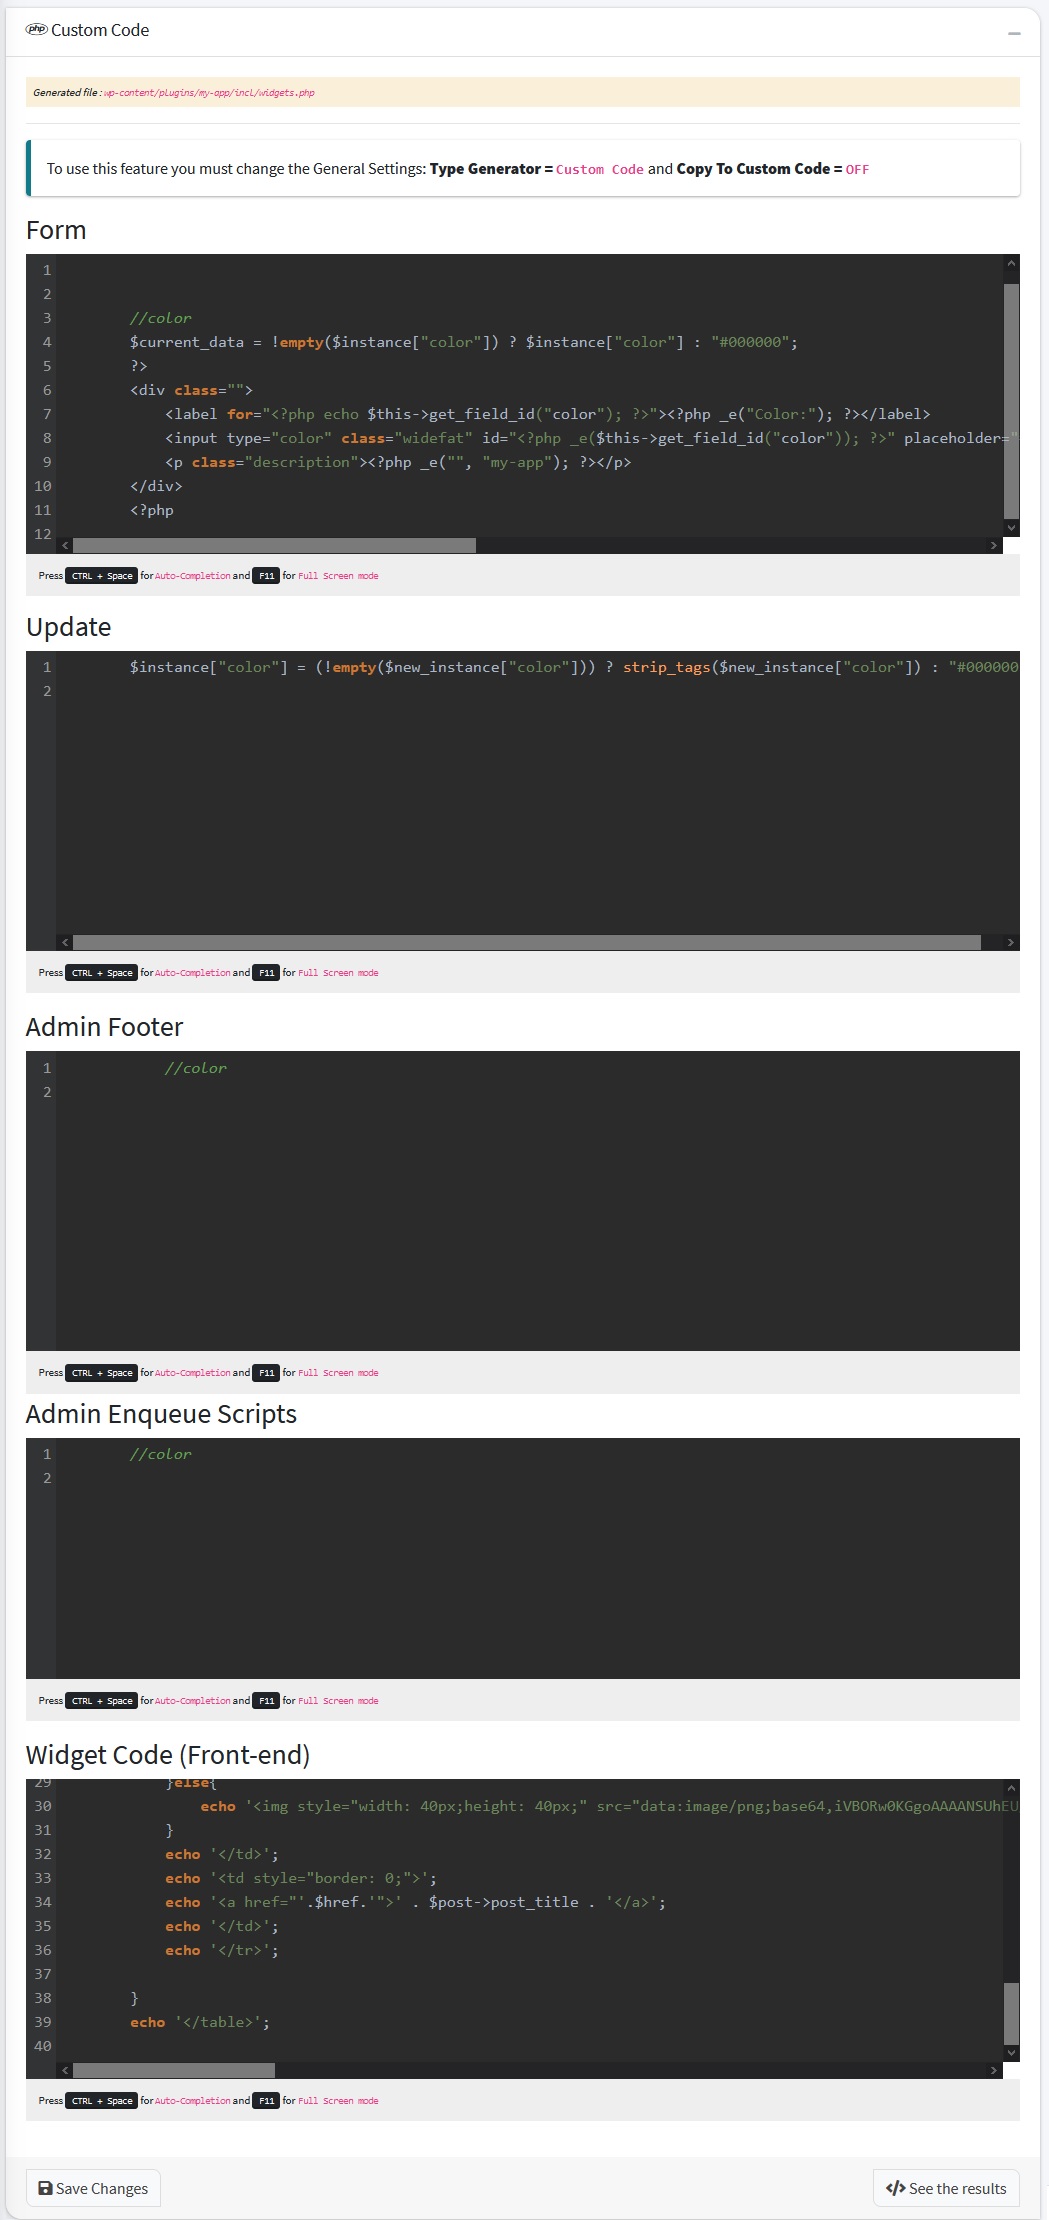
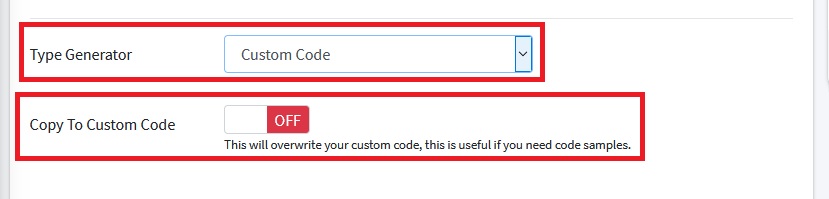
 - Then migrate to Custom Code mode, by changing the options: Type Generator : Custom Code and
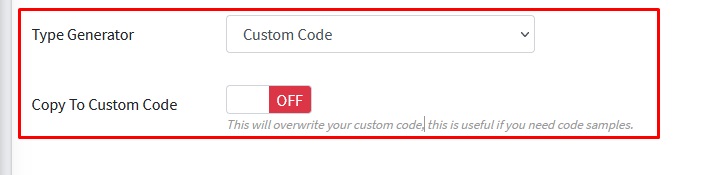 Then Click Save Changes button
 - Sample code will appear in the Instructions box, you can use the code for your custom code
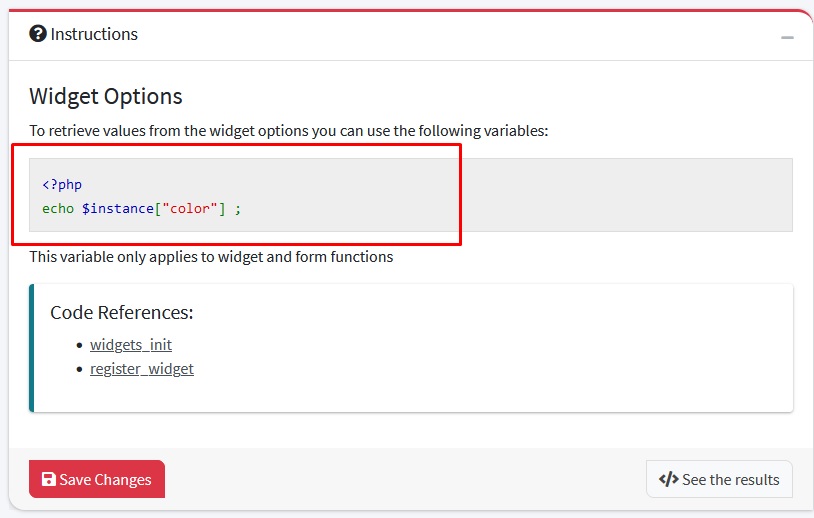
- For example, I want to use it as the text color for the widget.
Last update: 2021-12-05 08:18:26
2) How to create a new WordPress Plugin?
To create a new plugin, you need to follow these four steps:
- Create a New Project
- Activate The Project
- Generate Readme Text
- Test The Project
STEP 1: CREATE A NEW PROJECT
Goto Project page by clicking Projects menu on side menu, then we click Get Started in the Add Project box.
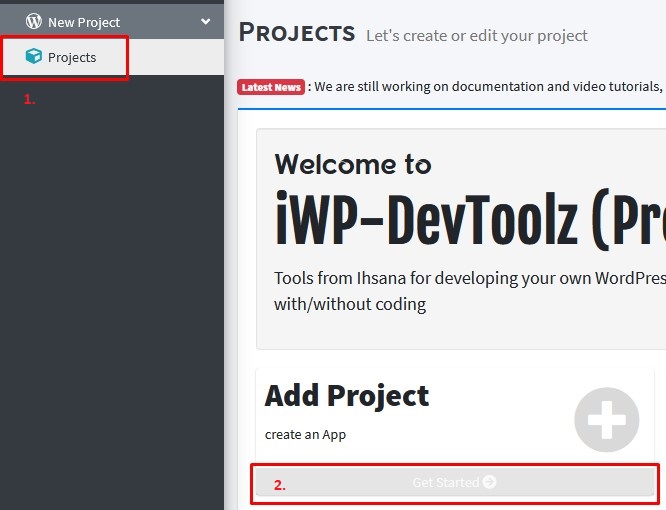
You will be directed to the project page and please enter the required data
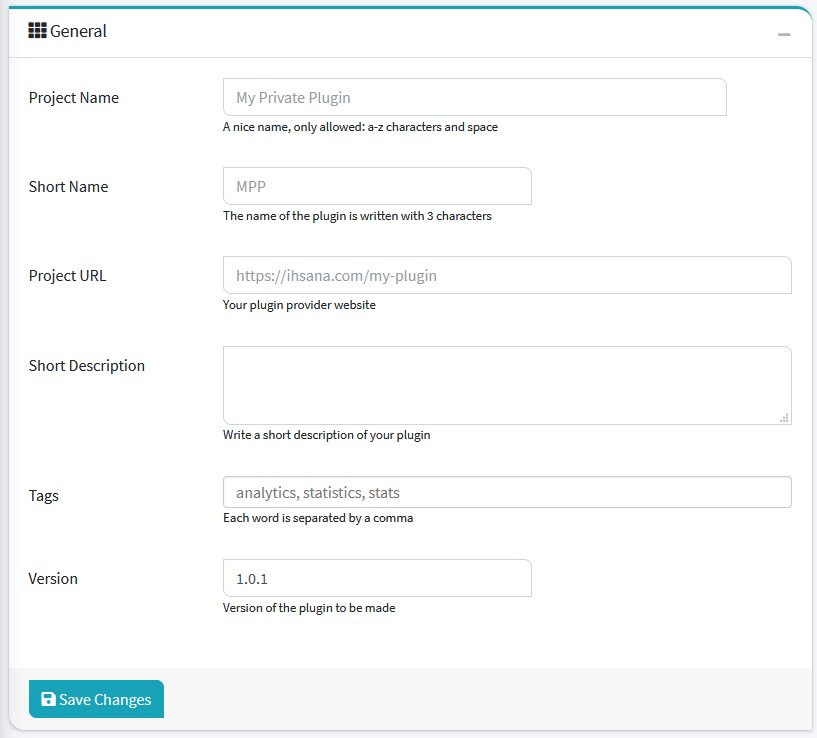
General Box
| Name | Info | Example |
|---|---|---|
| Project Name | A nice name, only allowed: a-z characters and space | My Private Plugin |
| Short Name | The name of the plugin is written with 3 characters | MPP |
| Project URL | Your plugin provider website | https://ihsana.com/my-plugin |
| Short Description | Write a short description of your plugin | |
| Tags | Each word is separated by a comma | analytics, statistics, stats |
| Version | Version of the plugin to be made | 1.0.1 |
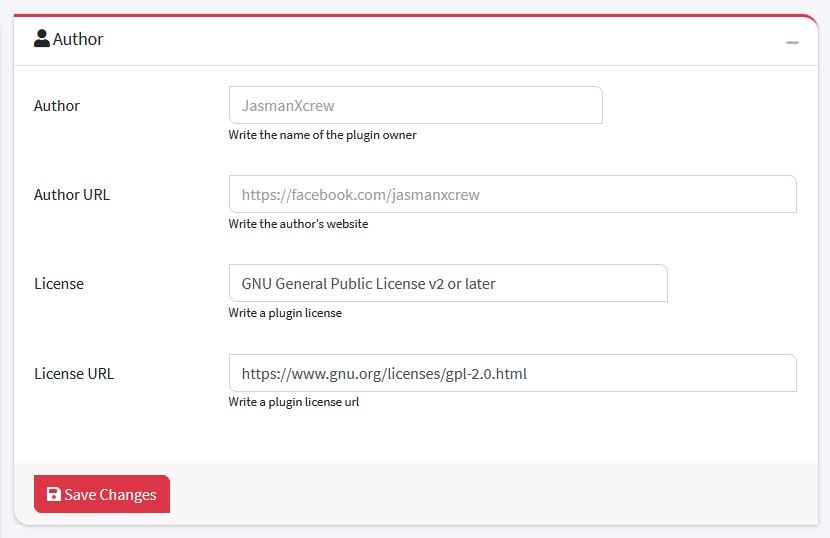
Author Box
| Name | Info | Example |
|---|---|---|
| Author | Write the name of the plugin owner | Jasman |
| Author URL | Write the author's website | https://facebook.com/jasmanxcrew |
| License | Write a plugin license | GNU General Public License v2 or later |
| License URL | Write a plugin license url | https://www.gnu.org/licenses/gpl-2.0.html |
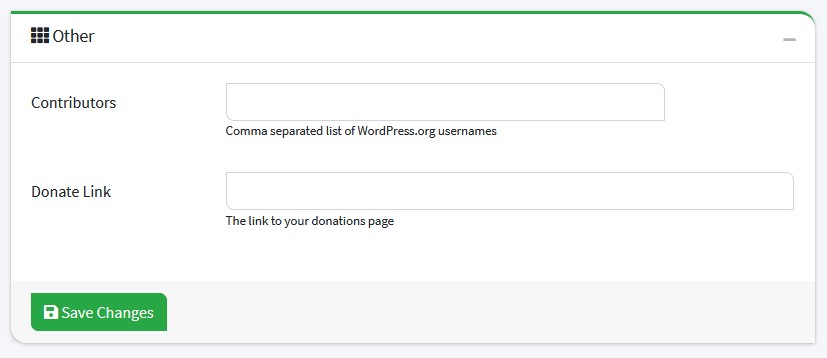
Others Box
| Name | Info | Example |
|---|---|---|
| Contributors | Comma separated list of WordPress.org usernames | |
| Donate Link | The link to your donations page |
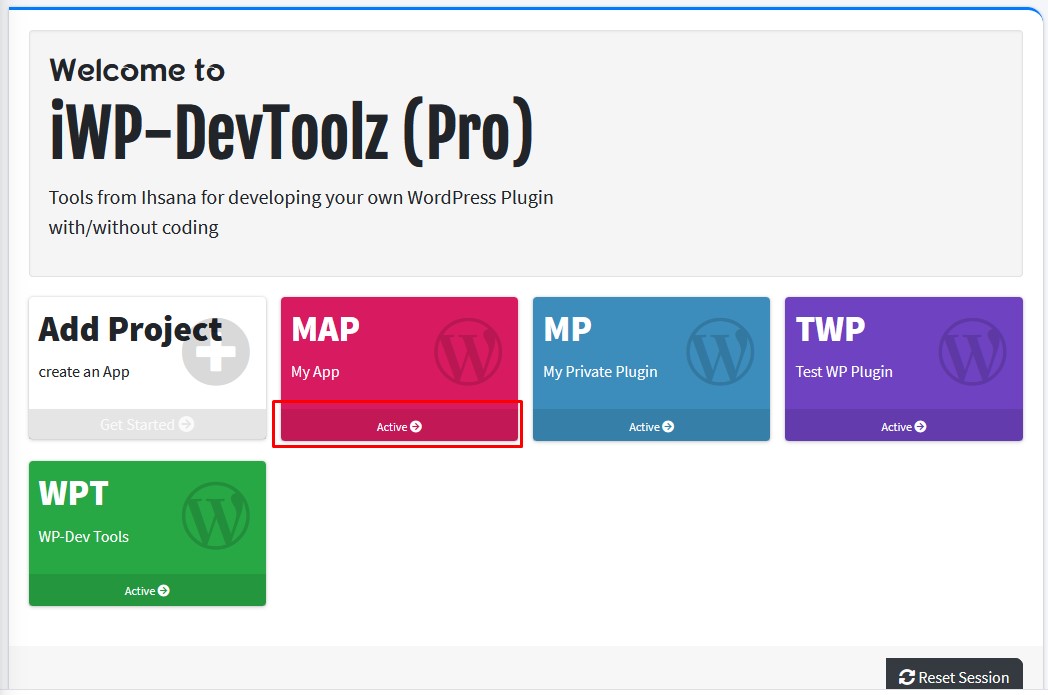
STEP 2: ACTIVATE THE PROJECT
Once the project is saved, you must activate the newly created project. by clicking the Active button.
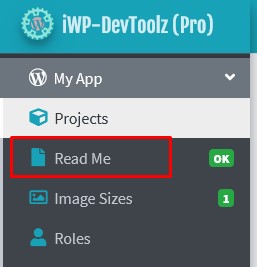
STEP 3: GENERATE README TEXT
Next you have to create a README file, this file is useful if you publish your plugin to the official wordpress site. Click the ReadMe menu on the side menu, you will be asked to fill out the forms provided or let it use the default data.
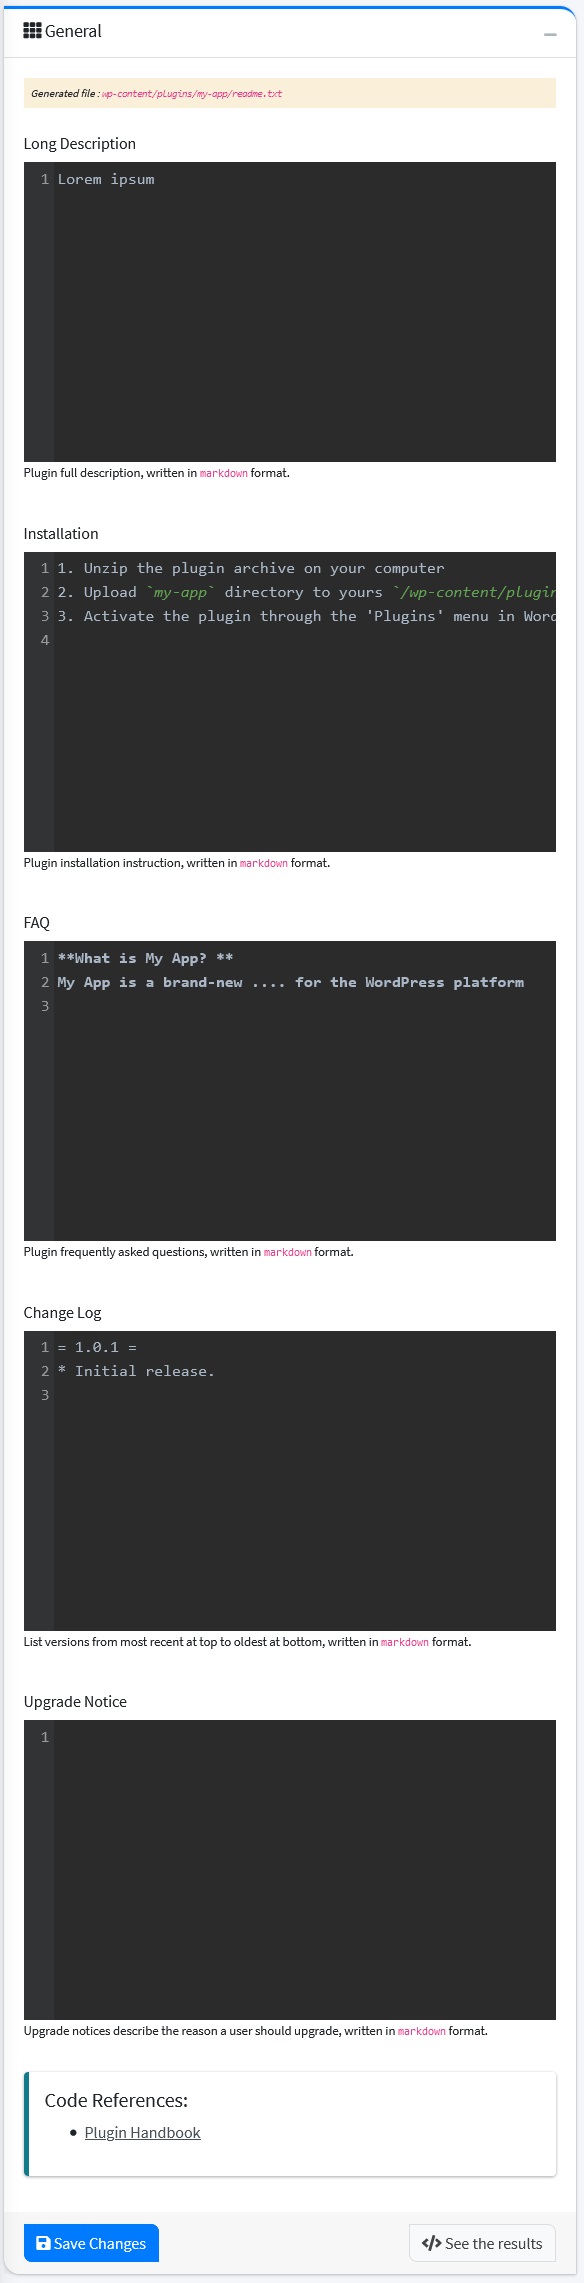
General Box
| Name | Info | Example |
|---|---|---|
| Long Description | Plugin full description, written in markdown format | |
| Installation | Plugin installation instruction, written in markdown format | |
| Project URL | Your plugin provider website | https://ihsana.com/my-plugin |
| FAQ | Plugin frequently asked questions, written in markdown format | |
| Change Log | List versions from most recent at top to oldest at bottom, written in markdown format | |
| Upgrade Notice | Upgrade notices describe the reason a user should upgrade, written in markdown format |
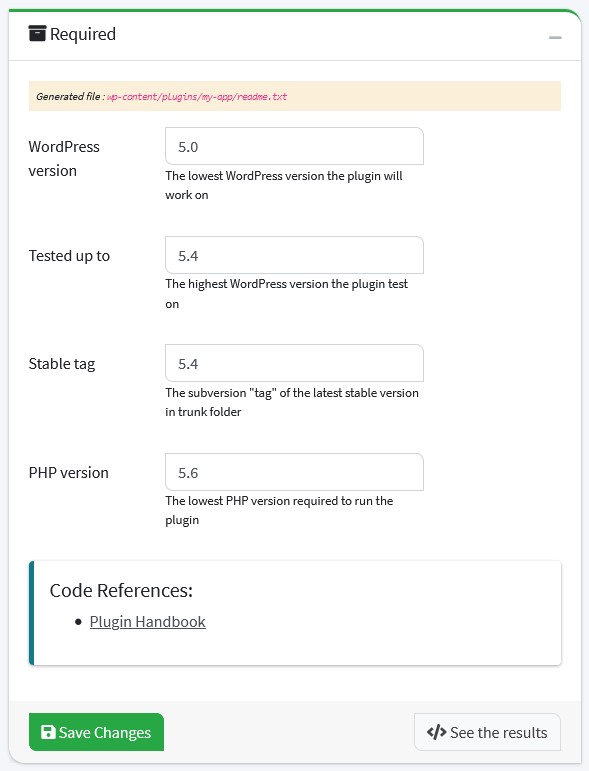
Required Box
| Name | Info | Example |
|---|---|---|
| WordPress version | The lowest WordPress version the plugin will work on | 5.0 |
| Tested up to | The highest WordPress version the plugin test on | 5.4 |
| Stable tag | The subversion "tag" of the latest stable version in trunk folder | 5.4 |
| PHP version | The lowest PHP version required to run the plugin | 5.6 |
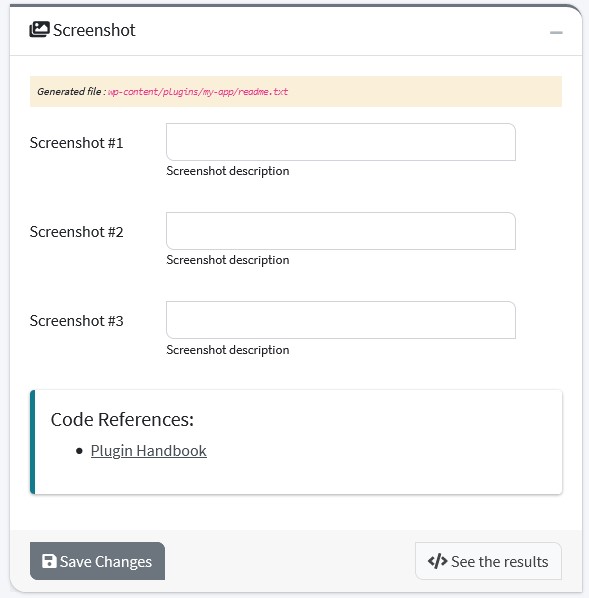
Screenshot Box
Screenshots fields are written with alternative text or image captions
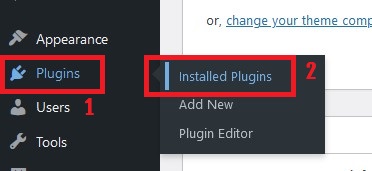
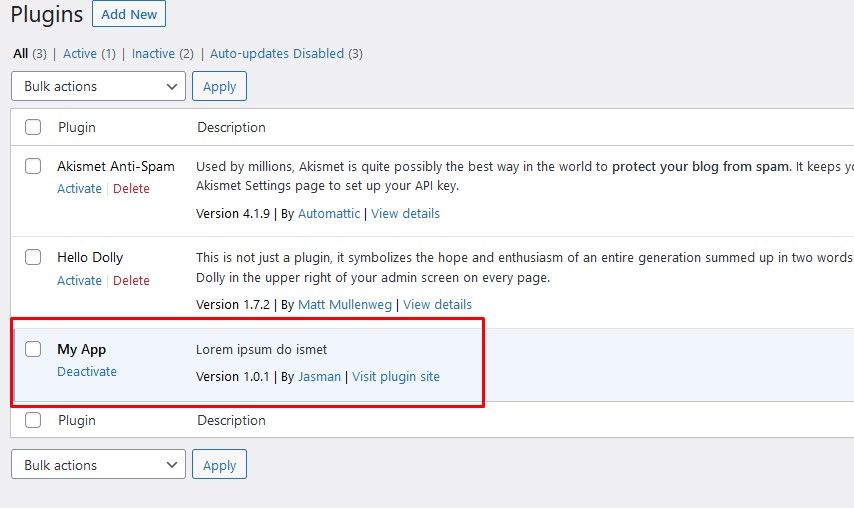
STEP 4: TEST THE PROJECT
You need to login to WordPress Live Test and go to the WordPress Dashboard, then click the plugins menu then Installed Plugins. If your plugin appears and tries to Activate, if successful it means you've successfully created a basic plugin.
Last update: 2021-04-22 09:39:28
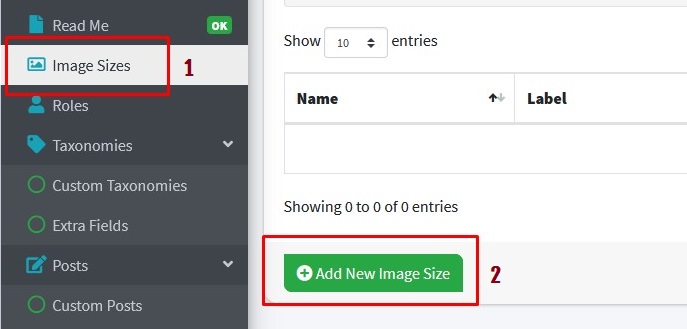
3) How to add Custom Image Sizes in WordPress?
STEP 1: GENERATE IMAGE SIZES CODE
Goto Image Size page by clicking Image Sizes menu on side menu, after that click Add New Image Size button. Then complete the fields provided and Click Save Changes Button.
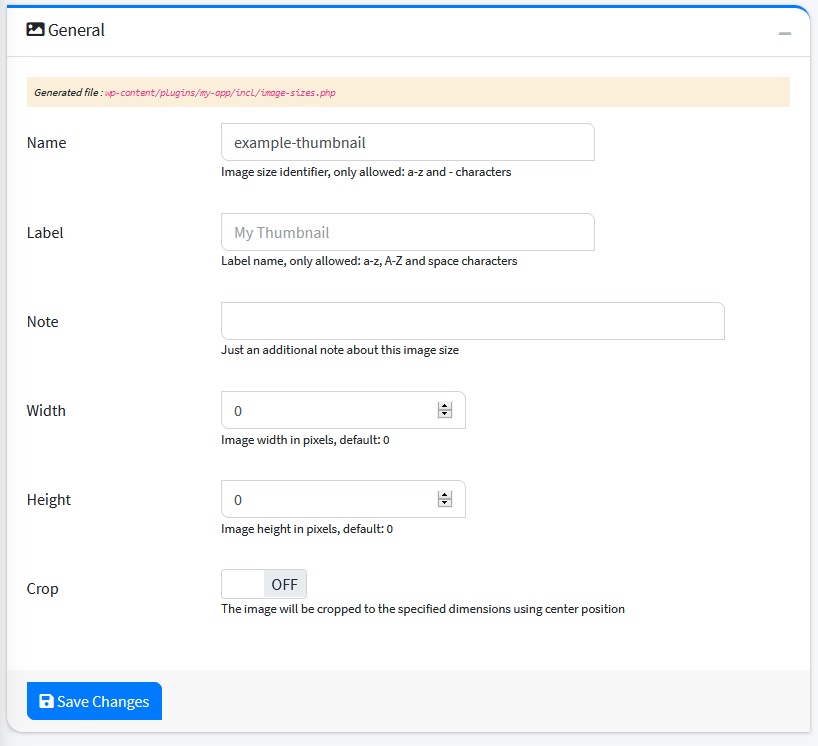
General Box
| Name | Info | Example |
|---|---|---|
| Name | Image size identifier, only allowed: a-z and - characters | my-cover |
| Label | Label name, only allowed: a-z, A-Z and space characters | My Cover |
| Note | Just an additional note about this image size | |
| Width | Image width in pixels, default: 0 | 80 |
| Height | Image height in pixels, default: 0 | 80 |
| Crop | The image will be cropped to the specified dimensions using center position | OFF |
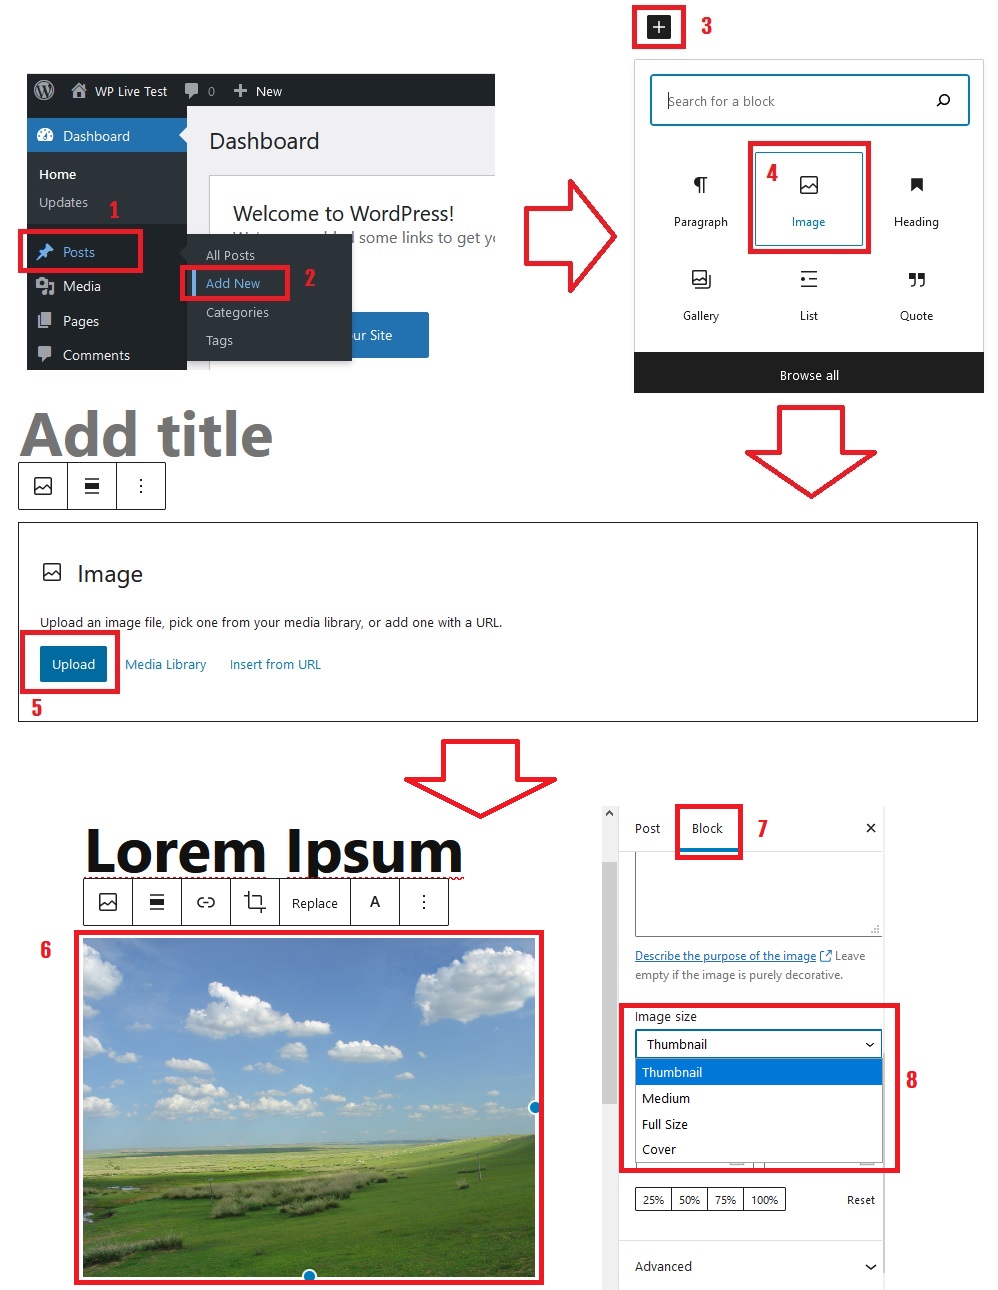
STEP 2: TEST THE PROJECT
Login to WordPress Dashboard and try to create a new post. Write the content, by adding blocks and selecting images and uploading images. Once the image is uploaded, click the image and see the image properties on the right. the image size you created should appear in the image size option.
Last update: 2021-04-16 08:16:38
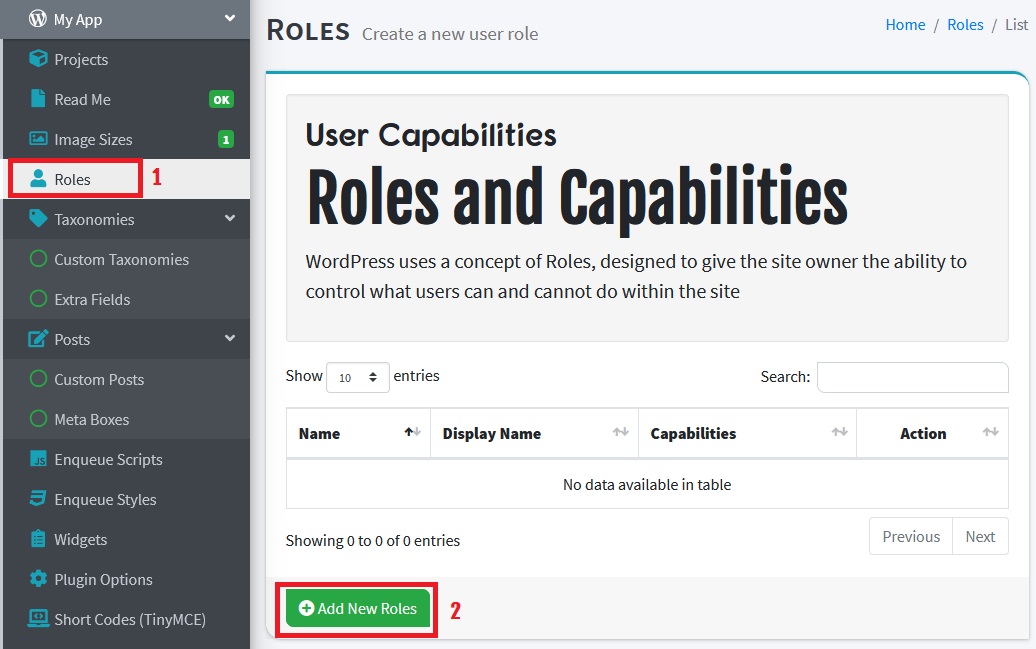
4) How to create Custom User Roles in WordPress?
STEP 1: GENERATE ROLE CODES
Roles is a role concept to give site owners the ability to control what users can and cannot do. Under the Image Sizes menu, there is the Roles menu, click Roles menu then click Add New Roles button, then the Roles page will appear, please complete the fields provided and Click Save Changes button
General Box
| Name | Info | Example |
|---|---|---|
| Role Name | only allowed: a-z characters and - | my-guest |
| Display Name | Display name for role | My Guest |
| Capabilities | Default capabilities |
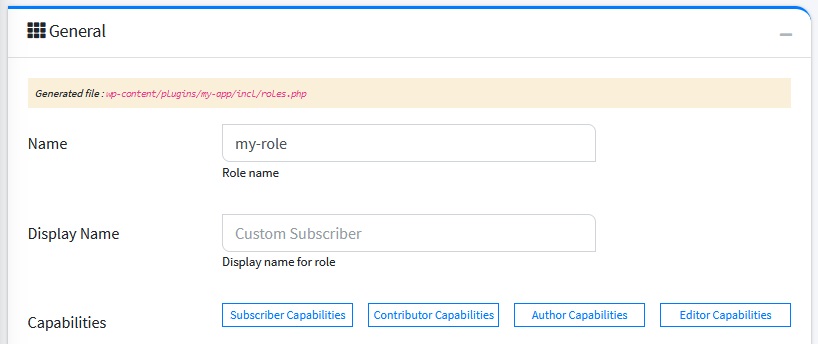
You can select Capabilities manually as well

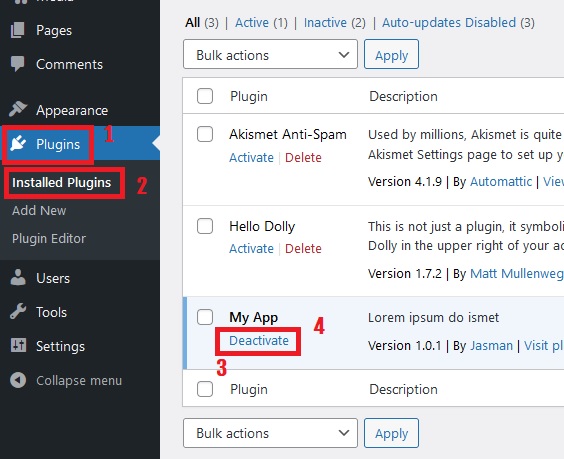
STEP 2: TEST THE PROJECT
-
Login to your WordPress Dashboard and go to Plugins Menu then click Installed Plugins, please deactivate your plugin and activate your plugin again.
Attention! This step is very important
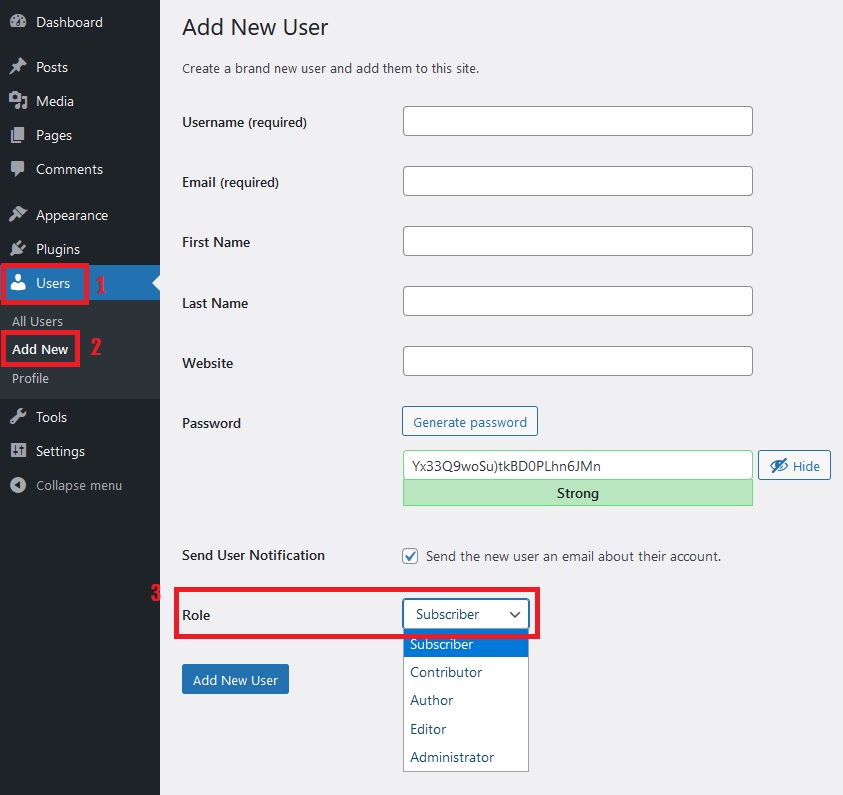
-
After that go to Users Menu then click Add New. The Add New User page appears, the roles you created should already be in the Role option.
Last update: 2021-04-19 10:19:03
5) How to create Custom Taxonomies in WordPress?
Taxonomies is a way of grouping posts together based on a select number of relationships
STEP 1: GENERATE TAXONOMIES CODES
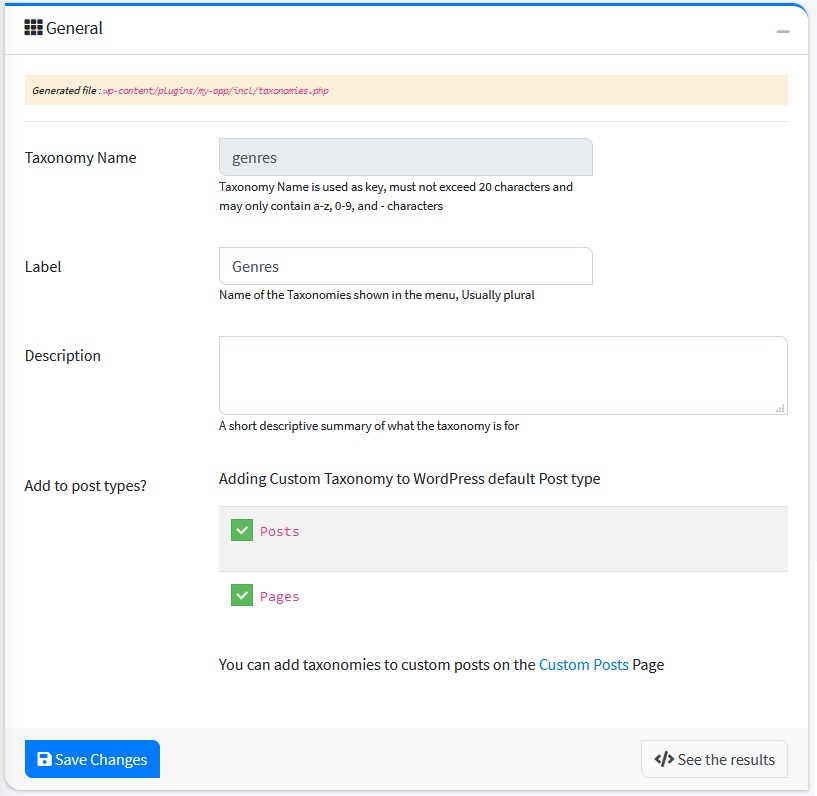
How to add taxonomies is very easy, click the Taxonomies menu on sidemenu, then click Custom Taxonomies. The Taxonomies page will appear, then click the Add New Taxonomies button. Complete the fields provided, then click the Save Changes button.
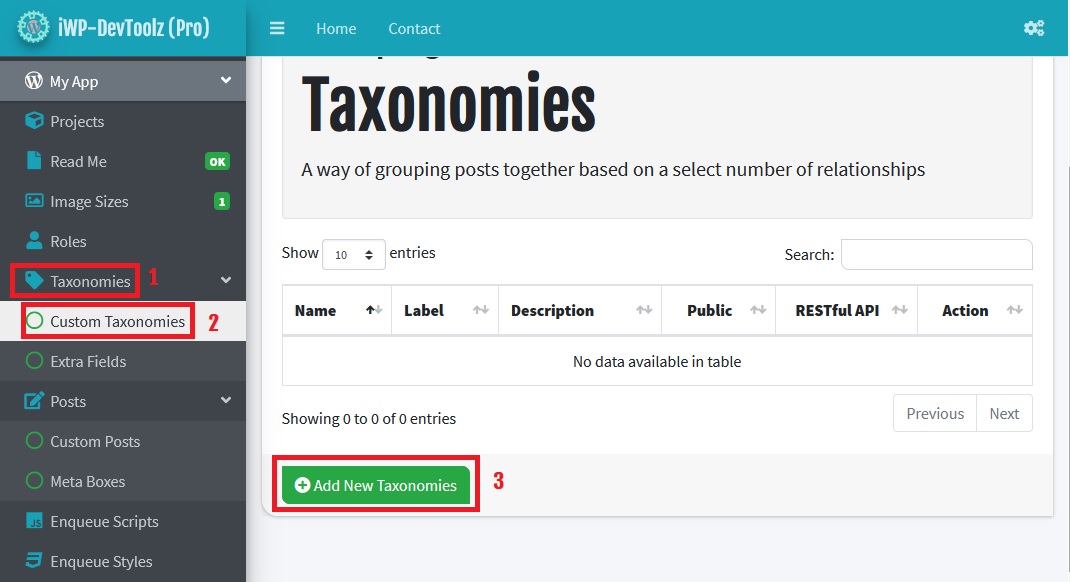
Information fields that must be filled are as follows:
General Box
| Name | Info | Example |
|---|---|---|
| Taxonomy Name | Taxonomy Name is used as key, must not exceed 20 characters and may only contain a-z, 0-9, and - characters | genre |
| Label | Name of the Taxonomies shown in the menu, Usually plural | Genre |
| Description | A short descriptive summary of what the taxonomy is for | |
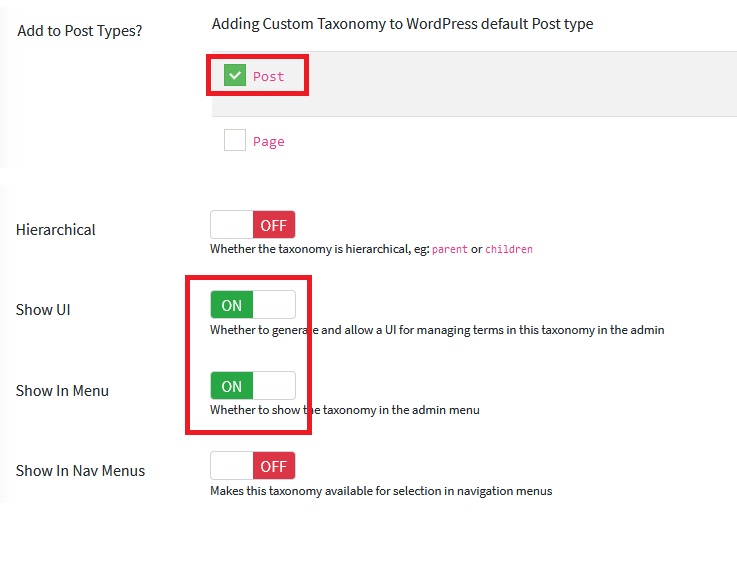
| Add to Post Types? | Adding Custom Taxonomy to WordPress default Post type | Post |
Options Box
| Name | Info | Example |
|---|---|---|
| Public | Whether a taxonomy is intended for use publicly either via the admin interface or by front-end users | ON |
| Publicly Queryable | Whether the taxonomy is publicly queryable | ON |
| Hierarchical | Whether the taxonomy is hierarchical, eg: parent or children | OFF |
| Show UI | Whether to generate and allow a UI for managing terms in this taxonomy in the admin | ON |
| Show In Menu | Whether to show the taxonomy in the admin menu | ON |
| Show In Nav Menus | Makes this taxonomy available for selection in navigation menus | ON |
| Show In REST-API | Whether to include the taxonomy in the REST API | ON |
| Show Tagcloud | Whether to list the taxonomy in the Tag Cloud Widget controls | ON |
| Show In Quick Edit | Whether to show the taxonomy in the quick/bulk edit panel | ON |
| Show Admin Column | Whether to display a column for the taxonomy on its post type listing screens | ON |

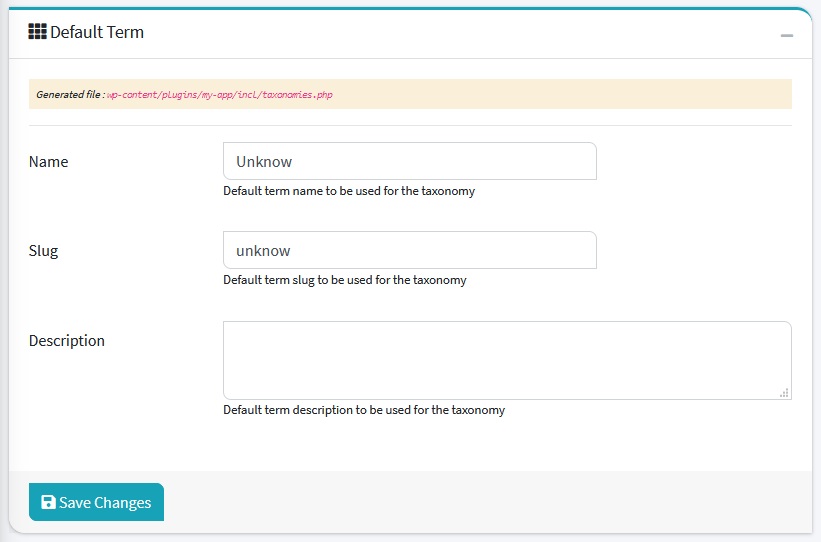
Default Term
The values in this box are used if the user has not entered the field.
| Name | Info | Example |
|---|---|---|
| Name | Default term name to be used for the taxonomy | Unknow |
| Slug | Default term slug to be used for the taxonomy | unknow |
| Description | Default term description to be used for the taxonomy |
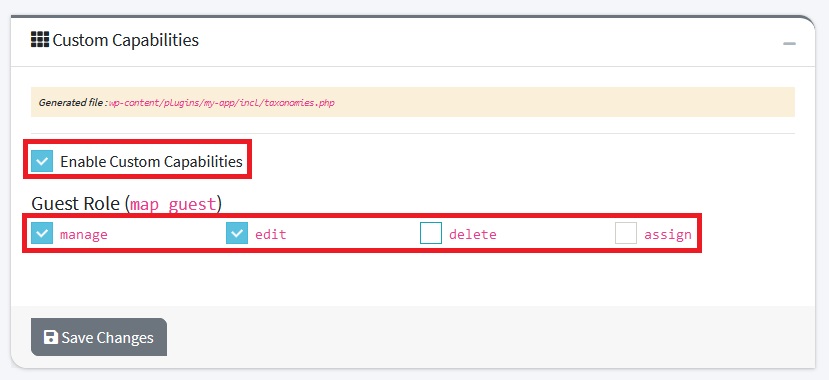
Custom Capabilities Box
If you want to use Custom User Roles please check Enable Custom Capabilities and select the desired role.
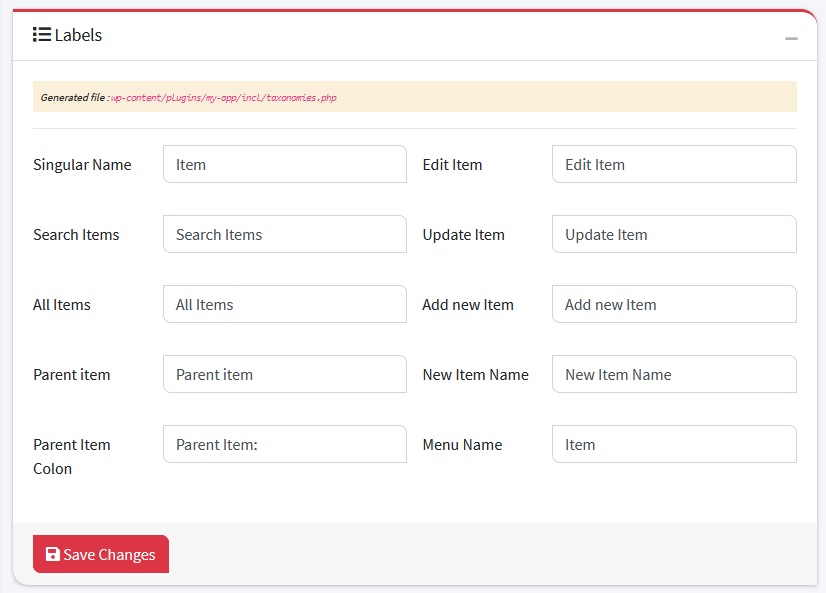
Labels Box
| Name | Info | Example |
|---|---|---|
| Singular Name | Genre | |
| Search Items | Search Genres | |
| All Items | All Genres | |
| Parent item | Parent genre | |
| Parent Item Colon | Parent Genre: | |
| Edit Item | Edit Genre | |
| Update Item | Update Genre | |
| Add new Item | Add new Genre | |
| New Item Name | New Genre Name | |
| Menu Name | Genre |
STEP 2: TEST THE PROJECT
- Previously, you could change these settings so it's easy to check: Add to Post Types? =
Postand Options: Show UI and Show In Menu =ON
- Login to your WordPress Dashboard and The taxonomies that you created should already be in the Post menu

Last update: 2021-04-17 09:30:52
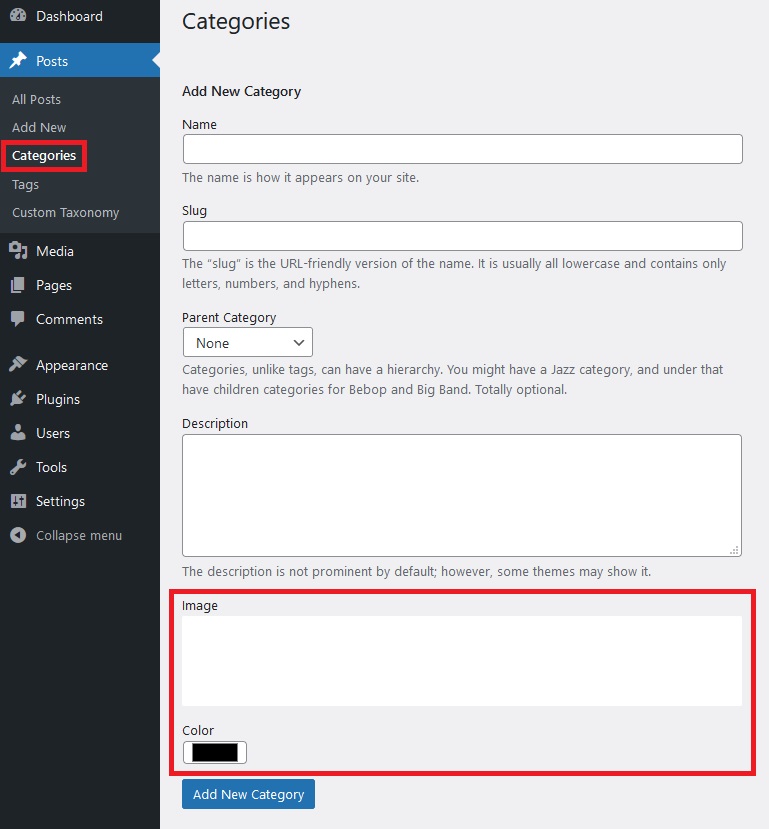
6) How to add Fields to Taxonomies/Categories in WordPress?
Sometimes You need additional fields in the category or taxonomies such as adding an image for the category, You can create it with the extra fields feature.
STEP 1: GENERATE EXTRA-FIELDS CODE
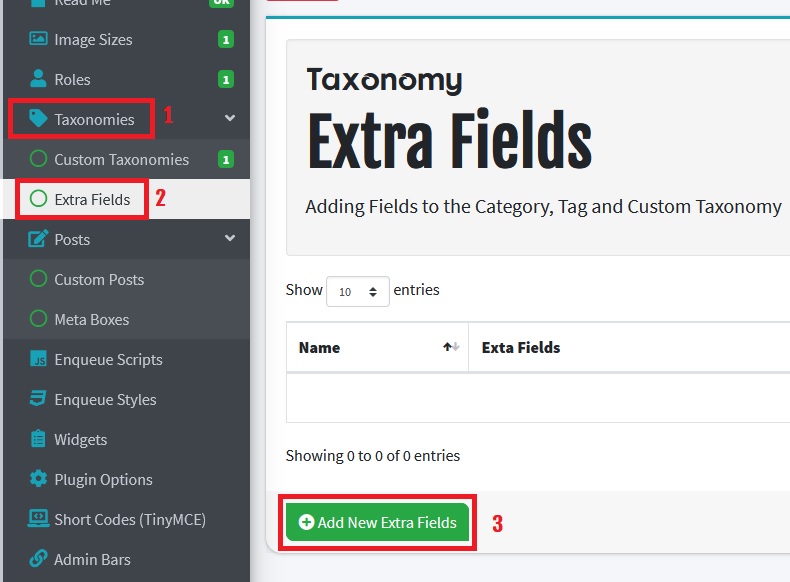
To create extra-fields code go to the Taxonomies menu then click Extra Fields, The extra-field page will appear then click Add New Extra-Fields button, and complete the requested data then click Save Changes button.
Information fields that must be filled are as follows:
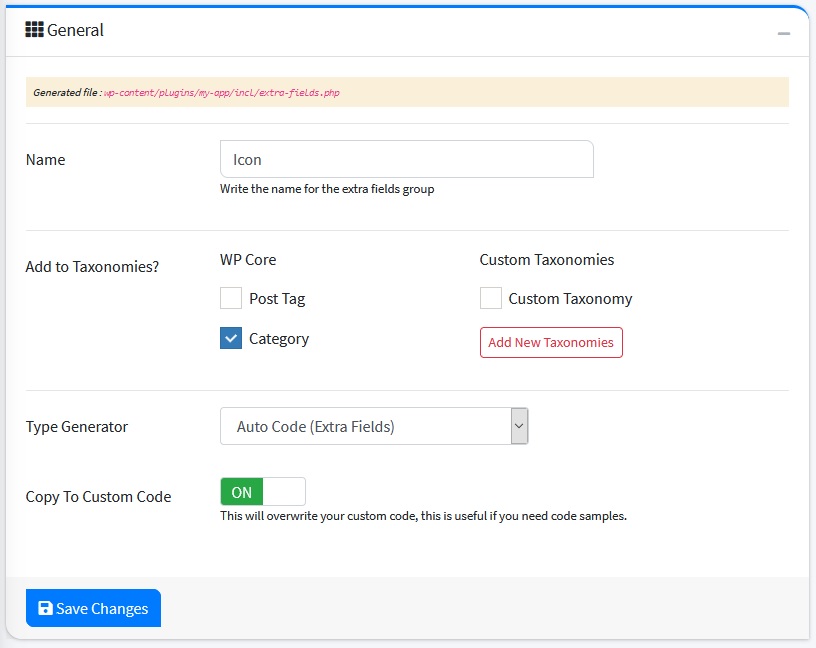
General Box
| Name | Info | Example |
|---|---|---|
| Name | Write the name for the extra fields group | Icon |
| Add to Taxonomies? | You can add fields to the selected taxonomies | Post Tag |
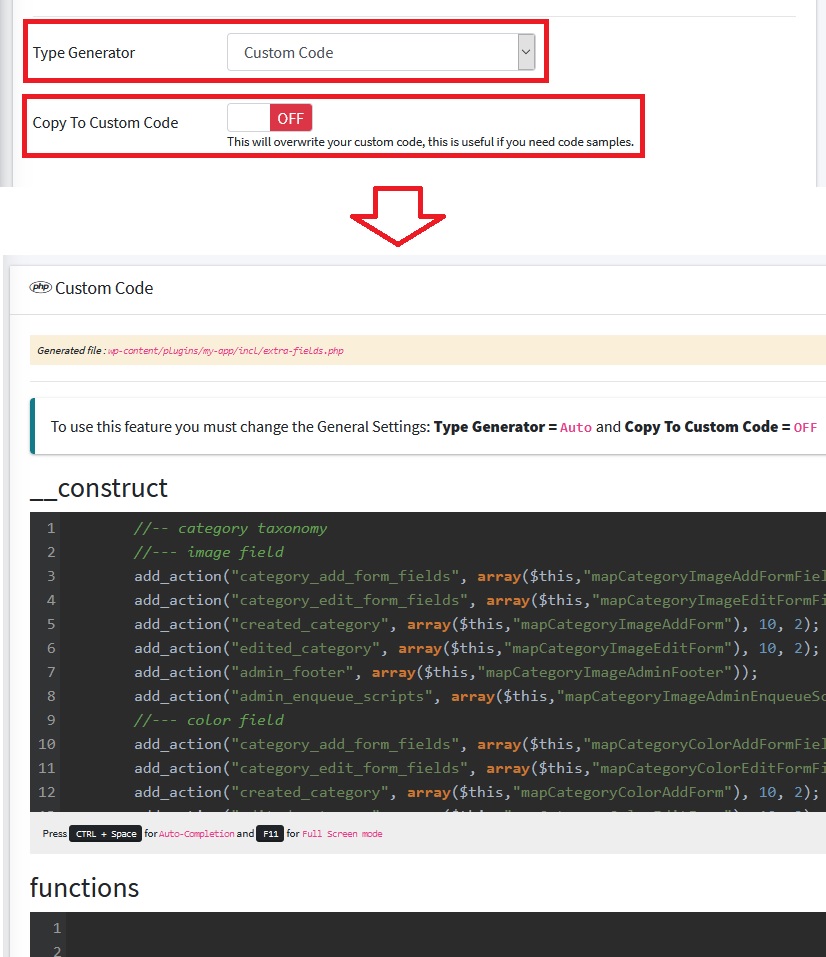
| Type Generator | Auto Code | |
| Copy To Custom Code | This will overwrite your custom code, this is useful if you need code samples | ON |
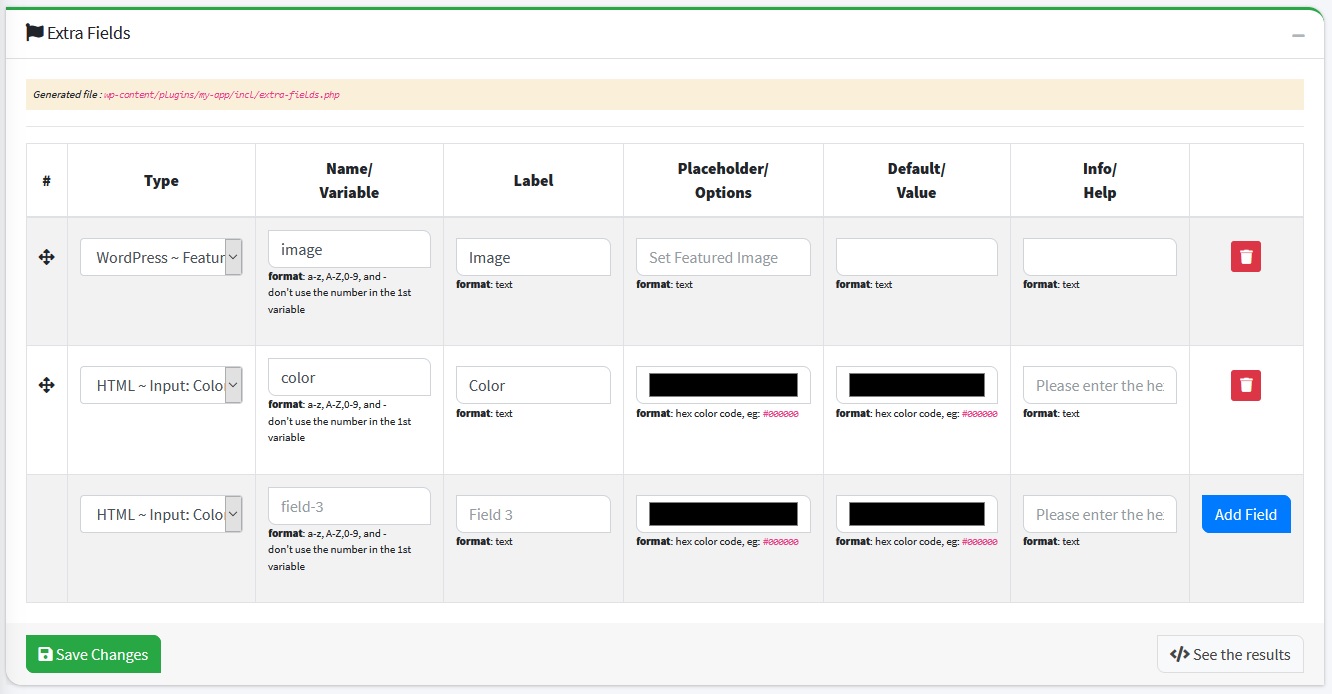
Extra Fields Box
You can create fields or form-input on the fields in this Extra-Fields box
Custom Code Box
This field is used to modify code generated automatically. Don't make changes if you are not experienced in PHP programming
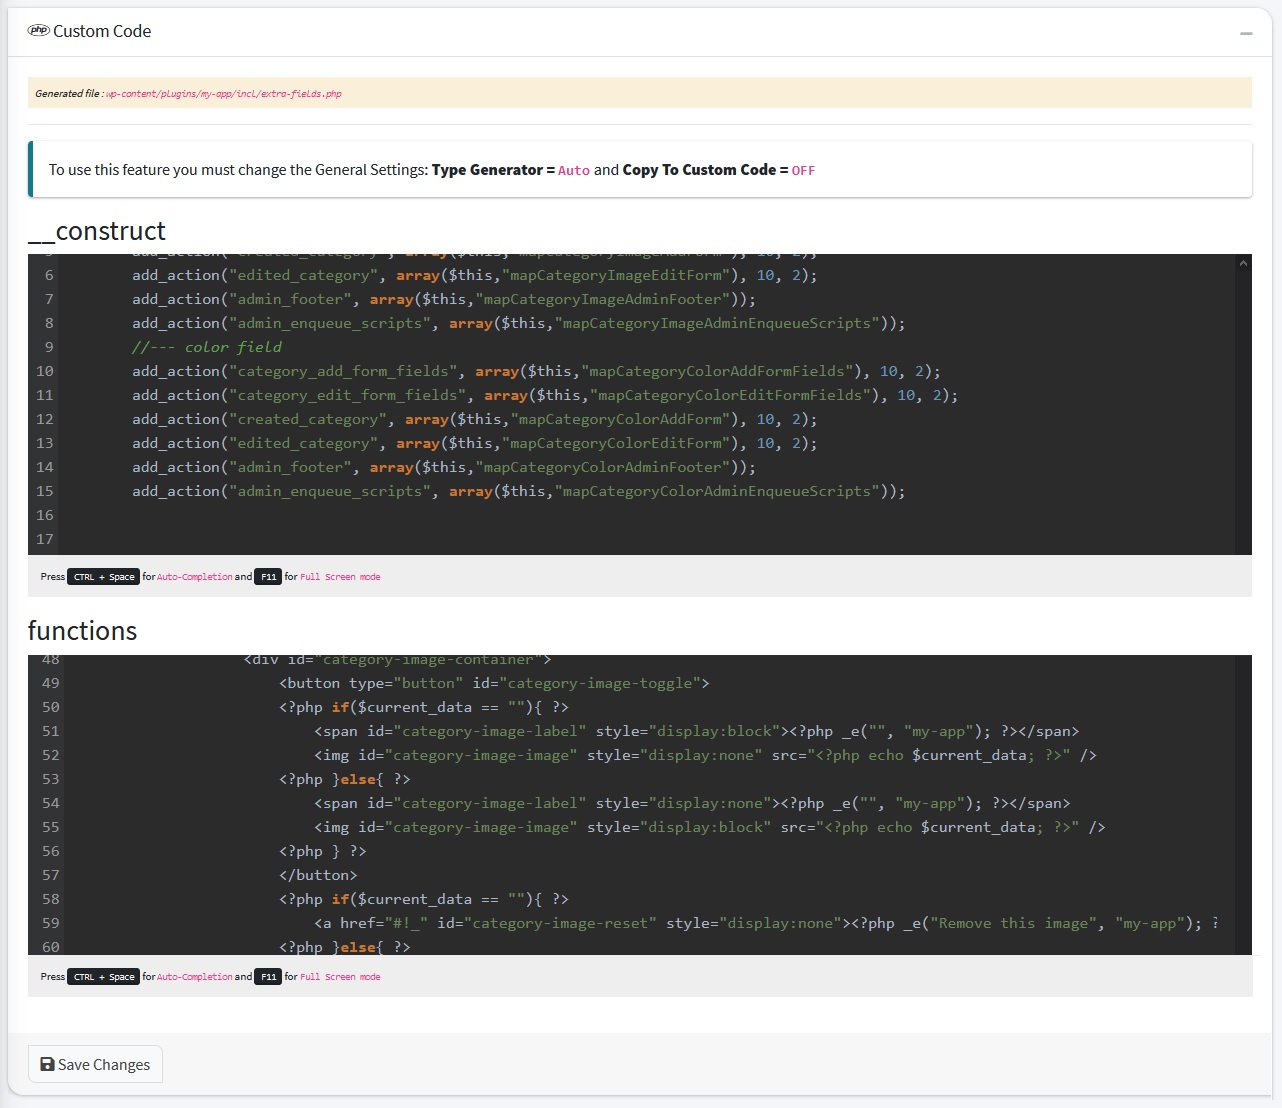
STEP 2: CUSTOM CODE
To use this feature you must change the General Settings: Type Generator = Custom Code and Copy To Custom Code = OFF, after the settings are changed, you can edit the code in Custom Code Box
STEP 3: TEST THE PROJECT
-
You could change General Settings so it's easy to check: Add to Taxonomies? =
Category
-
Login to your WordPress Dashboard and The fields that you created should already be in the Categories menu
Last update: 2021-04-25 05:11:06
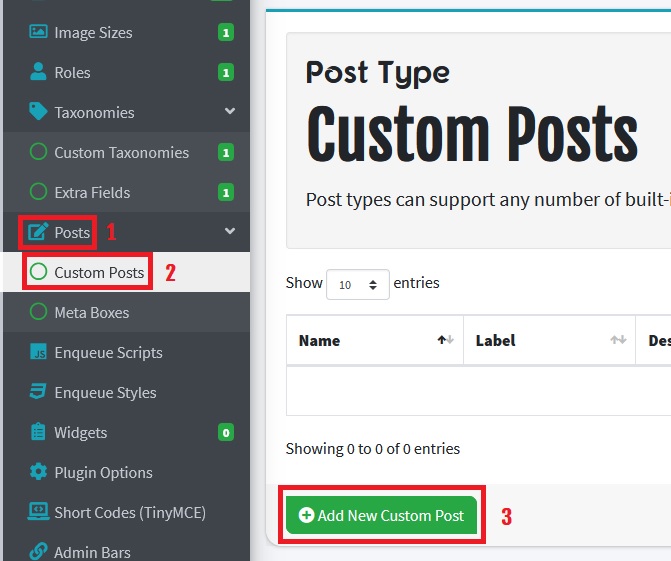
7) How to create Custom Posts in WordPress?
STEP 1: GENERATE CUSTOM-POSTS CODE
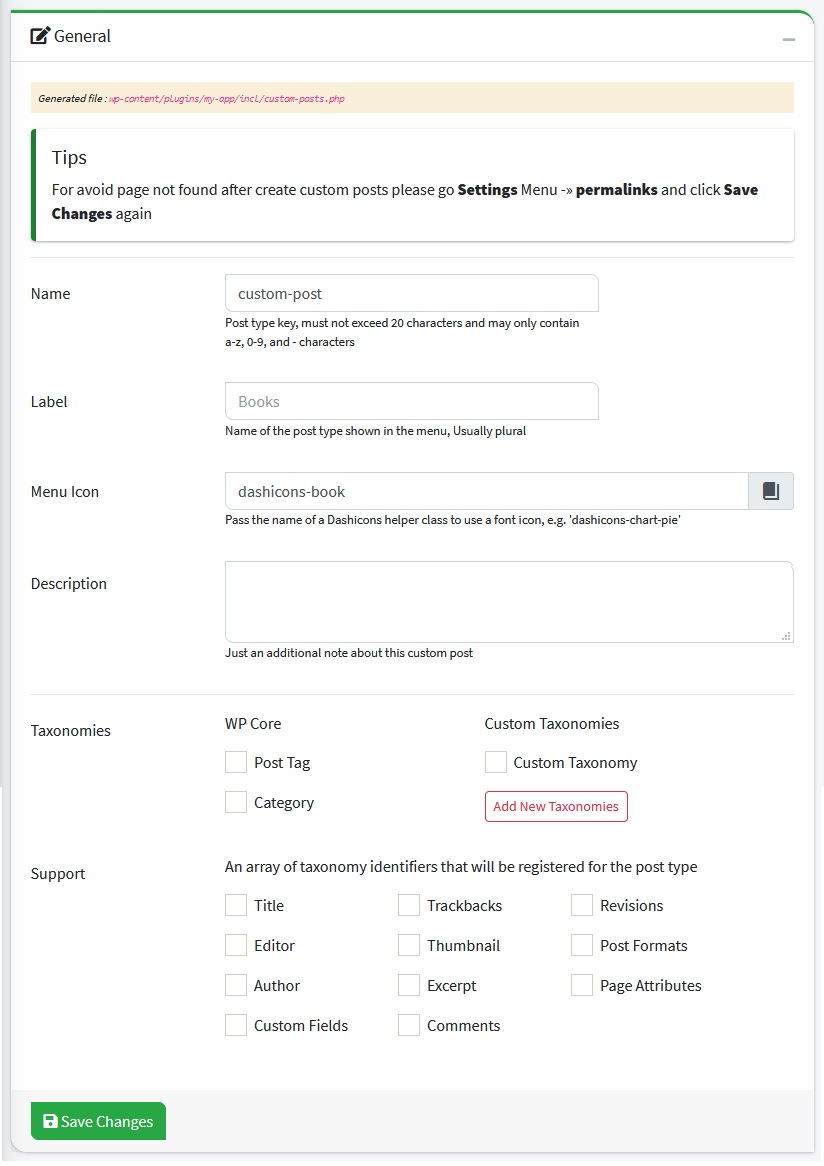
Go to Custom Posts page by clicking Posts menu on side menu then click Custom Posts menu, after that click Add New Custom Post button. Then complete the fields provided and Click Save Changes Button.
Information fields that must be filled are as follows:
General Box
| Name | Info | Example |
|---|---|---|
| Name | Post type key, must not exceed 20 characters and may only contain a-z, 0-9, and - characters | Books |
| Label | Name of the post type shown in the menu, Usually plural | books |
| Menu Icon | Pass the name of a Dashicons helper class to use a font icon, e.g. 'dashicons-chart-pie' | dashicon-book |
| Description | Just an additional note about this custom post | Lorem Ipsum do ismet |
| Taxonomies | WP Core | Custom Taxonomies |
| Support | An array of taxonomy identifiers that will be registered for the post type | Title, Editor, Author |
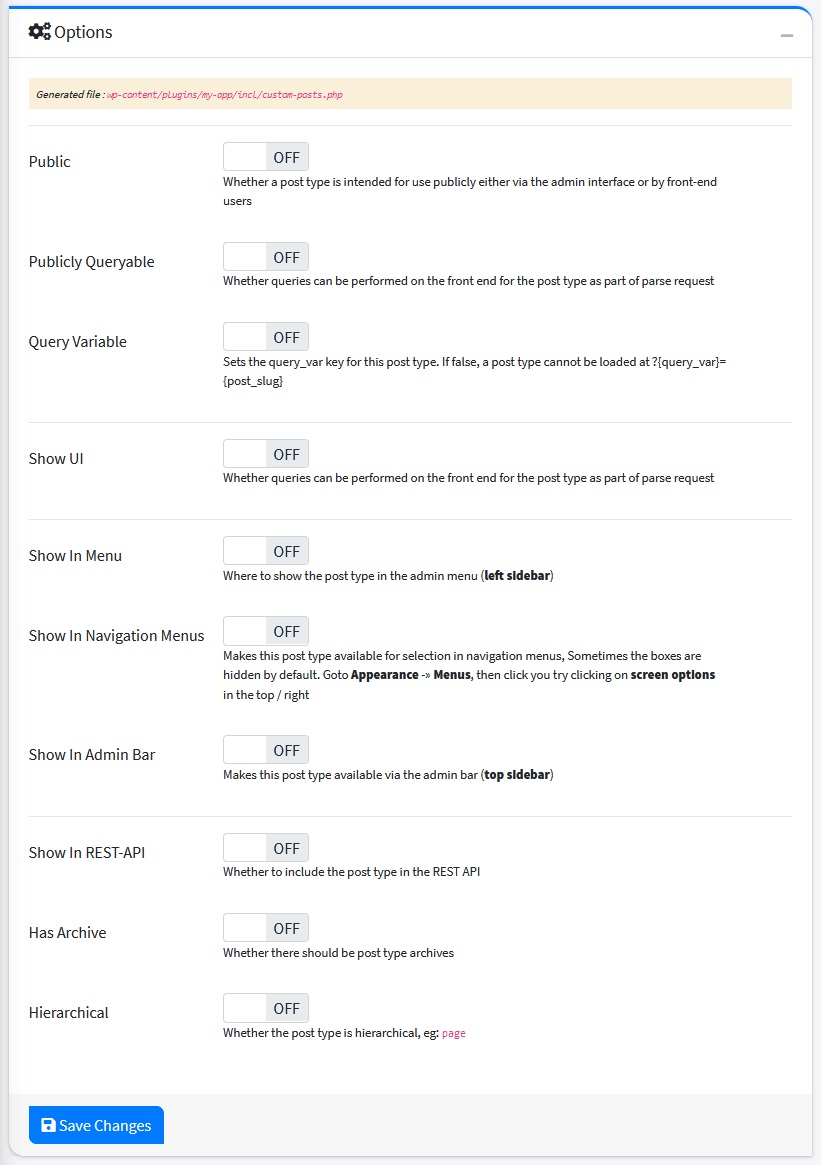
Options Box
| Name | Info | Example |
|---|---|---|
| Public | Whether a post type is intended for use publicly either via the admin interface or by front-end users | OFF |
| Publicly Queryable | Whether queries can be performed on the front end for the post type as part of parse request | ON |
| Query Variable | Sets the query_var key for this post type. If false, a post type cannot be loaded at ?{query_var}={post_slug} | OFF |
| Show UI | Whether queries can be performed on the front end for the post type as part of parse request | ON |
| Show In Menu | Where to show the post type in the admin menu | ON |
| Show In Navigation Menus | Makes this post type available for selection in navigation menus, Sometimes the boxes are hidden by default. Goto Appearance -» Menus, then click you try clicking on screen options in the top / right | OFF |
| Show In Admin Bar | Makes this post type available via the admin bar (top sidebar) | OFF |
| Show In REST-API | Whether to include the post type in the REST API | OFF |
| Has Archive | Whether there should be post type archives | OFF |
| Hierarchical | Whether the post type is hierarchical, eg: page | OFF |
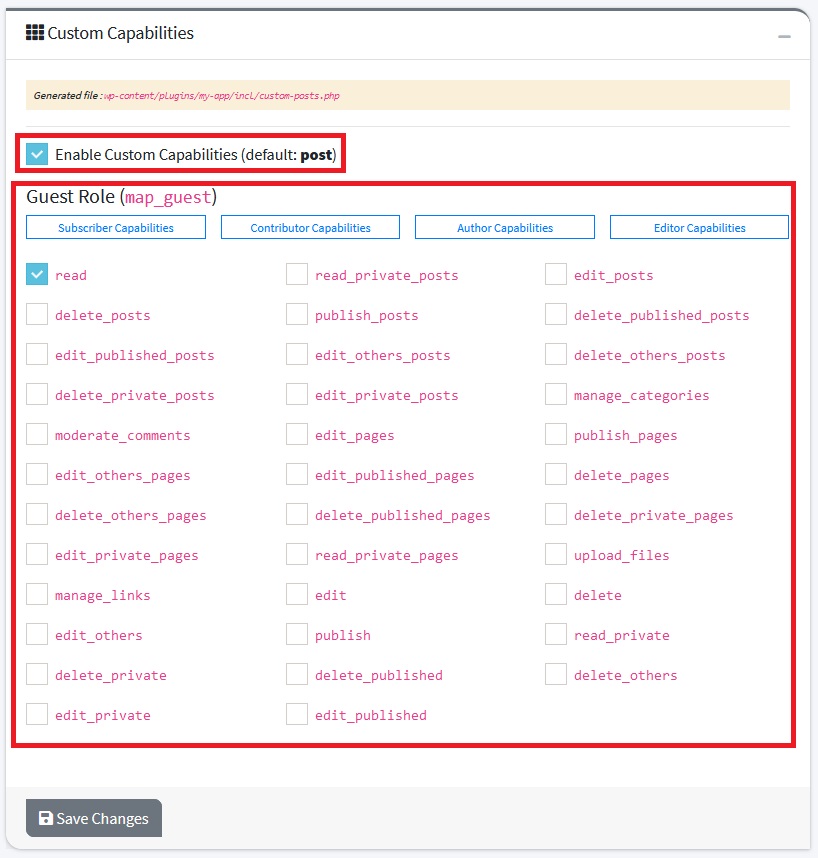
Custom Capabilities Box
By default custom post uses Capabilities: POST. But if you want to use Custom Roles/Capabilities, check Enable Custom Capabilities and choose the user roles that you want.
Labels Box
Labels are text that will appear on the wordpress dashboard
| Name | Info | Example |
|---|---|---|
| Singular Name | Item | |
| Add New | Add New | |
| Add New Item | Add New Item | |
| Add Item | Add Item | |
| Edit Item | Edit Item | |
| View Item | View Item | |
| All Items | All Items | |
| Search Items | Search Items | |
| Parent Items: | Parent Items: | |
| Not found | Not found | |
| No found in trash | No found in trash |

STEP 2: TEST THE PROJECT
- Previously, you could change these options so it's easy to check: Show UI and Show In Menu =
ON
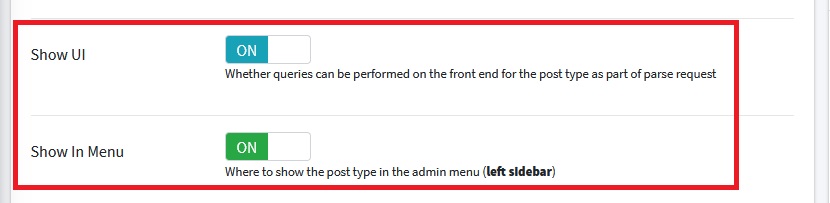
-
Login to your WordPress Dashboard and go to Settings menu and click Permalinks then click Save Changes (Just click save without any changes)
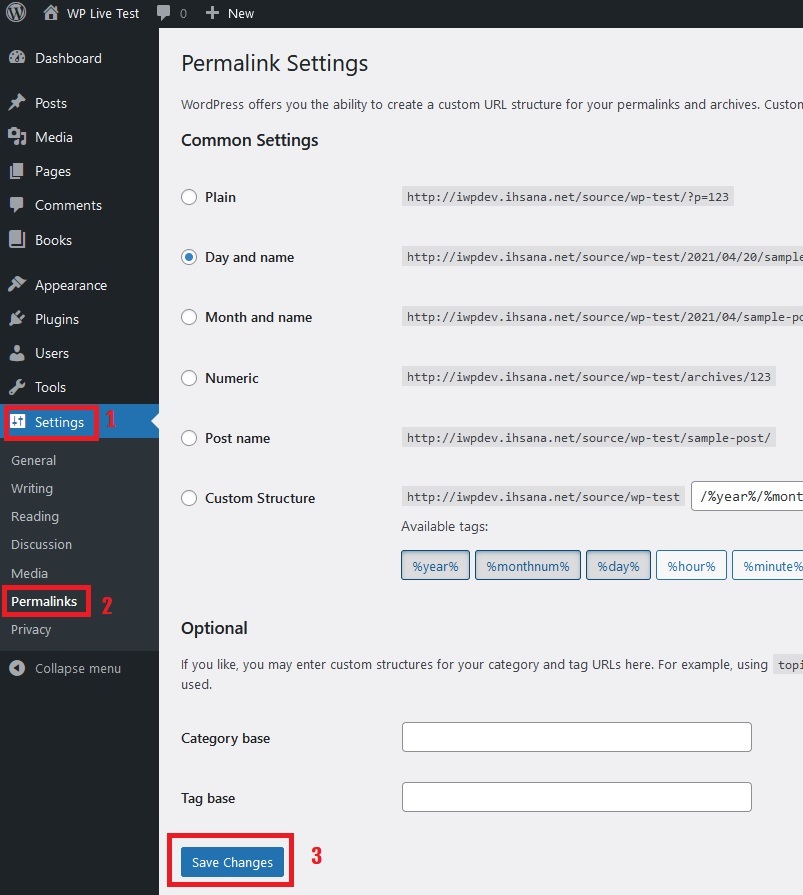
- Done, the custom posts should already be there.

Last update: 2021-04-22 06:04:49
8) How to add Fields to Custom Posts in WordPress?
Custom fields, also referred to as post meta, is a feature in WordPress which allows users to add additional information when writing a post
STEP 1: GENERATE CUSTOM-FIELDS CODES
To add fields to a post, you can create it as follows: click the Posts menu on sidemenu, then click Meta Boxes. The Meta Boxes page will appear, then click the Add New Meta Boxes button. Complete the fields provided, then click the Save Changes button.
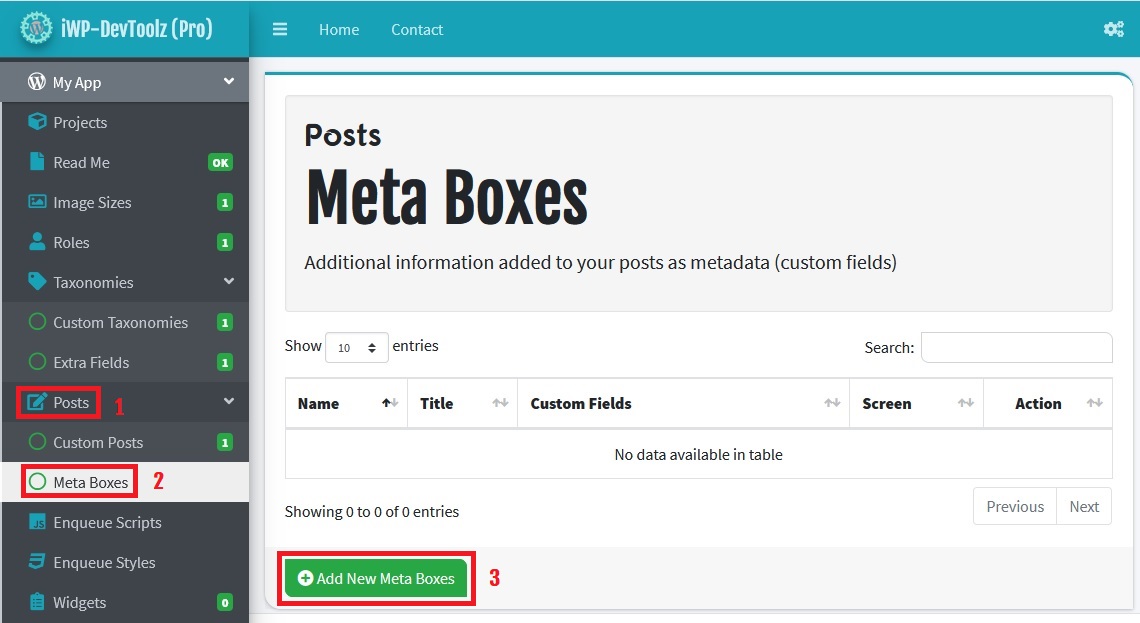
Information fields that must be filled are as follows:
General Box
| Name | Info | Example |
|---|---|---|
| Name | Meta box ID (used in the id attribute for the meta box) | biography |
| Title | Title of the meta box | Biography |
| Context | The context within the screen where the boxes should display | Advanced |
| Priority | The priority within the context where the boxes should show | Defauld |
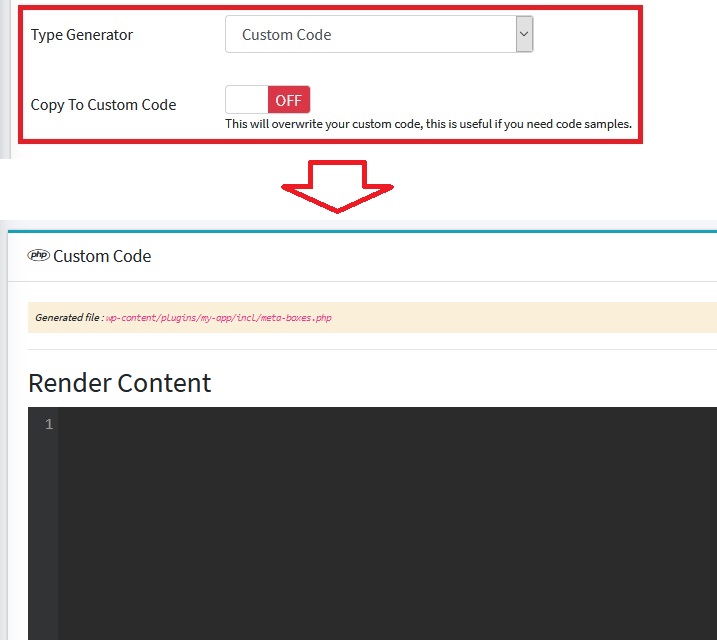
| Type Generator | Auto Code | |
| Copy To Custom Code | This will overwrite your custom code, this is useful if you need code samples. | ON |

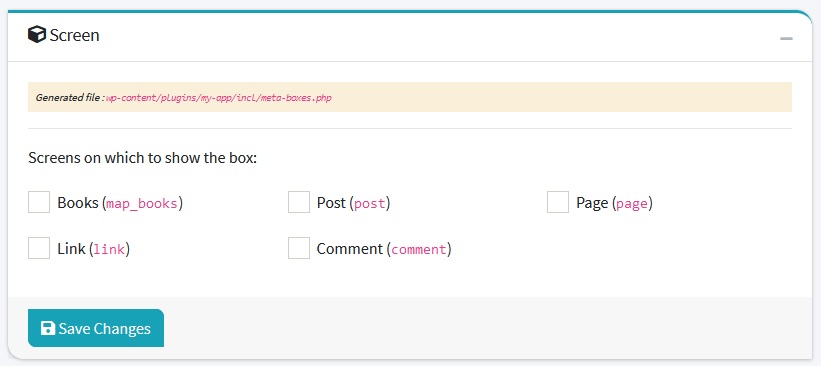
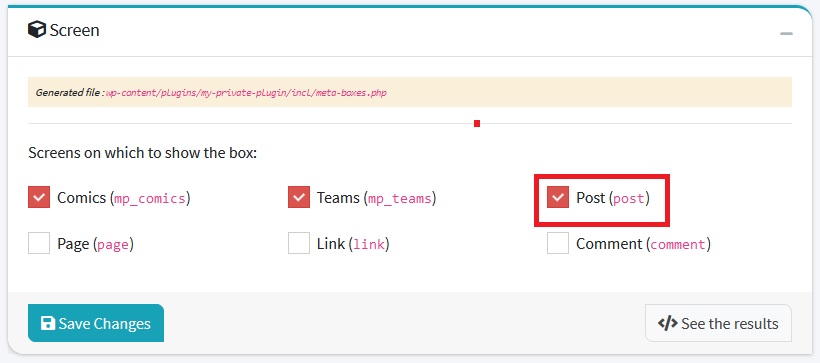
Screen Box
You can limit where the metabox will be displayed by checking the post name in this feature
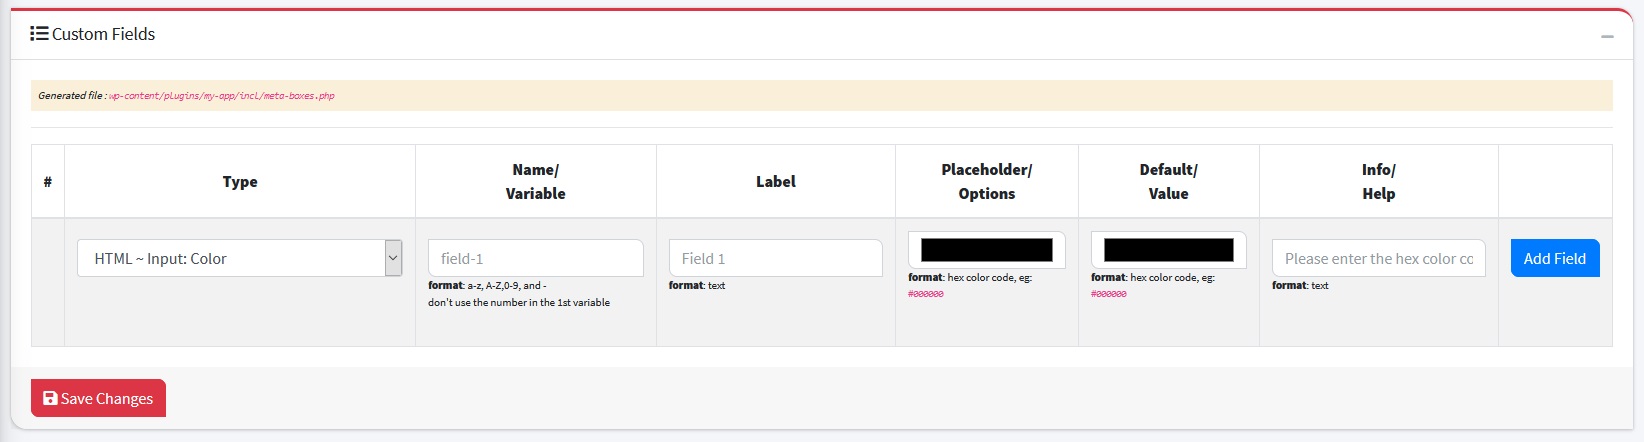
Custom Fields Box
By using this feature, you don't need to write coding to create a field (form input) on the post page, you can write a name, label or input type.
Custom Code Box
The generated code will appear here, You can edit it if needed.
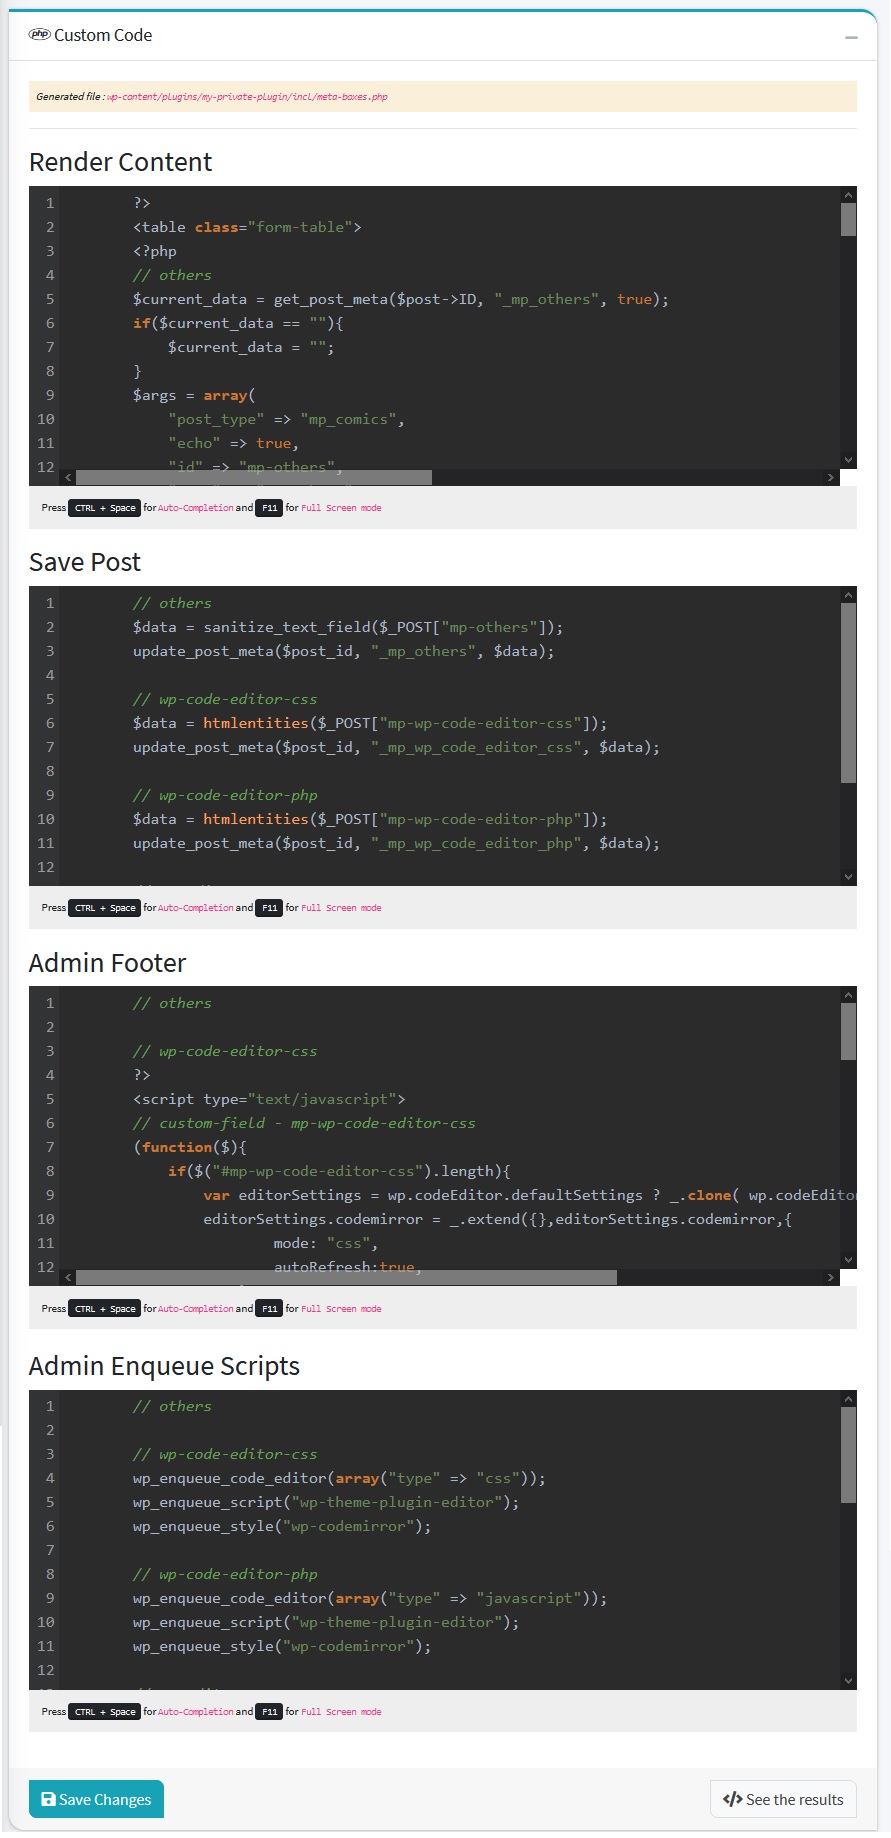
STEP 2: CUSTOM CODE
To use this feature you must change the General Settings: Type Generator = Custom Code and Copy To Custom Code = OFF, after the settings are changed, you can edit the code in Custom Code Box
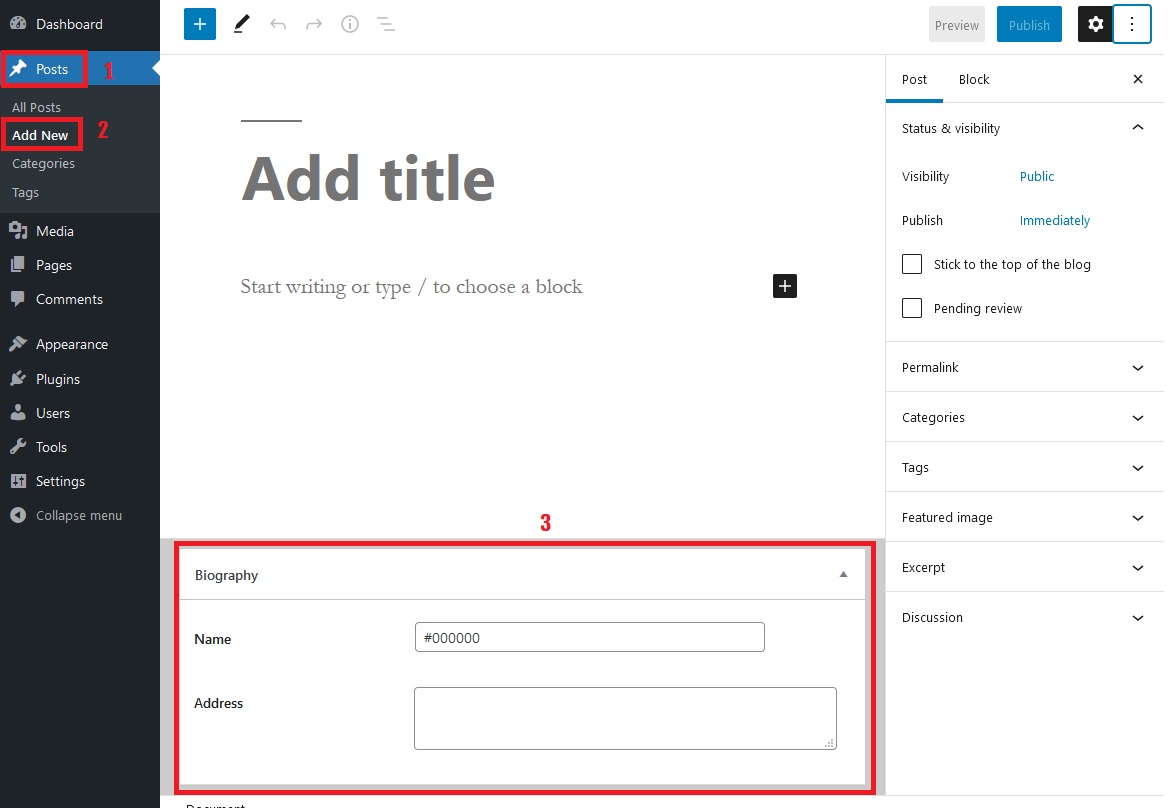
STEP 3: TEST THE PROJECT
-
In order to make it easier to check using the default Posts Type, please change the Screen box settings for a while by checking the post
-
Login to your WordPress Dashboard and Go to Posts menu then click Add New, the fields should already be there.
Last update: 2021-04-25 05:11:21
9) How to add JavaScript files into WordPress?
If you want to insert a javascript file into WordPress, you must use
STEP 1: GENERATE ENQUEUE SCRIPTS CODES
Go to Enqueue Scripts page by clicking Enqueue then Scripts menu on side menu, then we click Add New Scripts button
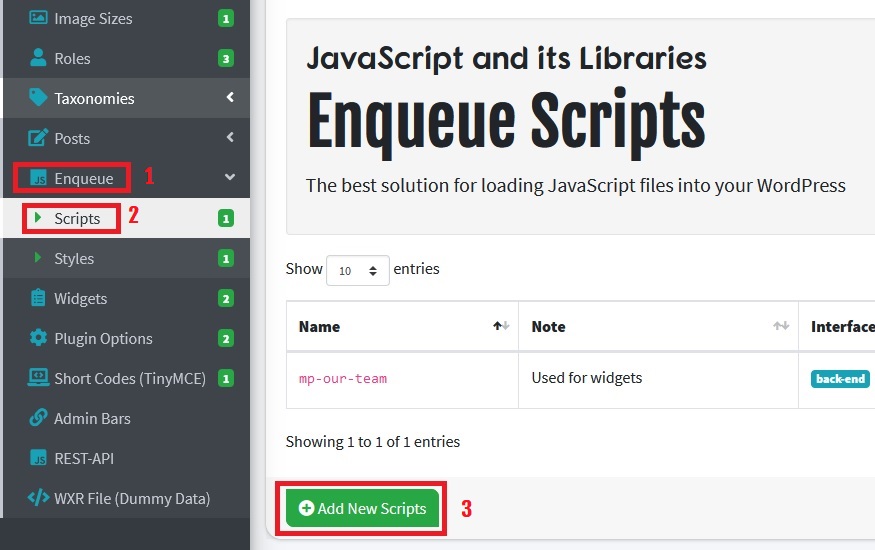
After that, complete the form provided and press the Save Changes button.
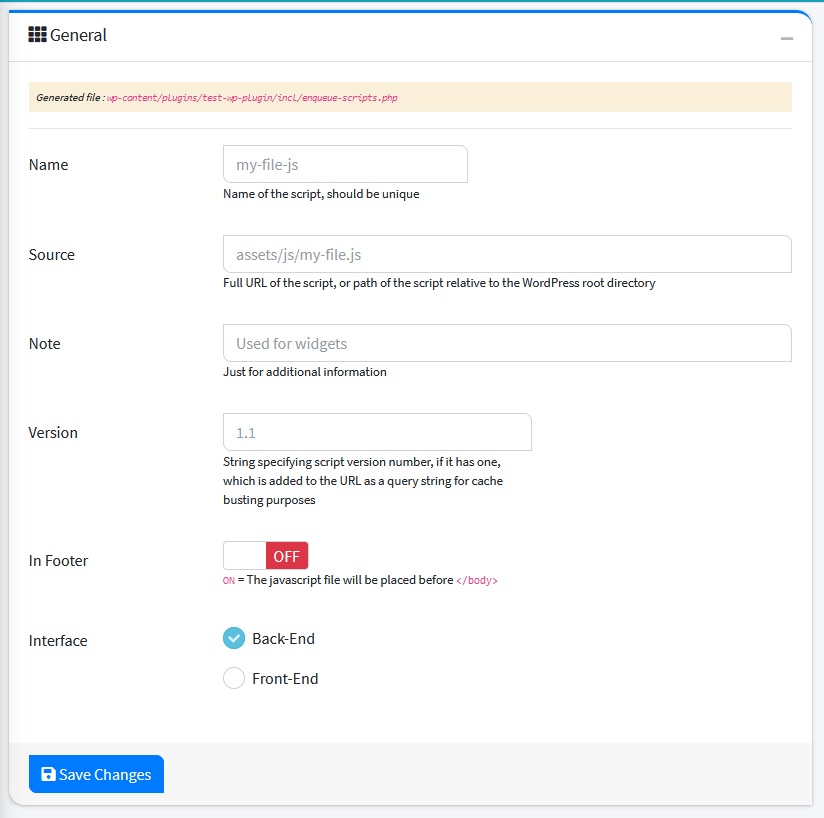
General Box
| Name | Info | Example |
|---|---|---|
| Name | Name of the script, should be unique | my-file-js |
| Source | Full URL of the script, or path of the script relative to the WordPress root directory | asset/js/my-file.js |
| Note | Just for additional information | Used For Widget |
| Version | String specifying script version number, if it has one, which is added to the URL as a query string for cache busting purposes | 1.1 |
| In Footer | ON = The javascript file will be placed before </body> |
OFF |
| Interface | Where the script will be inserted at: Front-End or Back-End | Back-End |
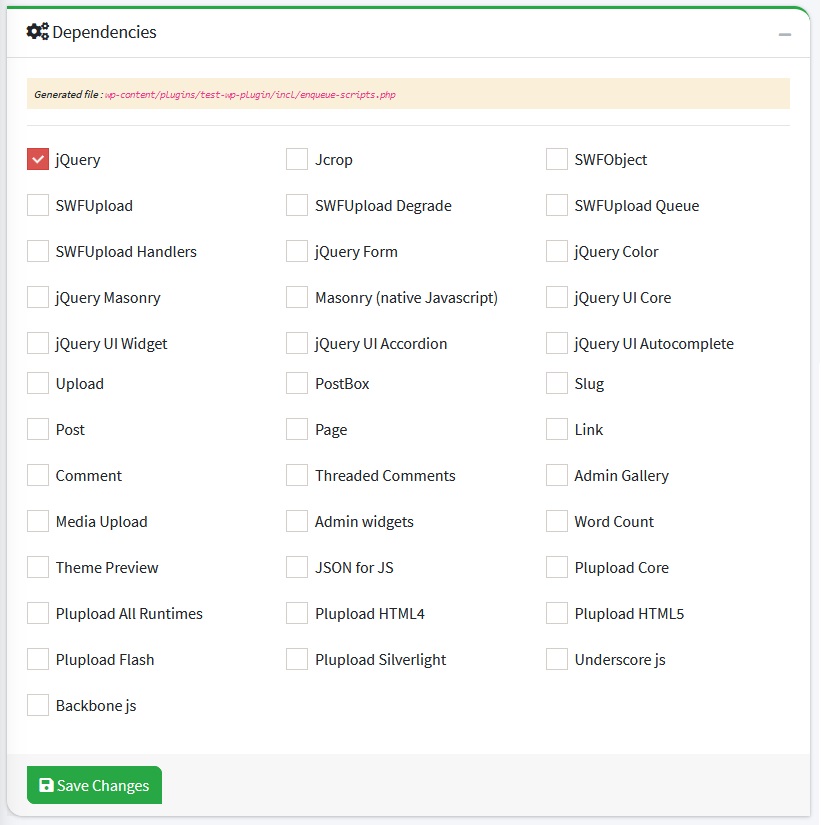
Dependencies Box
Please tick the libraries used for the code dependencies you are using, eg: jQuery
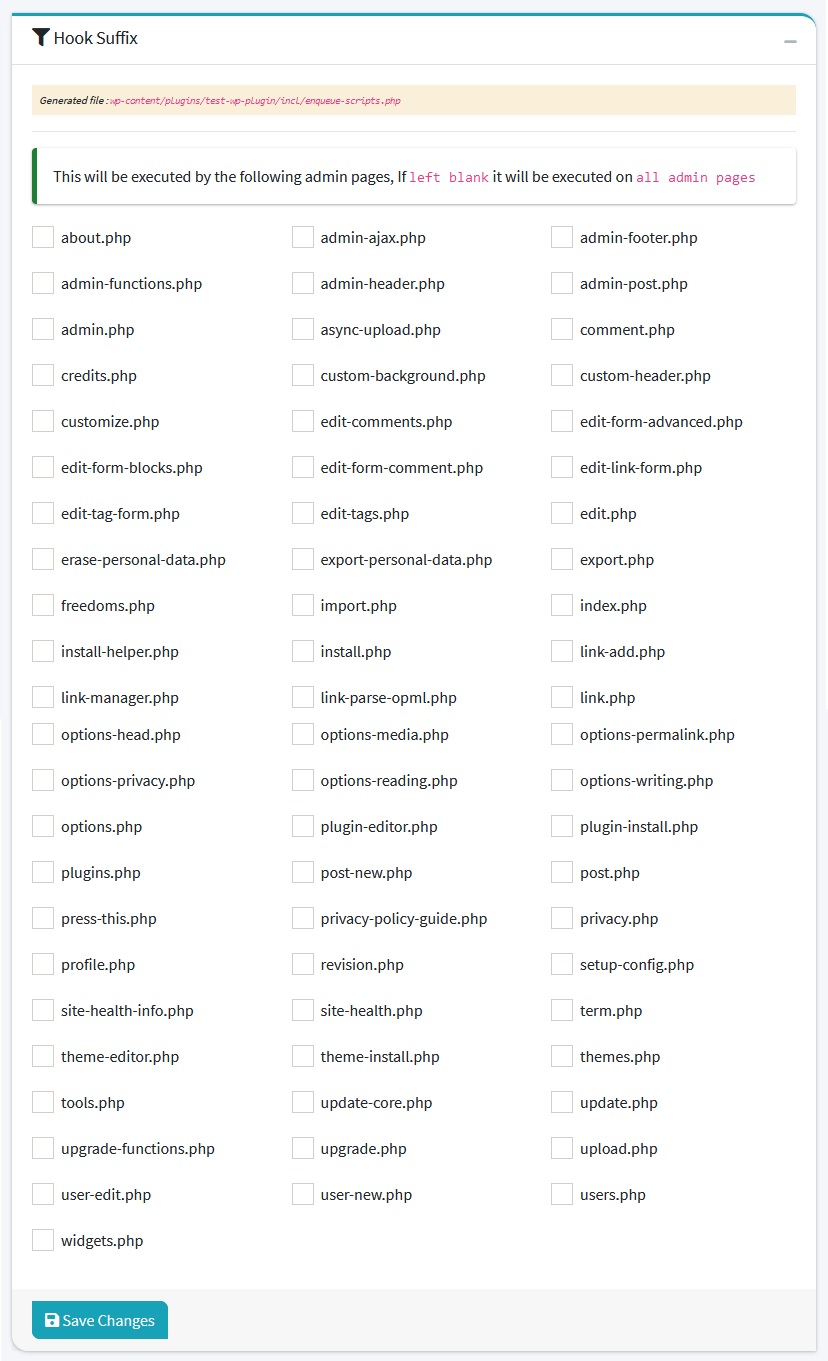
Hook Suffix Box
Restrict script from being executed on other pages.
STEP 2: TEST THE PROJECT
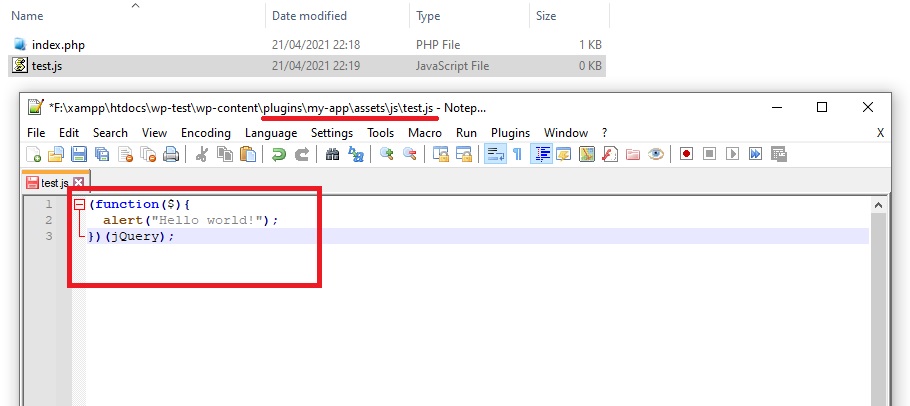
-
Write the code below and save it in the folder:
yourplugin/assets/js/test.js(function($){ alert("Hello world!"); })(jQuery);
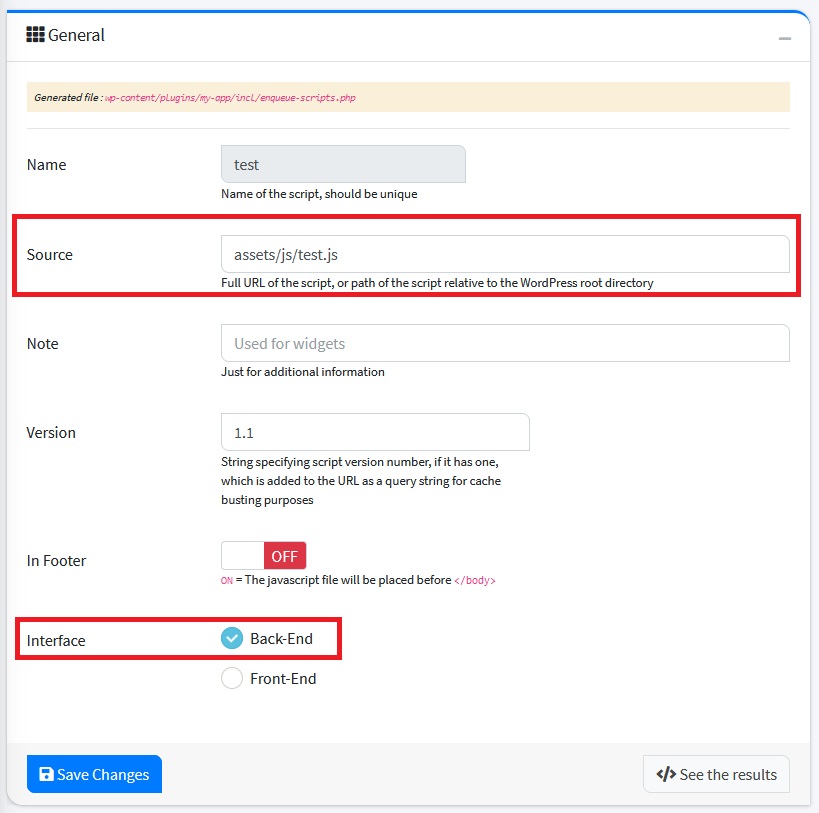
-
In order to make it easier to check, change general settings: Source =
assets/js/test.jsand Interface =Back-Endand Dependencies =jquery
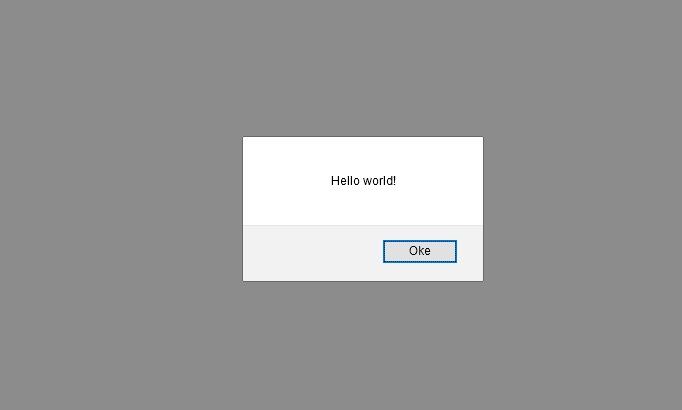
-
Login to your WordPress Dashboard and the alert message should appear on your dashboard.
- If the code doesn't work, either try clearing the cache or running the browser in private mode
Last update: 2021-04-24 06:27:31
10) How to add Style files into WordPress?
Just like javascripts, you must use Enqueue Styles to insert styles or css files into your WordPress
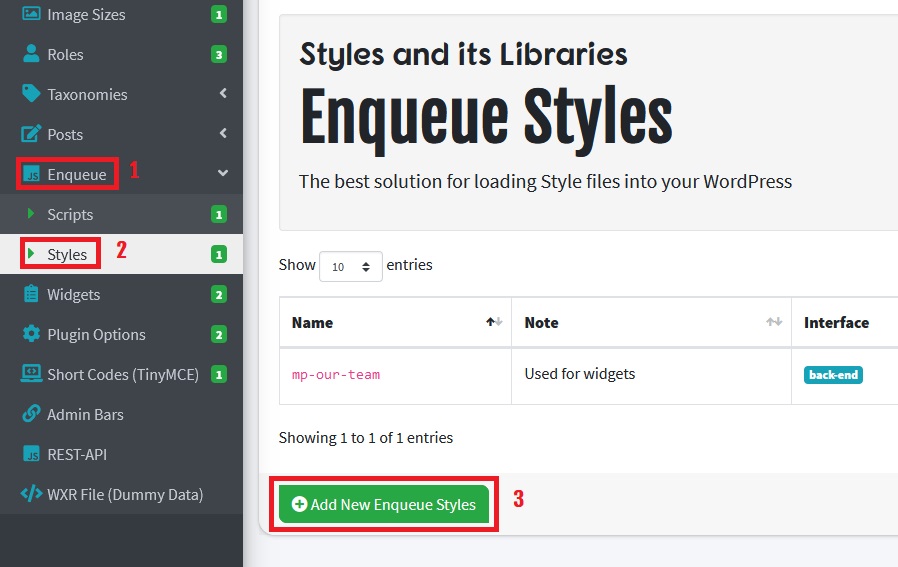
STEP 1: GENERATE ENQUEUE STYLES CODES
How to make the code is very easy, go to the Enqueue and Styles menu and click the Add New Enqueue Styles button, then complete the form provided and click Save Changes button
General Box
| Name | Info | Example |
|---|---|---|
| Name | Name of the stylesheet, should be unique | my-style |
| Note | Just for additional information | Used For Widged |
| Source | Full URL of the stylesheet, or path of the stylesheet relative to the WordPress root directory | asset/css/my-file.css |
| Version | String specifying stylesheet version number | 1.1 |
| Interface | Back-End | |
| Media | The media for which this stylesheet has been defined |

Dependencies Box
Dependencies for these styles, this is necessary so that the code is executed after the dependencies have been processed.
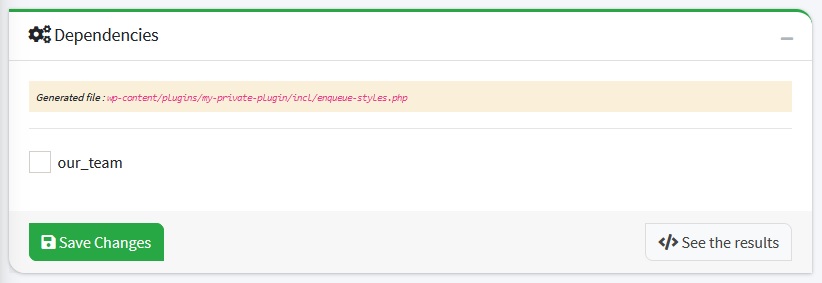
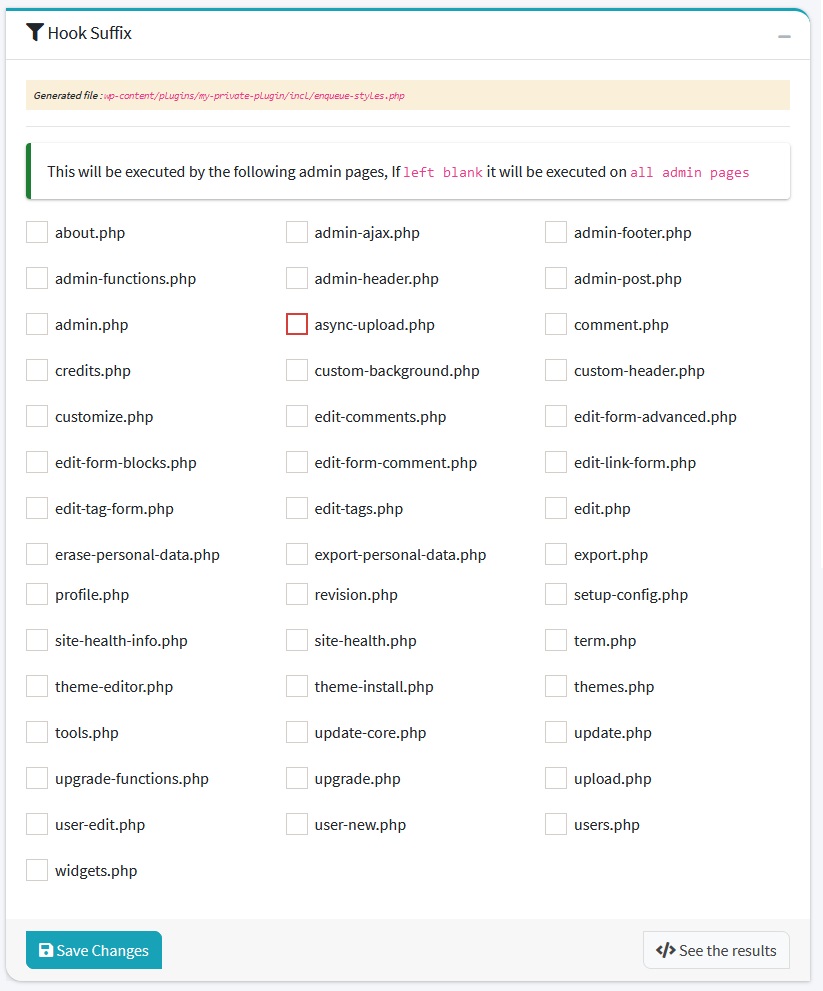
Hook Suffix Box
So that using styles does not affect other pages, you can use this feature.
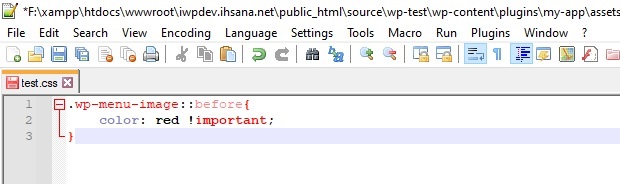
STEP 2: TEST THE PROJECT
-
for testing we set the icon color on the navigation menu, write the code below and save it in the folder:
yourplugin/assets/css/test.css.wp-menu-image::before{color: red !important;}
-
In order to make it easier to check, change General settings: Source =
assets/css/test.cssand Interface =Back-End
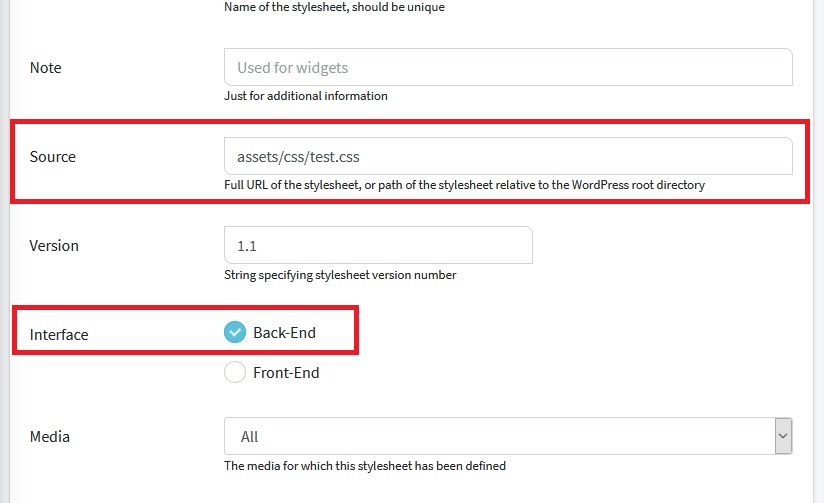
-
Login to your WordPress Dashboard and the icon on the navigation menu should be red.
- If the code doesn't work, either try clearing the cache or running the browser in private mode
Last update: 2021-04-24 11:18:50
11) How to create Custom WordPress Widgets?
In WordPress, widgets are blocks of content that you can add to your site's sidebars, footers, and other area.
STEP 1: GENERATE WIDGETS CODES
Widgets can be made by going to the Appearance menu then clicking the Widgets, The widgets page will appear, then click the Add New Widget button. Complete the form provided then click Save Changes button.
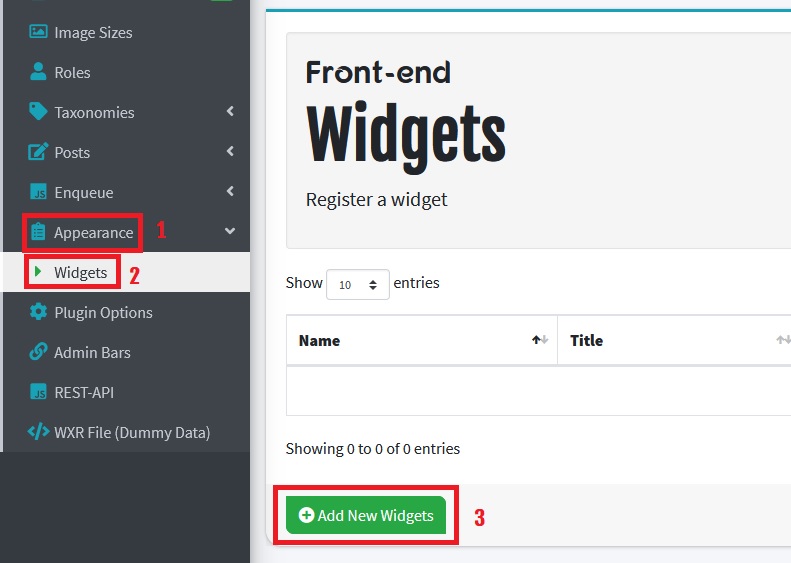
The following are the forms that must be filled out:
General Box
| Name | Info | Example |
|---|---|---|
| Name | Only contain a-z, 0-9, and - characters | my-widget |
| Title | The widget title will appear on the dashboard | My Widget |
| Description | The widget description will appear on the dashboard | |
| Type Generator | Auto Code | |
| Copy To Custom Code | This will overwrite your custom code, this is useful if you need code samples. | ON |

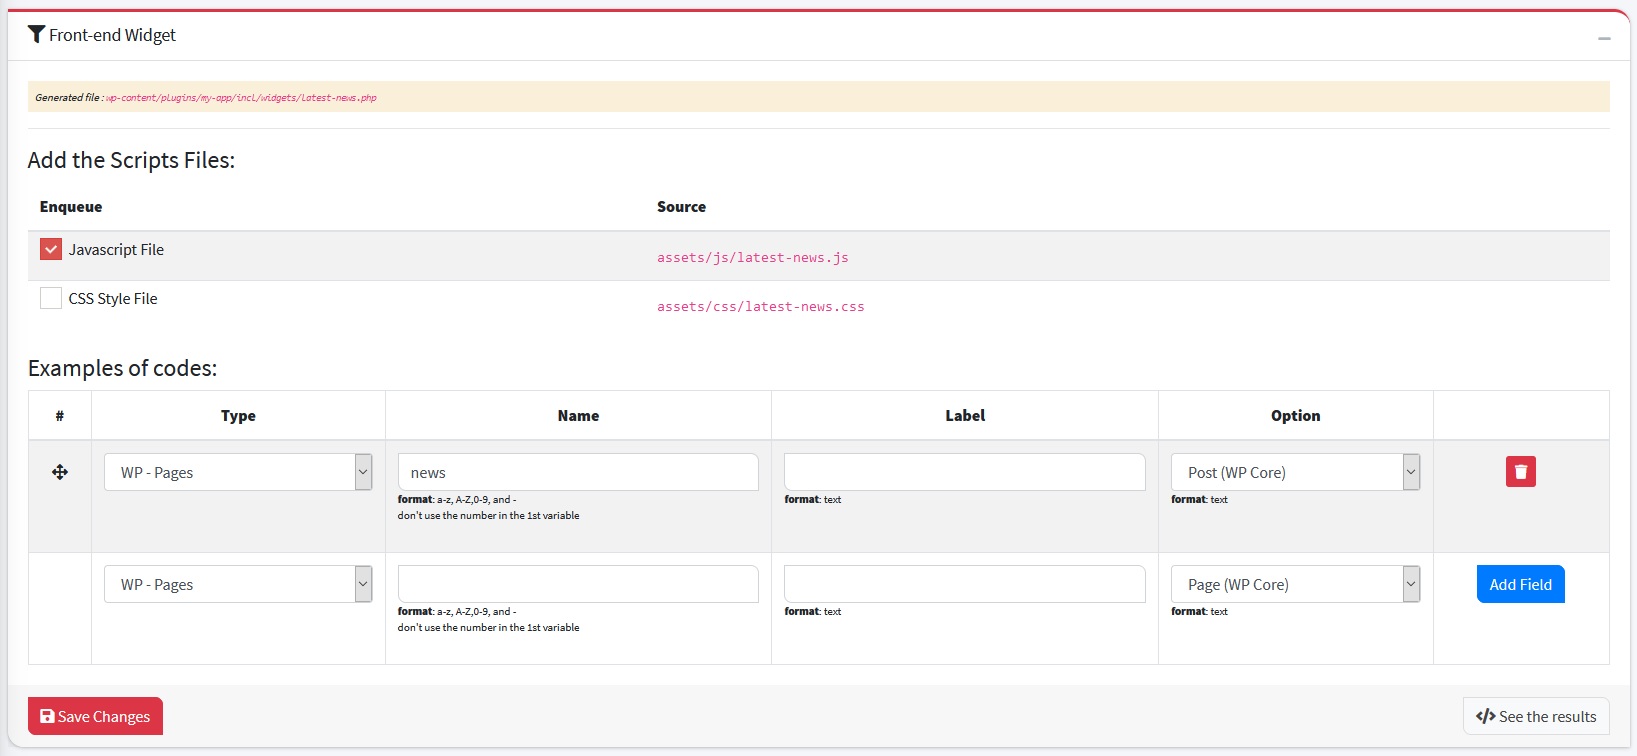
Front-end Widget Box
In this feature you can add scripts to your widget, you just need to tick Javascript File or CSS Style File. And as well as the sample code needed to create your widget, you just need to add what code samples you need. code will be generated to your widget.
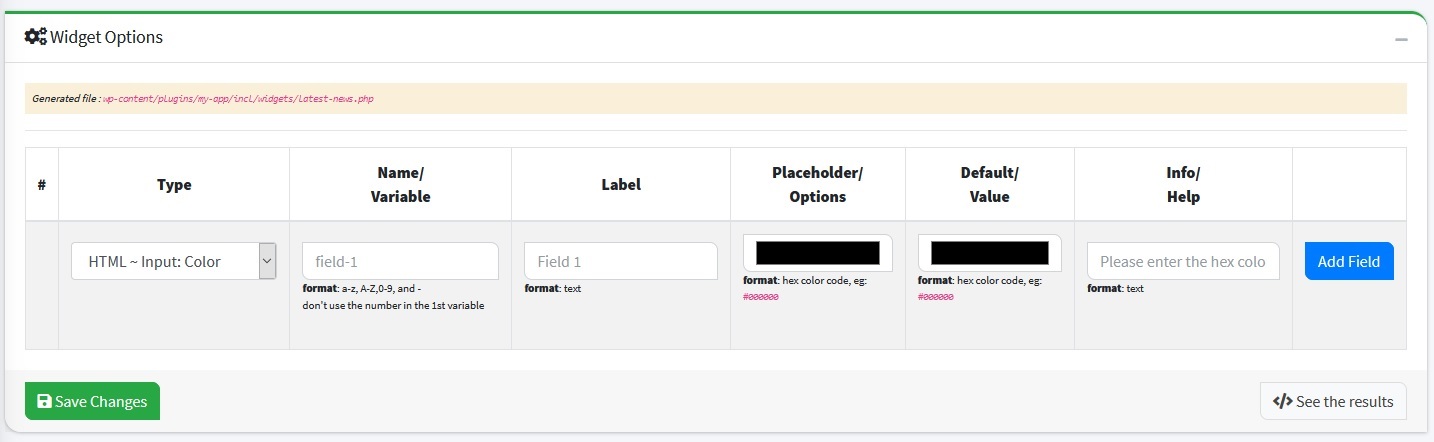
Widget Options Box
You can also make options for your widget such as color options, number and others
Custom Code Box
This field is used to modify code generated automatically
STEP 2: CUSTOM CODE
To use this feature you must change the General Settings: Type Generator = Custom Code and Copy To Custom Code = OFF, after the settings are changed, you can edit the code in Custom Code Box
STEP 3: TEST THE PROJECT
- Login to your WordPress Dashboard, go to the Appearance menu, and select Widgets. You should see a widget named your widget in the Available Widgets list
- Next, drag the widget and drop it in the Sidebar section on the right side of the page
- Save your changes and visit your website
Last update: 2021-04-25 05:24:54
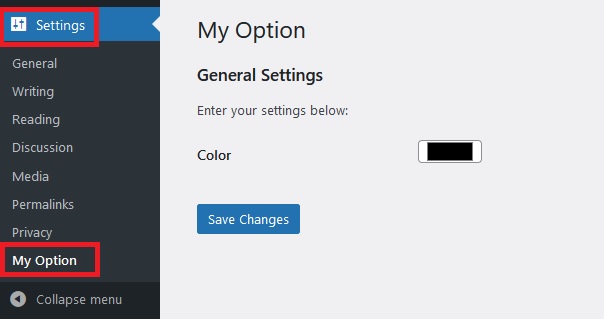
12) How to create Plugin Options in WordPress?
By using this feature you can easily create options for your plugins, You can make options like: date, number, color, range, telp etc
STEP 1: GENERATE PLUGIN-OPTION CODES
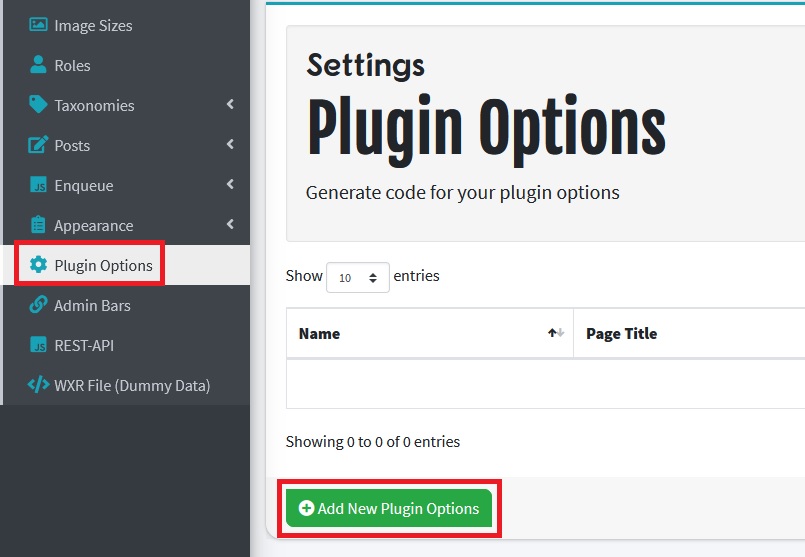
To create plugin option code go to the Plugin Options menu, The Plugin Options page will appear then click Add New Plugin Options button, and complete the requested data then click Save Changes button.
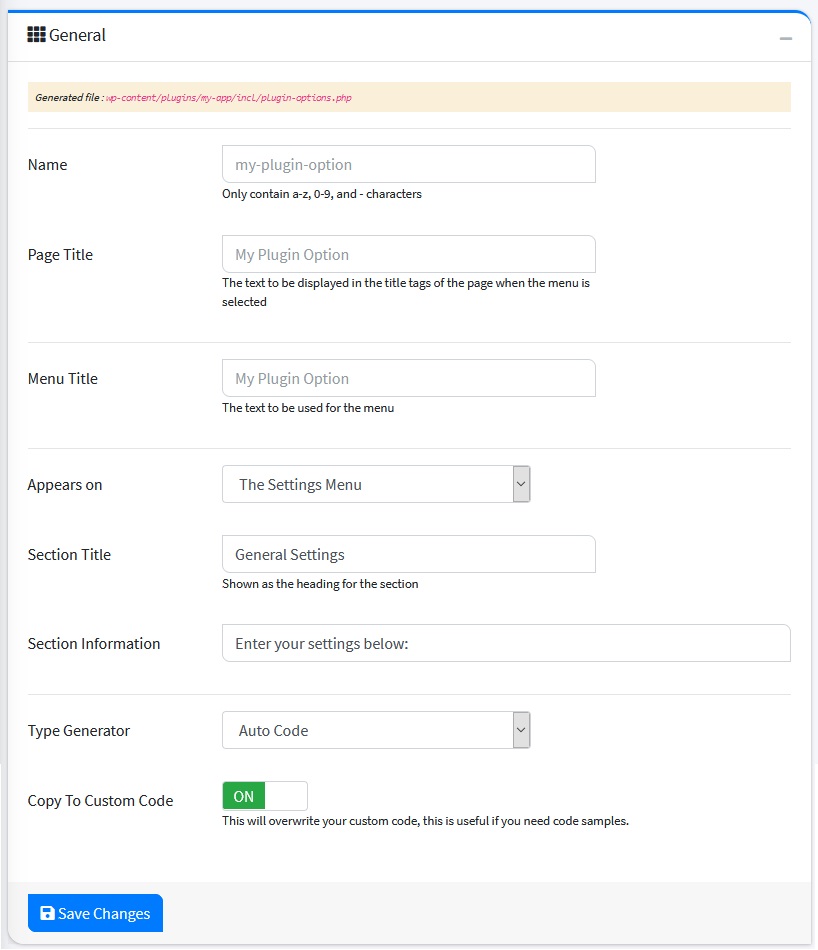
General Box
| Name | Info | Example |
|---|---|---|
| Name | Only contain a-z, 0-9, and - characters | my-plugin-option |
| Page Title | The text to be displayed in the title tags of the page when the menu is selected | My Plugin Option |
| Menu Title | The text to be used for the menu | My Plugin Option |
| Appears on | Will the menu appear on The Setting Menu or The Top Level Menu | The Setting Menu |
| Section Title | Shown as the heading for the section | General Settings |
| Section Information | Enter your Settings Below: | |
| Type Generator | Auto Code | |
| Copy To Custom Code | This will overwrite your custom code, this is useful if you need code samples. | ON |
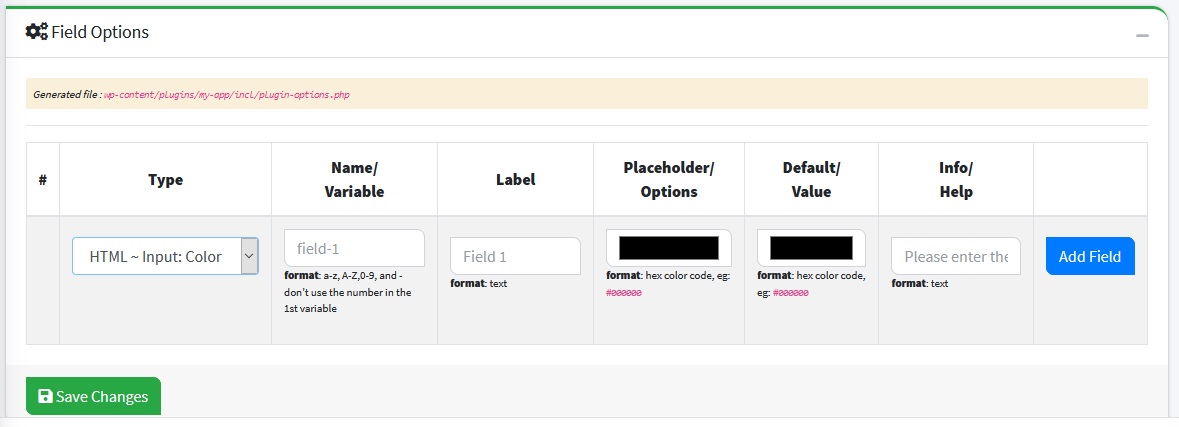
Field Options Box
The contents of this box are the input forms for plugin options
Custom Codes Box
This field is used to modify code generated automatically
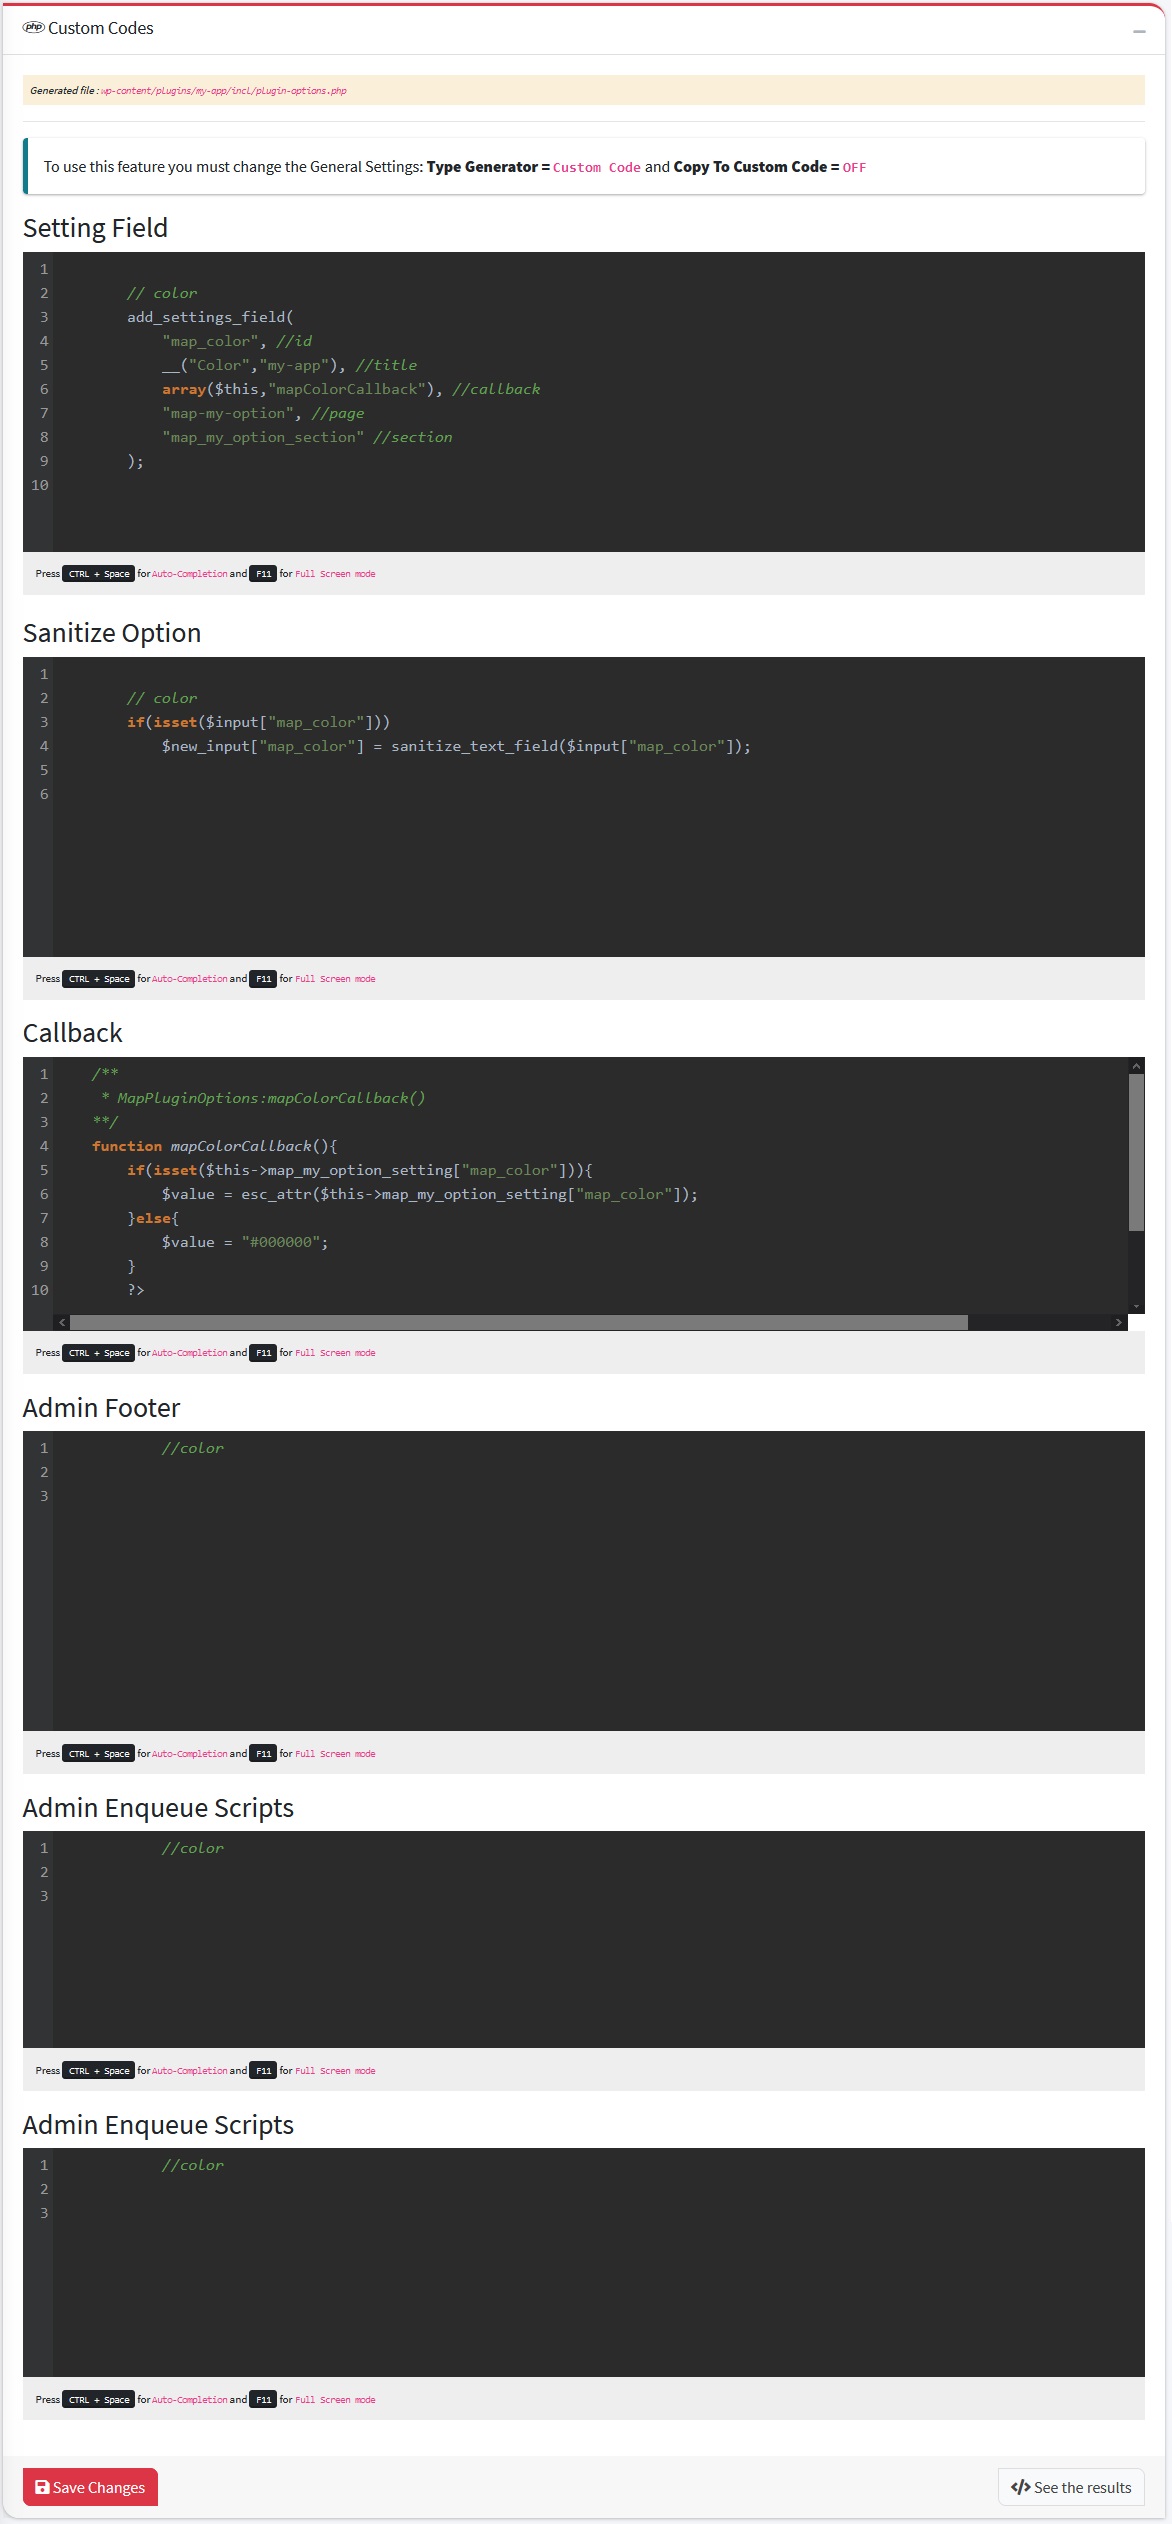
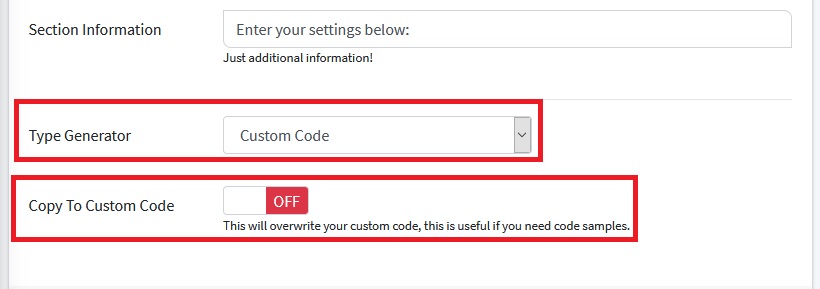
STEP 2: CUSTOM CODE
To use this feature you must change the General Settings: Type Generator = Custom Code and Copy To Custom Code = OFF, after the settings are changed, you can edit the code in Custom Code Box
STEP 3: TEST THE PROJECT
Login to WordPress Dashboard and the options page should already be there (The Top Level Menu) or you can see menu on Settings menu
Last update: 2021-04-29 01:53:12
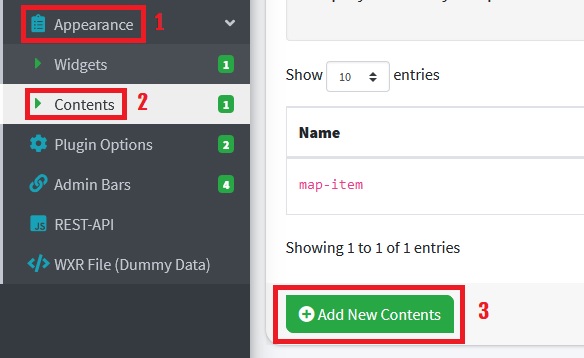
13) How to change Post Layout in WordPress?
Sometimes, we need to modify the layout for the post, this can be done using the following methods:
STEP 1: GENERATE CONTENT CODES
To change layout post go to the Appearance menu then click Content, The content page will appear then click Add New Content button, and complete the requested data then click Save Changes button.
Information fields that must be filled are as follows:
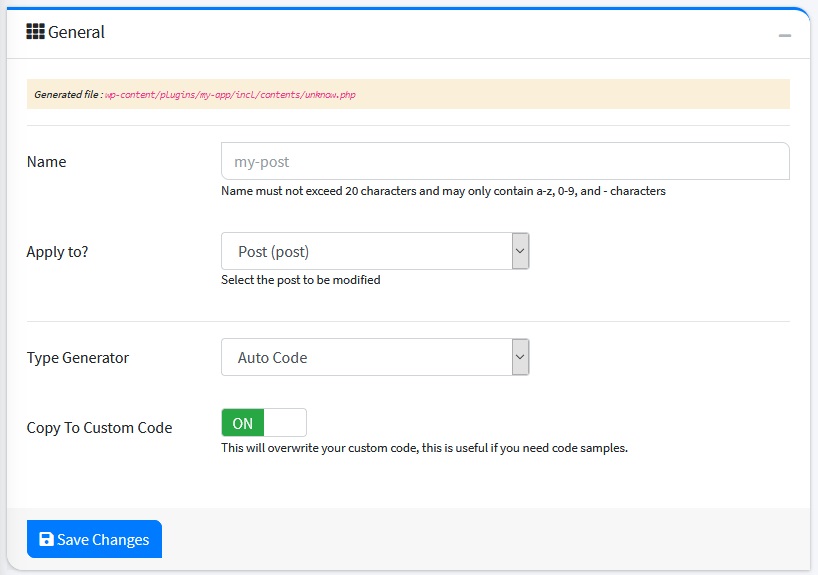
General Box
| Name | Info | Example |
|---|---|---|
| Name | Name must not exceed 20 characters and may only contain a-z, 0-9, and - characters | my-post |
| Apply to? | You can add fields to the selected taxonomies | Post Tag |
| Type Generator | Auto Code | |
| Copy To Custom Code | This will overwrite your custom code, this is useful if you need code samples | ON |
Front-end Content Box
In this feature you can add scripts to your content layout, you just need to tick Javascript File or CSS Style File. And as well as the sample code needed to create your content layout, you just need to add what code samples you need. code will be generated to your content layout.

Custom Code Box
This field is used to modify code generated automatically
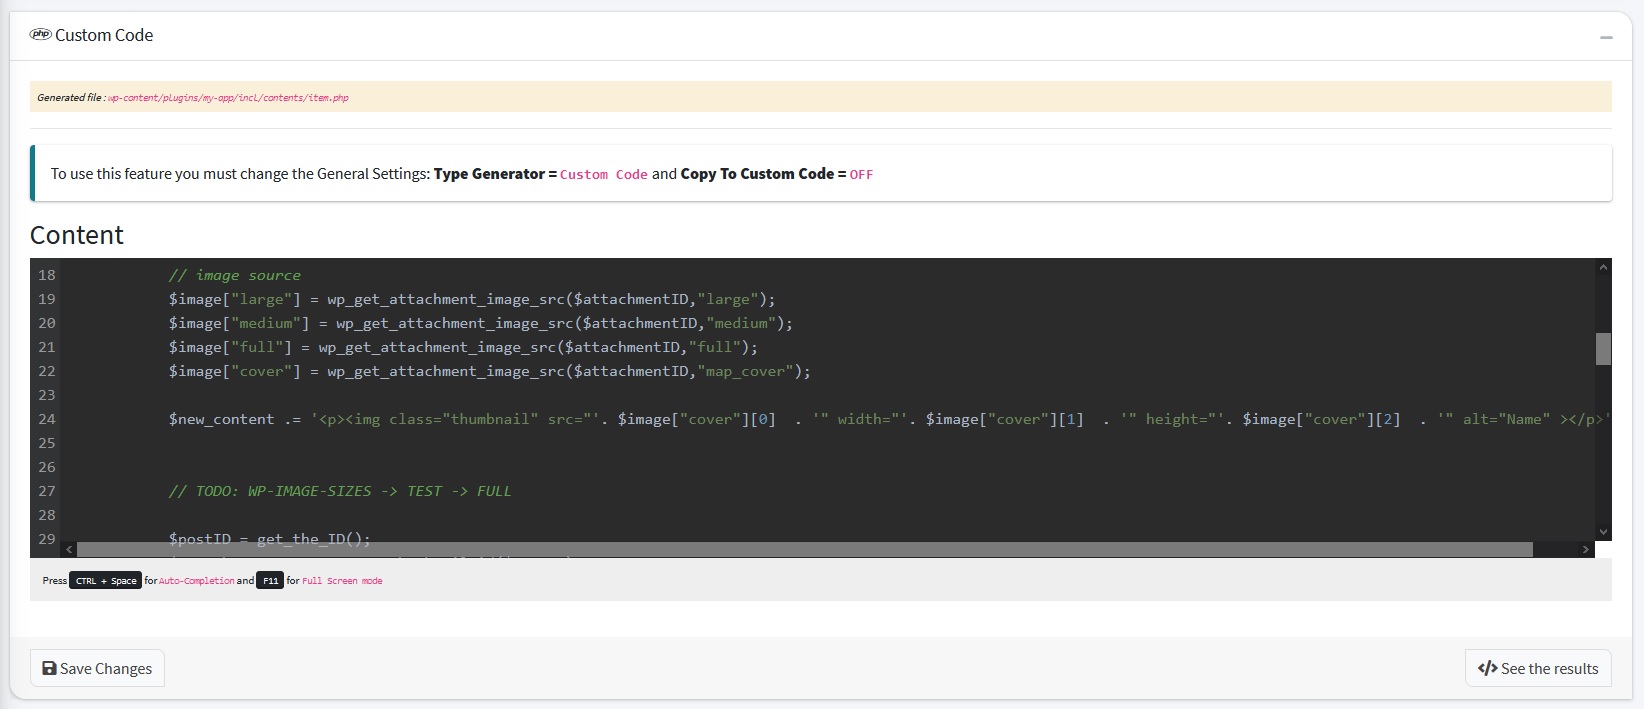
STEP 2: CUSTOM CODE
To use this feature you must change the General Settings: Type Generator = Custom Code and Copy To Custom Code = OFF, after the settings are changed, you can edit the code in Custom Code Box
STEP 3: TEST THE PROJECT
To test the project, please go to the post page on your WordPress.
Last update: 2021-05-07 03:26:48
14) How to create Short Codes in WordPress?
Short codes that are used to change content formatting or add features to web pages and TinyMCE plugin makes it more user friendly.
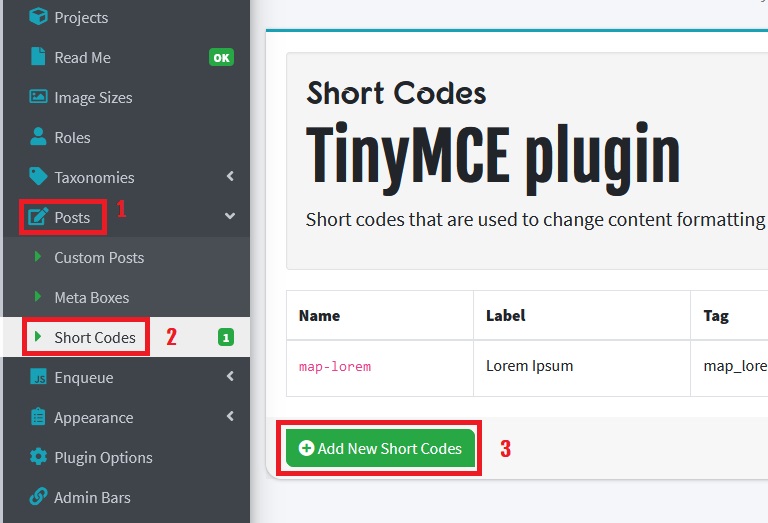
STEP 1: GENERATE SHORT-CODE CODES
Go to the Posts menu then clicking the Short Codes, The Short Code page will appear, then click the Add New Short Code button. Complete the form provided then click Save Changes button.
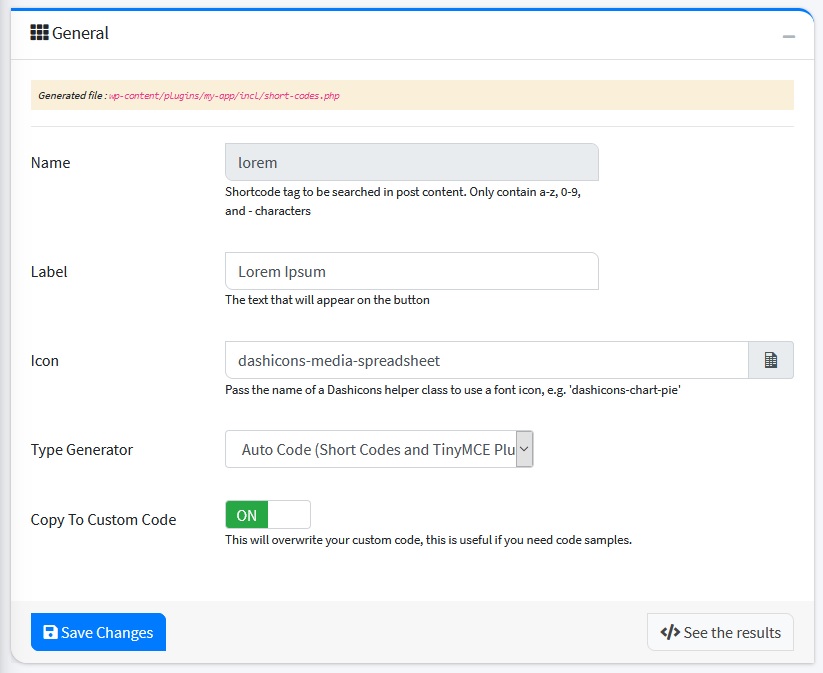
General Box
| Name | Info | Example |
|---|---|---|
| Name | Shortcode tag to be searched in post content. Only contain a-z, 0-9, and - characters | lorem-ipsum |
| Label | The text that will appear on the button | Lorem Ipsum |
| Icon | Pass the name of a Dashicons helper class to use a font icon, e.g. 'dashicons-chart-pie' | dashicons-media-spreadsheet |
| Type Generator | Auto Code | |
| Copy To Custom Code | This will overwrite your custom code, this is useful if you need code samples. | ON |
Front-end Shortcodes Box
You can add scripts to your short-code, you just need to tick Javascript File or CSS Style File. and the same goes for the shortcode replacement code (content render), you just need to add what code samples you need. Sample code will be generated automatically .
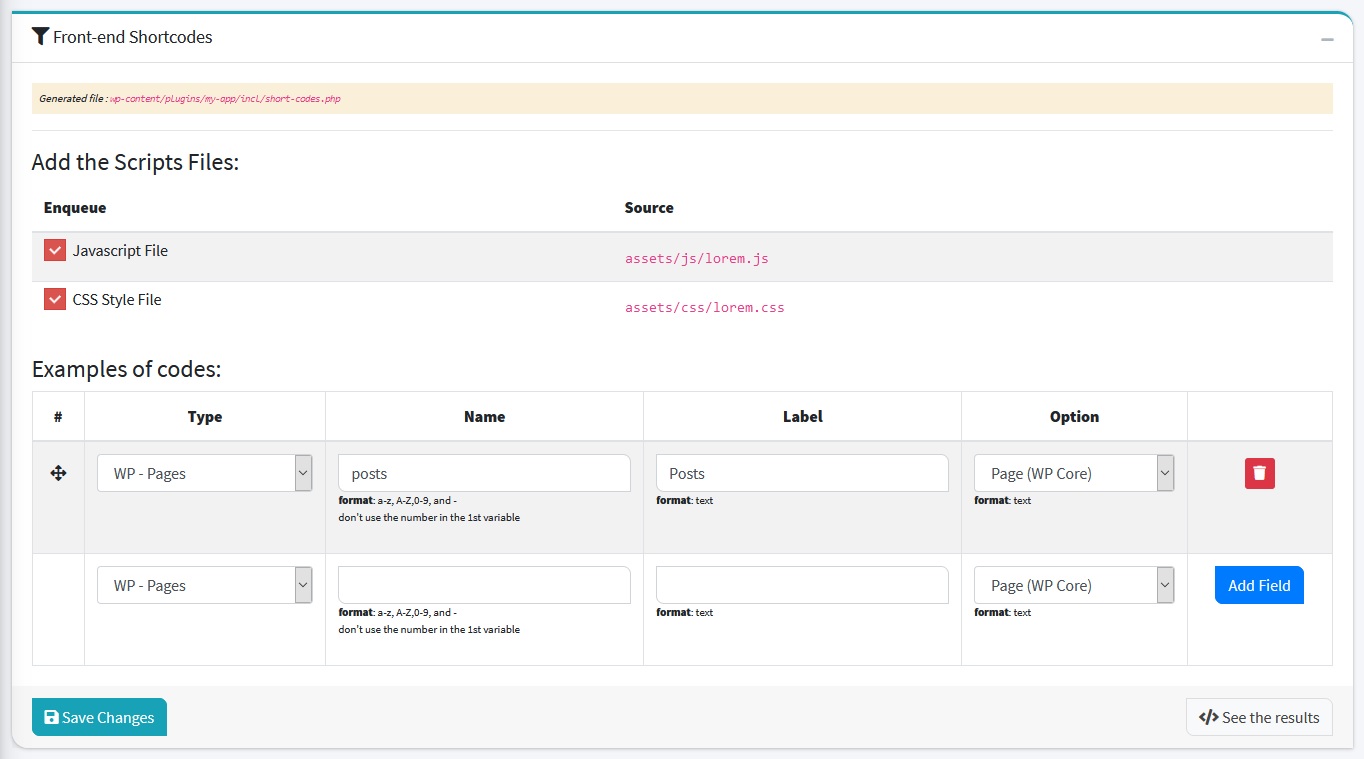
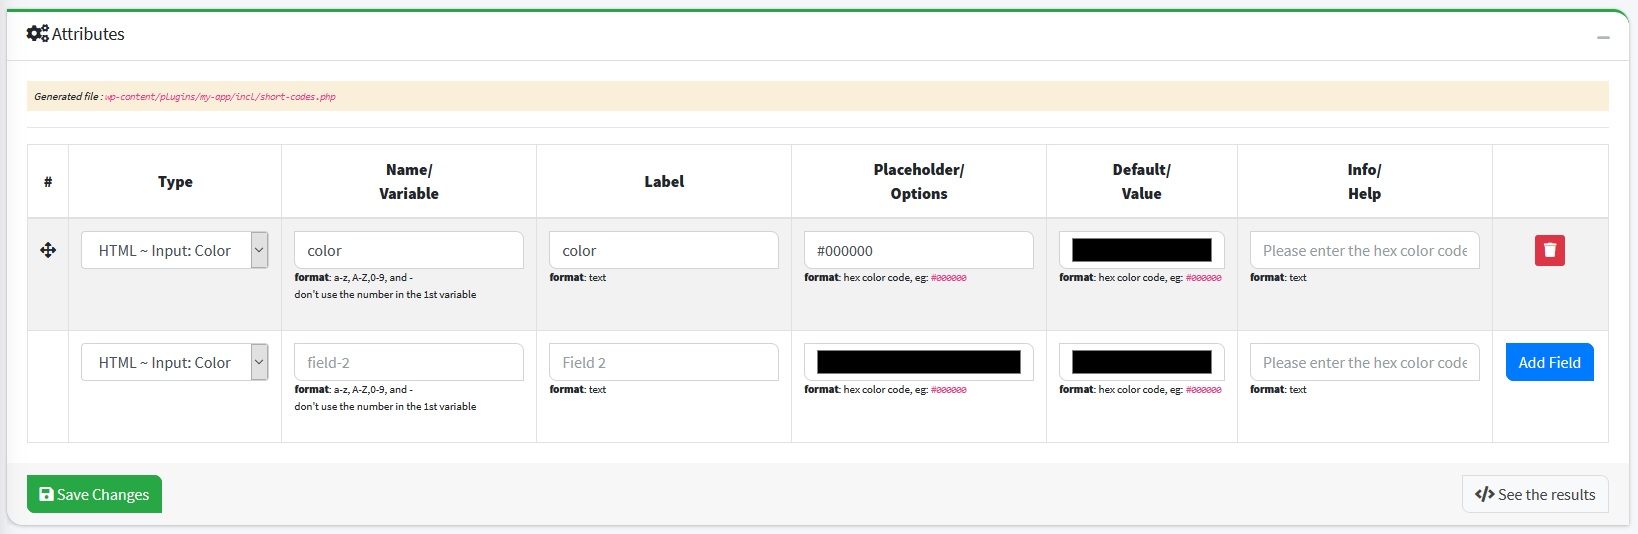
Attributes Box
You can make attributes for your short-code such as color options, number and others, example: [myshortcode color="#ddd"][/myshortcode]
Custom Code Box
This field is used to modify code generated automatically

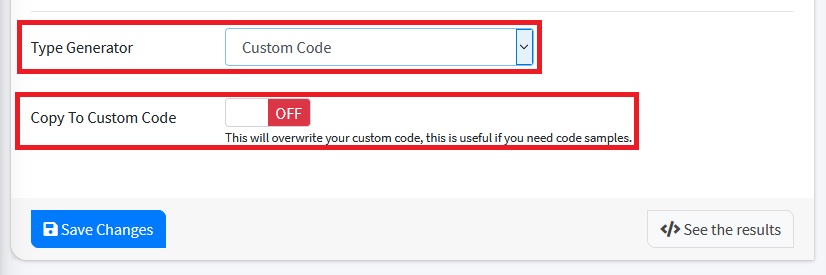
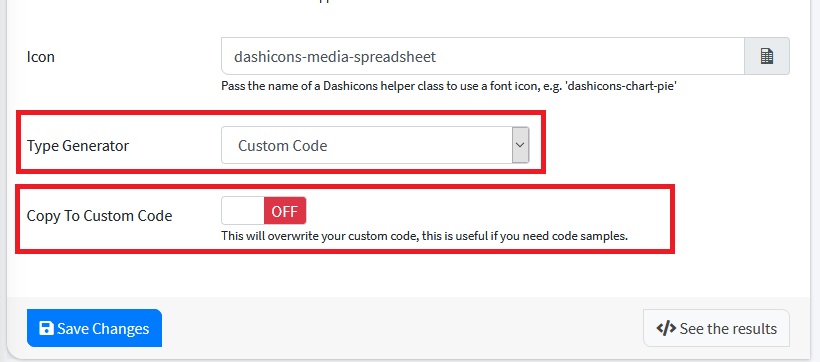
STEP 2: CUSTOM CODE
To use this feature you must change the General Settings: Type Generator = Custom Code and Copy To Custom Code = OFF, after the settings are changed, you can edit the code in Custom Code Box
STEP 3: TEST THE PROJECT
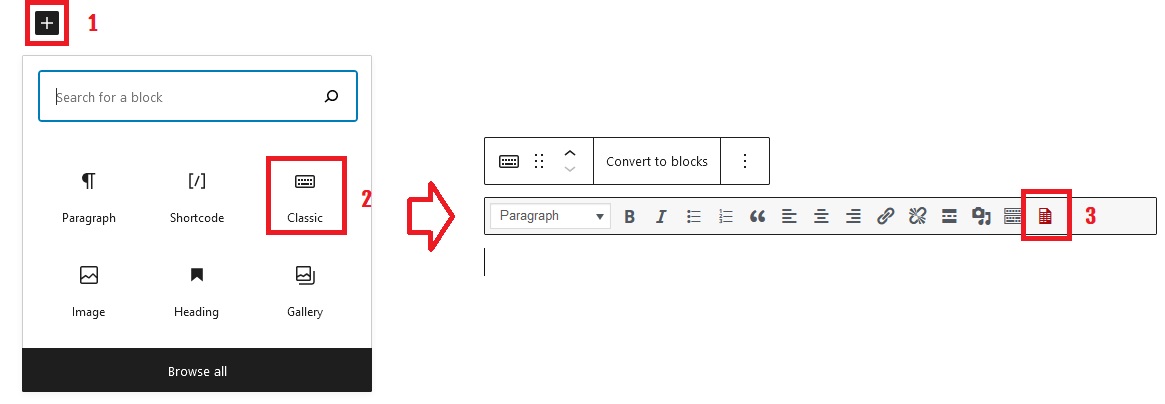
- Login to your WordPress Dashboard, go to the Posts menu, and Add New
- Next, Go to your Editor field, then click Add Block Then Blocks next click Text select Classic
- Publish your posts and visit your website
Last update: 2021-04-26 12:31:14
15) How to add navigation menus to the Admin Bar in WordPress?
STEP 1: GENERATE ADMIN-BAR CODES
Goto Admin Bar page by clicking Admin Bars menu on side menu, after that click Add New Admin Bars button. Then complete the fields provided and Click Save Changes Button.
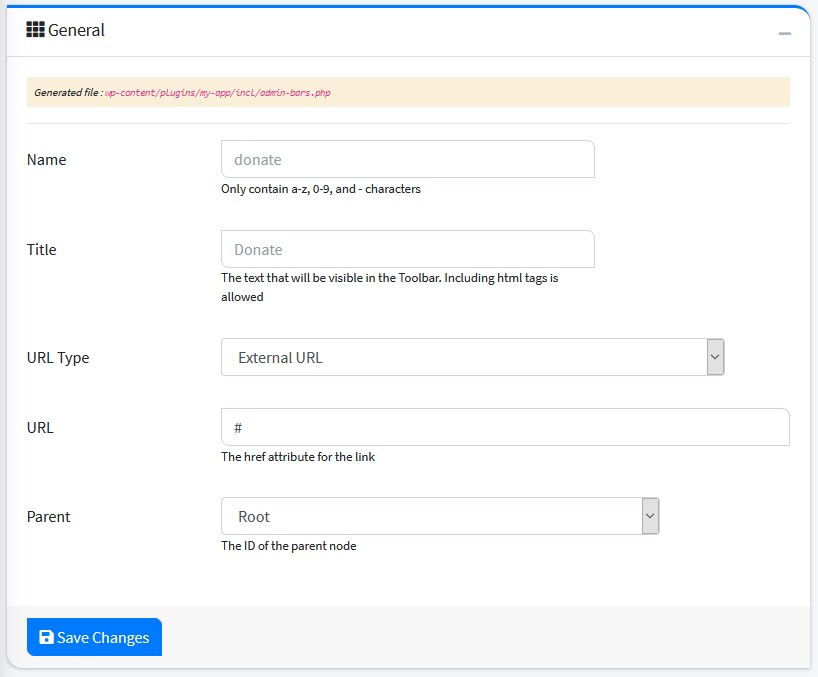
General Box
| Name | Info | Example |
|---|---|---|
| Name | Only contain a-z, 0-9, and - characters | Donate |
| Title | The text that will be visible in the Toolbar. Including html tags is allowed> | Donate |
| URL Type | External URL | |
| URL | The href attribute for the link | https://ihsana.com/donate |
| Parent | The ID of the parent node | Root |
STEP 2: TEST THE PROJECT
Login to your WordPress Dashboard and The admin bars that you created should already be in the top menu.
Last update: 2021-05-01 10:08:49
16) How to enable REST-API in WordPress?
For information about REST-API, you can go to REST-API on side menu.
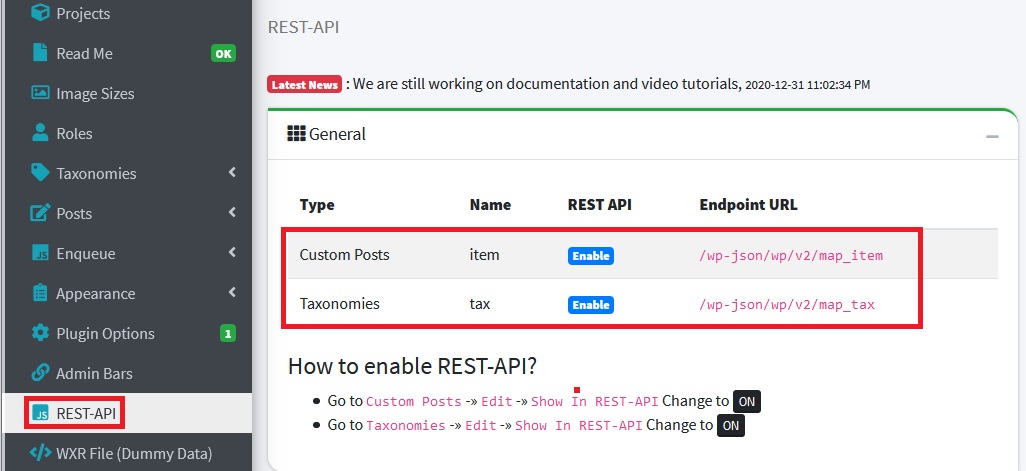
To activate rest-api, please follow the instructions below:
Posts
Go to Posts then click Custom Posts menu, then edit your custom Posts, then this option: Show In REST-API = ON

Taxonomies
Go to Taxonomies then click Custom Taxonomies menu, then edit your custom taxonomies, then this option: Show In REST-API = ON

Last update: 2021-04-29 02:58:19
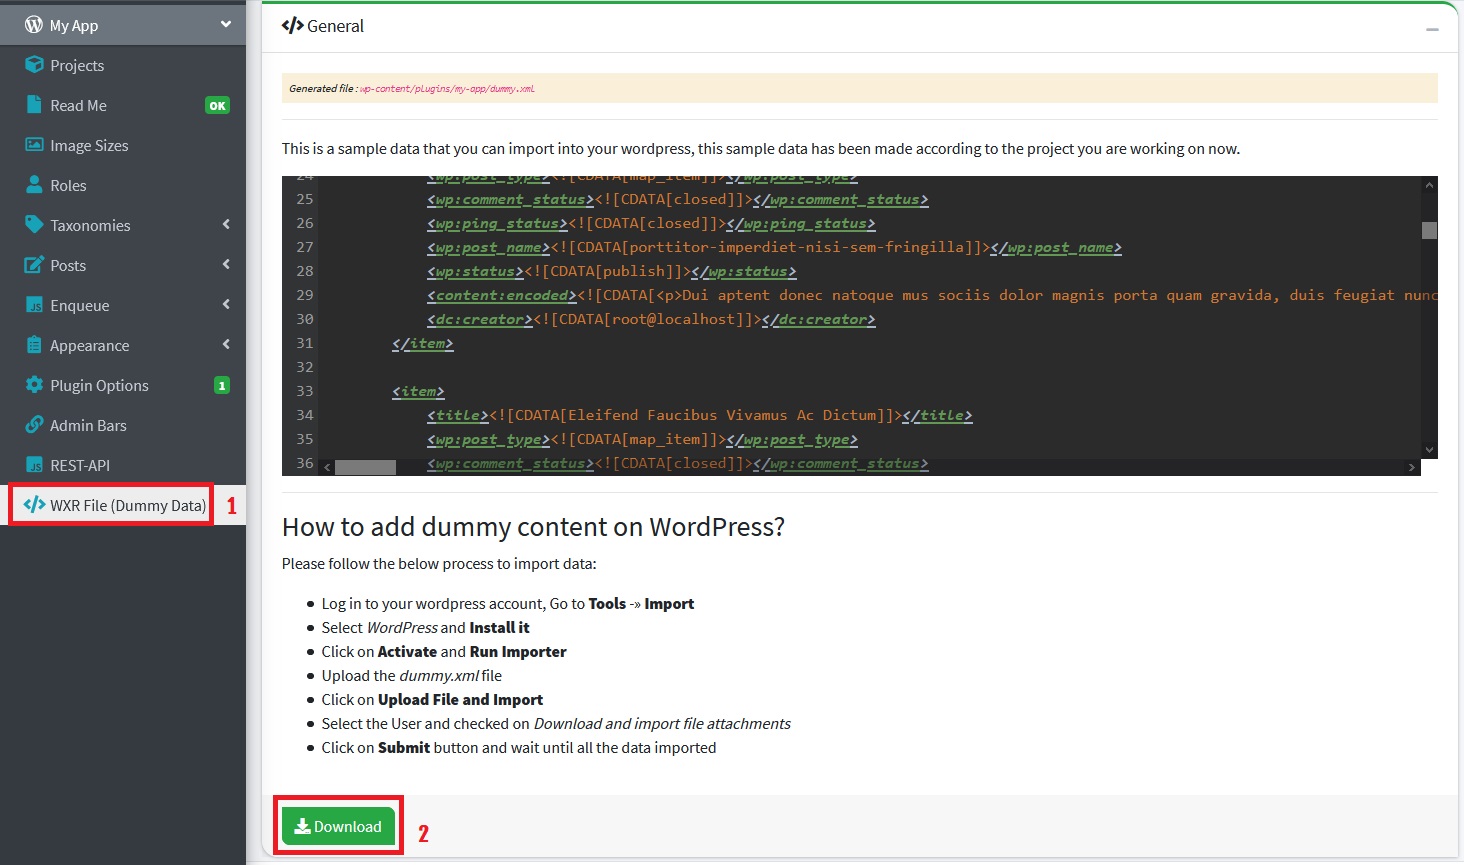
17) How to use WordPress Extended RSS (WXR File) ?
WXR File is a sample data that you can import into your wordpress, this sample data has been made according to the project you are working on now.
- Go to WXR File menu, then click Download button
- Log in to your WordPress Dashboard, Go to Tools then click Import
- Select WordPress and Install Now
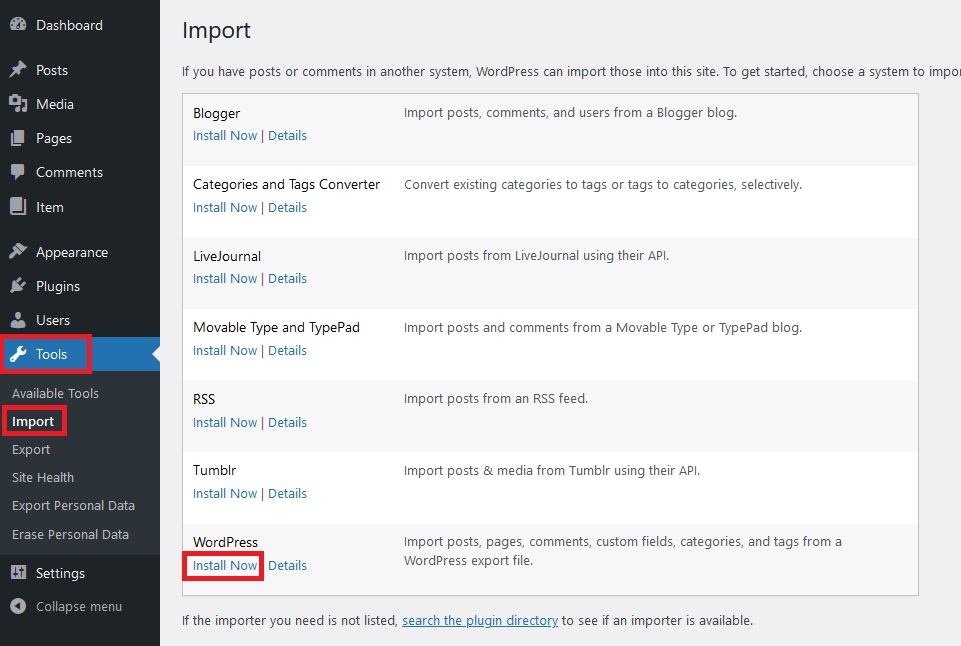
- Click Run Importer
- Upload the dummy.xml file
- Click on Upload File and Import
- Select the User and checked on Download and import file attachments
- Click on Submit button and wait until all the data imported
Last update: 2021-04-29 02:03:39
C. LICENSES
1) Tools License
The low-down! The nuts and bolts of this license
-
1. This license grants you, the purchaser, an ongoing, non-exclusive, non-transferable, worldwide license to make use of the digital Tool or App you have selected. Read the rest of this license for the details that apply to your use of the Tool or App, as well as the FAQs (which form part of this license).
-
2. This license is for one copy (one seat, or one usage at any one time) of the Tool or App, installed on up to 2 of your computers.
Go for it! Things you can do with the Tool or App
-
3. You can use a Tool to create an unlimited number of different End Products. You can use an App for its intended application. Both using a Tool and an App is conditional upon there only ever being one concurrent use of the item by you, the original purchaser.
-
4. You can sell End Products created using a Tool, to any number of people. As explained further on, the End Products must not contain the Tool or App itself.
Whoa there! Things you can’t do with the Tool or App
-
5. You can’t re-distribute a Tool or App (this includes no public distribution, display or performance). You also can’t modify or make derivatives of a Tool or App.
For example: You purchase a PSD brush; you can’t give the brush file to a friend.
The Tool or App is licensed to you ‘as is’ and is a complete item that cannot be modified. -
6. You can’t incorporate or distribute the Tool or the App with an End Product. But you may link the users of the End Product to where they can directly license the Tool or App.
For example: You license a font and use it in a poster template. You can’t include the font in the poster template download, but you can link buyers of the template to the font.
The nitty gritty! Other license terms
-
7. This license applies in conjunction with the Envato Market Terms for your use of Envato Market. If there is an inconsistency between this license and the Envato Market Terms, this license will apply to the extent necessary to resolve the inconsistency.
-
8. This license can be terminated if you breach it. If that happens, you must stop using the Tool or App and delete it from your computers.
-
9. The author of the Tool or App retains ownership of the item but grants you the license on these terms. This license is between the author and you. Envato Pty Ltd is not a party to this license or the one giving you the license.
Definitions
| Term used | Meaning |
|---|---|
| End Product | Any digital or printed work |
| Tool | An installable software application designed to perform specific tasks in order to create other works. Tools include fonts, extensions, 3D and video software scripts, 3D and video software plug-ins, and graphics software add-ons. |
| App | An installable software application designed to automate and perform specific tasks. Apps include email and file extractors, slideshow creators, data harvesters, crawlers, compressors, generators, and file importers and exporters. |
Last update: 2021-04-30 02:52:15
2) Third Parties
| Name | License | Author | URL |
|---|---|---|---|
| AdminLTE | MIT License | Colorlib | http://colorlib.com |
| Bootstrap | MIT | The Bootstrap Authors | https://github.com/twbs/bootstrap/graphs/contributors |
| Bootstrap Switch | Apache-2.0 | Mattia Larentis | https://bttstrp.github.io/bootstrap-switch |
| Bootstrap Tags Input | MIT License | Tim Schlechter | https://github.com/bootstrap-tagsinput/bootstrap-tagsinput |
| Chart.js | MIT License | Chart.js Contributors | https://www.chartjs.org |
| CodeMirror | MIT License | Marijn Haverbeke and others | https://codemirror.net |
| Dashicons | GPL 2.0 or later | WordPress | https://github.com/WordPress/dashicons |
| DataTables | MIT License | SpryMedia Ltd | http://www.datatables.net |
| DataTables AutoFill | MIT License | SpryMedia Ltd | http://www.datatables.net |
| DataTables Bootstrap 4 integration | MIT License | SpryMedia Ltd | http://www.datatables.net |
| DataTables Buttons | MIT License | SpryMedia Ltd | http://www.datatables.net |
| DataTables ColReorder | MIT License | SpryMedia Ltd | http://www.datatables.net |
| DataTables FixedColumns | MIT License | SpryMedia Ltd | http://www.datatables.net |
| DataTables FixedHeader | MIT License | SpryMedia Ltd | http://www.datatables.net |
| DataTables KeyTable | MIT License | SpryMedia Ltd | http://www.datatables.net |
| DataTables Responsive | MIT License | SpryMedia Ltd | http://www.datatables.net |
| DataTables RowGroup | MIT License | SpryMedia Ltd | http://www.datatables.net |
| DataTables RowReorder | MIT License | SpryMedia Ltd | http://www.datatables.net |
| DataTables Scroller | MIT License | SpryMedia Ltd | http://www.datatables.net |
| DataTables Select | MIT License | SpryMedia Ltd | http://www.datatables.net |
| Font Awesome Free | MIT, SIL OFL, and CC | @fontawesome | https://fontawesome.com |
| iCheck Bootstrap | MIT License | Hovhannes Bantikyan | https://fontawesome.com |
| jQuery | MIT License | JS Foundation | https://jquery.com/ |
| Jquery Mapael | MIT License | Vincent Brouté | https://www.vincentbroute.fr/mapael |
| jQuery UI | MIT License | JS Foundation | http://jqueryui.com |
| Overlay Scrollbars | MIT License | KingSora | Rene Haas | https://github.com/KingSora/OverlayScrollbars |
| Raphaël | MIT License | Dmitry Baranovskiy | http://raphaeljs.com |
| SweetAlert2 | MIT License | Tristan Edwards & Limon Monte | https://sweetalert2.github.io/ |
| SweetAlert2 Theme Bootstrap 4 | MIT License | SweetAlert2 | https://sweetalert2.github.io/ |
| Toast | MIT License | Toastr Maintainers | https://github.com/CodeSeven/toastr |
Last update: 2021-05-03 12:03:44
Video Tutorials
- [DIY] How to Install iWP Dev Toolz v2 [English]
- [DIY] How to Install iWP Dev Toolz v2 [Bahasa Indonesia]
- [DIY] How to create new WordPress Plugin Without Coding [English]
- [DIY] How to create new WordPress Plugin Without Coding [Bahasa Indonesia]
- [DIY] How to create a Custom Image Sizes [English]
- [DIY] How to create a Custom Image Sizes [Bahasa Indonesia]
- [DIY] How to create a form using Ajax Request and Short-code Without Coding [English]
- [DIY] How to Customize the WooCommerce Product or Custom Post Layout? [English]
- [DIY] How to create Elementor Widget without coding? [English]
- [DIY] How to create Elementor Widget without coding? [Bahasa Indonesia]
- [DIY] How to add a Custom Settings Tab to WooCommerce Settings and Display it on the Product Page [English]
- [DIY] Create custom theme functions just by Copying and Pasting [English]
- [DIY] Create new Custom ShortCode With/Without Coding [English]
- [DIY] How to create WPBakery PageBuilder addons without coding [English]
A. [DIY] HOW TO INSTALL IWP DEV TOOLZ V2 [ENGLISH]
B. [DIY] HOW TO INSTALL IWP DEV TOOLZ V2 [BAHASA INDONESIA]
C. [DIY] HOW TO CREATE NEW WORDPRESS PLUGIN WITHOUT CODING [ENGLISH]
D. [DIY] HOW TO CREATE NEW WORDPRESS PLUGIN WITHOUT CODING [BAHASA INDONESIA]
E. [DIY] HOW TO CREATE A CUSTOM IMAGE SIZES [ENGLISH]
F. [DIY] HOW TO CREATE A CUSTOM IMAGE SIZES [BAHASA INDONESIA]
G. [DIY] HOW TO CREATE A FORM USING AJAX REQUEST AND SHORT-CODE WITHOUT CODING [ENGLISH]
H. [DIY] HOW TO CUSTOMIZE THE WOOCOMMERCE PRODUCT OR CUSTOM POST LAYOUT? [ENGLISH]
I. [DIY] HOW TO CREATE ELEMENTOR WIDGET WITHOUT CODING? [ENGLISH]
J. [DIY] HOW TO CREATE ELEMENTOR WIDGET WITHOUT CODING? [BAHASA INDONESIA]
K. [DIY] HOW TO ADD A CUSTOM SETTINGS TAB TO WOOCOMMERCE SETTINGS AND DISPLAY IT ON THE PRODUCT PAGE [ENGLISH]
L. [DIY] CREATE CUSTOM THEME FUNCTIONS JUST BY COPYING AND PASTING [ENGLISH]
M. [DIY] CREATE NEW CUSTOM SHORTCODE WITH/WITHOUT CODING [ENGLISH]
N. [DIY] HOW TO CREATE WPBAKERY PAGEBUILDER ADDONS WITHOUT CODING [ENGLISH]
Frequently Asked Questions
A. I have purchased iWP-DevToolz v1, should i buy a iWP-DevToolz v2?
B. What is the difference between v1 and v2?
| Generator/Features | v1 | v2 |
|---|---|---|
| Project | Yes | Yes |
| ReadMe | No | Yes |
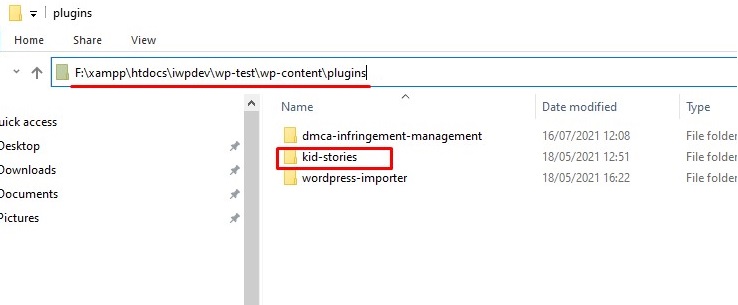
C. How to export plugin after creation?
Open an explorer or finder window, just go to the folder: your_iwpdev/wp-test/wp-content/plugins/your-plugin then you can compress your plugin with zip
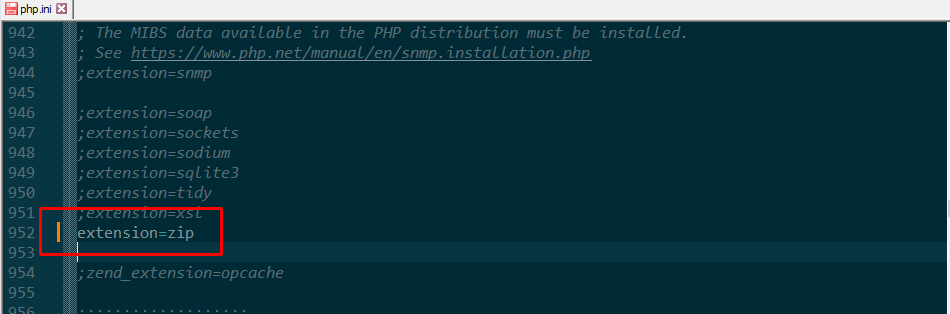
D. PHP-Zip or PHP-GD module Issue?
It seems you didn't install PHP-Zip or PHP-GD module as suggested in system requirements, please do this:
-
Edit file:
/php/php.inilook for "extension=zip" and uncomment it
;extension=zip
change to:extension=zip
-
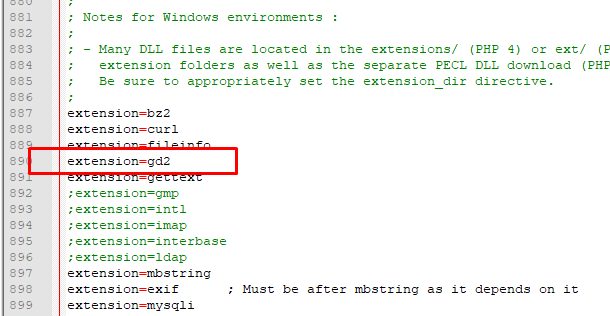
and continue still on:
/php/php.inilook for "extension=gd2" and uncomment it
;extension=gd
change to:extension=gd
Or
;extension=gd2
change to:extension=gd2

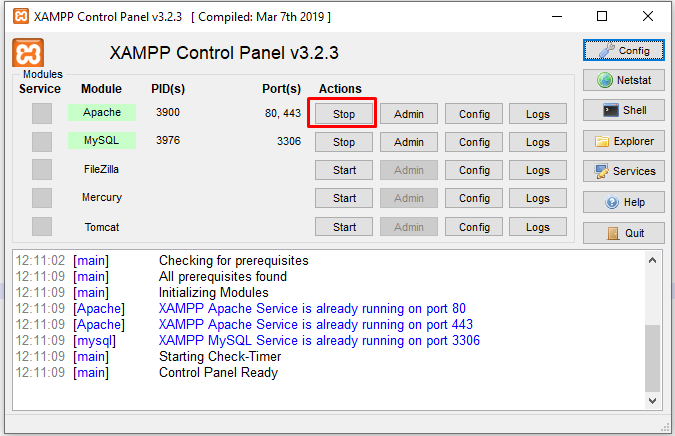
-
Stop and Then Start Apache after uncommeting an extension
E. How do I find the code I've made?
You can find the file path at the top of the form
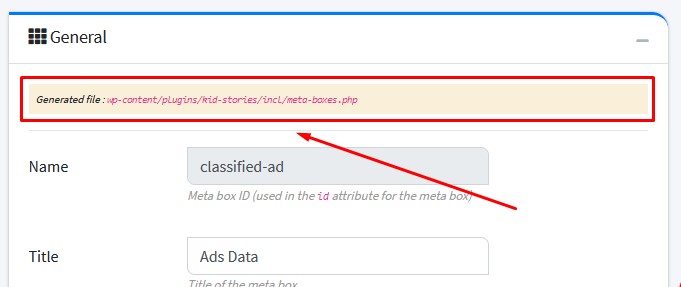
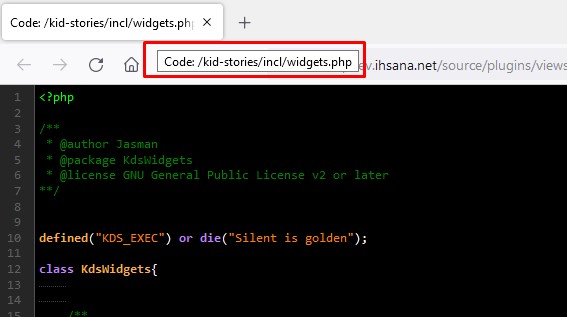
And also on See The Result button:
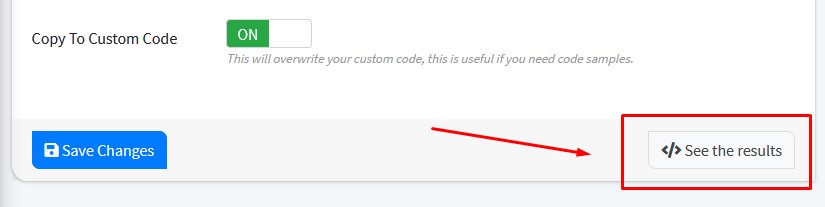
or in the Browser title
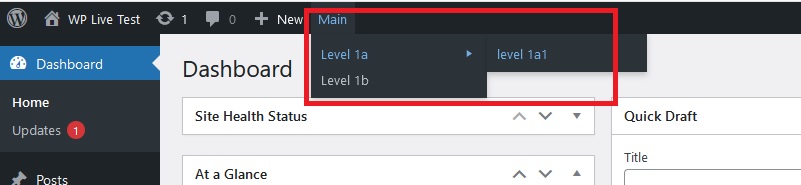
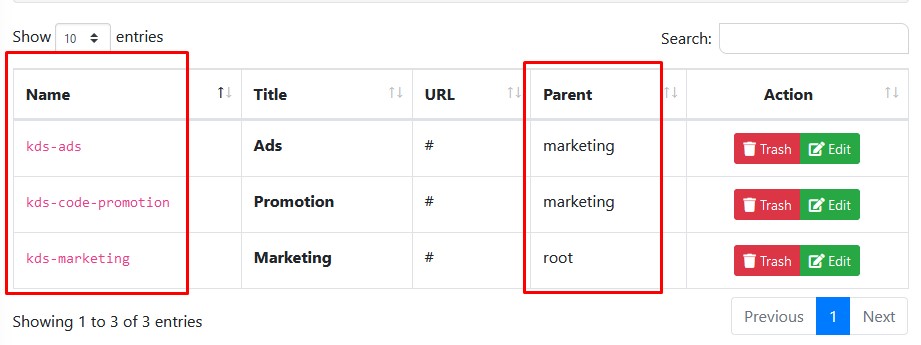
F. How to make sub-menu (2, 3 or 4 levels) in the adminbar menu?
You have to use parent node fields.
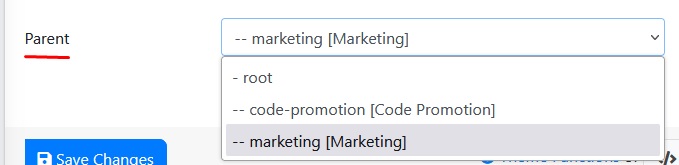
Example:
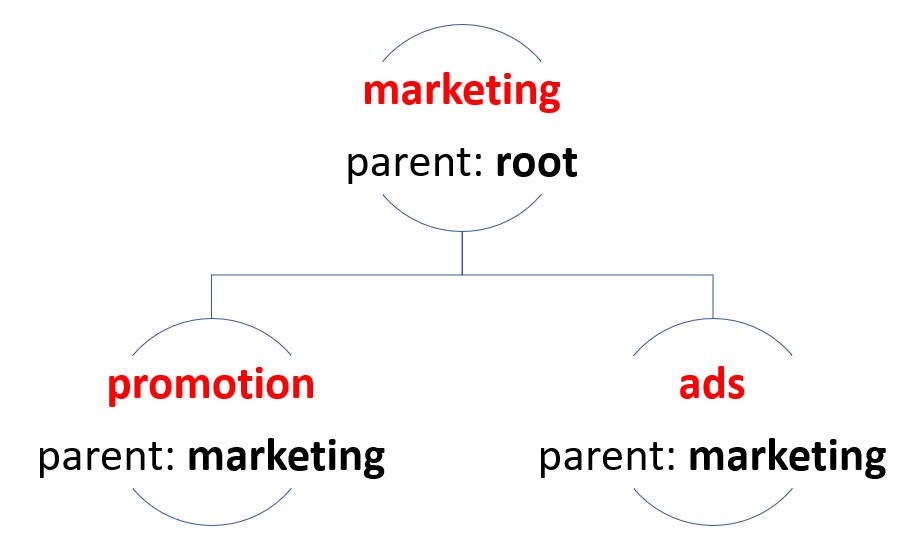
In IWPDevToolz you have to create 3 menus with parents like the following picture:
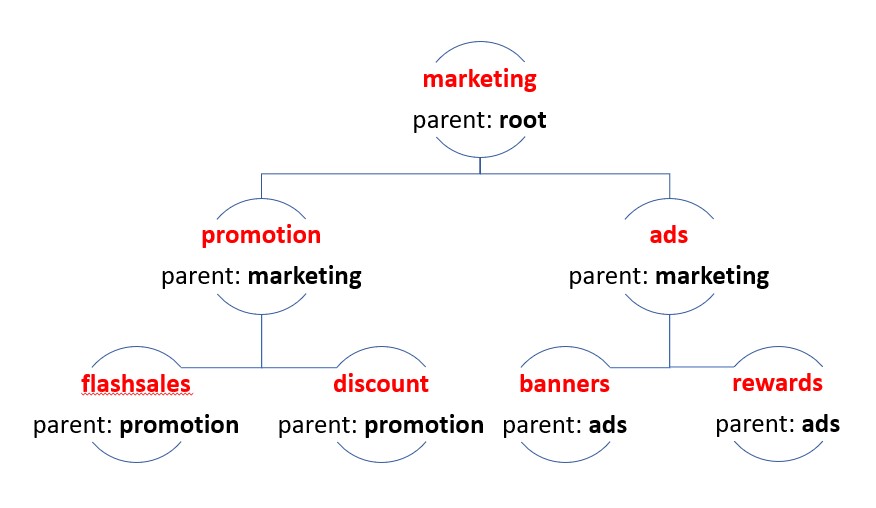
For three or more levels the same as above, look at the image below:
G. How to edit code or use custom code?
Type Generator = Custom Code and Copy To Custom Code = OFF, after the settings are changed, you can edit the code in Custom Code Box